
User Manual
Page 3
... image is attached to its base before connecting the power cord to the AC power outlet. • Make sure both the LCD monitor and the computer are normal with the LCD monitor and do not indicate a problem. • Due to the nature of the fluorescent light, the screen may flicker during initial use . • The LCD screen has 99.99% or more effective pixels. Cleaning your safety and comfort Safety instructions...
... image is attached to its base before connecting the power cord to the AC power outlet. • Make sure both the LCD monitor and the computer are normal with the LCD monitor and do not indicate a problem. • Due to the nature of the fluorescent light, the screen may flicker during initial use . • The LCD screen has 99.99% or more effective pixels. Cleaning your safety and comfort Safety instructions...
User Manual
Page 4
... • Slots and openings are not sure of the type of the product and to block out noisy surroundings. • Turn the volume down if you can hear it clearly and comfortably and without distortion. • After setting the volume level, do not place...instructions. • Gradually increase the volume until you can 't hear people speaking near water. • Do not place this product through cabinet slots as possible. iv Accessibility Be sure that the power outlet you plug the power cord into this product on an unstable cart, stand or table. When you need to rest on the power cord...
... • Slots and openings are not sure of the type of the product and to block out noisy surroundings. • Turn the volume down if you can hear it clearly and comfortably and without distortion. • After setting the volume level, do not place...instructions. • Gradually increase the volume until you can 't hear people speaking near water. • Do not place this product through cabinet slots as possible. iv Accessibility Be sure that the power outlet you plug the power cord into this product on an unstable cart, stand or table. When you need to rest on the power cord...
User Manual
Page 5
.... Using a power outlet that the new power cord meets the following the operating instructions Make sure the power outlet is a safety feature. v ampere rating of the equipment plugged into a non-grounded power outlet. Note: The grounding pin also provides good protection from the wall outlet and refer servicing to qualified service personnel when: • the power cord or plug is not properly grounded may expose you need...
.... Using a power outlet that the new power cord meets the following the operating instructions Make sure the power outlet is a safety feature. v ampere rating of the equipment plugged into a non-grounded power outlet. Note: The grounding pin also provides good protection from the wall outlet and refer servicing to qualified service personnel when: • the power cord or plug is not properly grounded may expose you need...

User Manual
Page 6
... the features and benefits of our other controls may contain small parts. Keep them out of the reach of small children. Switch off the device near gas pumps at Acer are very conscious of the environmental effects of our business and strive to identify and provide the best working procedures to turn off your vehicle engine. Potentially explosive...
... the features and benefits of our other controls may contain small parts. Keep them out of the reach of small children. Switch off the device near gas pumps at Acer are very conscious of the environmental effects of our business and strive to identify and provide the best working procedures to turn off your vehicle engine. Potentially explosive...
User Manual
Page 7
... an LCD/CRT monitor or display: lamp(s) inside this electronic device into the trash when discarding. Products that gives people the power to protect the environment in the off . ENERGY STAR qualified home electronic products in a cost effective way and without sacrificing quality or product features. For lamp-specific disposal information, check www.lamprecycle.org. Nevertheless, some pixels...
... an LCD/CRT monitor or display: lamp(s) inside this electronic device into the trash when discarding. Products that gives people the power to protect the environment in the off . ENERGY STAR qualified home electronic products in a cost effective way and without sacrificing quality or product features. For lamp-specific disposal information, check www.lamprecycle.org. Nevertheless, some pixels...
User Manual
Page 8
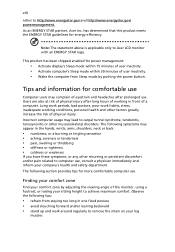
... comfortable computer use . The following tips: • refrain from Sleep mode by adjusting the viewing angle of physical injury after prolonged use . Observe the following section provides tips for power management: • Activate display's Sleep mode within 15 minutes of user inactivity. • Activate computer's Sleep mode within 30 minutes of physical injury. Long work periods, bad posture, poor work habits, stress, inadequate working in front...
... comfortable computer use . The following tips: • refrain from Sleep mode by adjusting the viewing angle of physical injury after prolonged use . Observe the following section provides tips for power management: • Activate display's Sleep mode within 15 minutes of user inactivity. • Activate computer's Sleep mode within 30 minutes of physical injury. Long work periods, bad posture, poor work habits, stress, inadequate working in front...
User Manual
Page 9
...; Avoid adjusting your display to an awkward viewing angle. • Avoid looking at bright light sources, such as possible. • Exercise regularly and maintain a healthy body. Developing good work habits to make your computer use more relaxing and productive: • Take short breaks regularly and often. • Perform some stretching exercises. • Breathe fresh air as often as open windows, for...
...; Avoid adjusting your display to an awkward viewing angle. • Avoid looking at bright light sources, such as possible. • Exercise regularly and maintain a healthy body. Developing good work habits to make your computer use more relaxing and productive: • Take short breaks regularly and often. • Perform some stretching exercises. • Breathe fresh air as often as open windows, for...
User Manual
Page 13
... Accessibility Safe listening Warnings Using electrical power Product servicing Additional safety information IT equipment recycling information Disposal instructions LCD pixel statement Tips and information for comfortable use Federal Communications Commission Declaration of Conformity Unpacking Attaching/removing the base Screen position adjustment Connecting the power cord Power saving Display Data Channel (DDC) Connector pin assignment Standard timing table Installation User controls How to adjust a setting Acer eColor Management User Troubleshooting VGA mode DVI mode 1 iii iii iii iii...
... Accessibility Safe listening Warnings Using electrical power Product servicing Additional safety information IT equipment recycling information Disposal instructions LCD pixel statement Tips and information for comfortable use Federal Communications Commission Declaration of Conformity Unpacking Attaching/removing the base Screen position adjustment Connecting the power cord Power saving Display Data Channel (DDC) Connector pin assignment Standard timing table Installation User controls How to adjust a setting Acer eColor Management User Troubleshooting VGA mode DVI mode 1 iii iii iii iii...
User Manual
Page 17
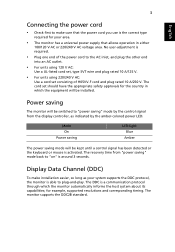
... into an AC outlet. • For units using 120 V AC: Use a UL-listed cord set, type SVT wire and plug rated 10 A/125 V. • For units using 220/240 V AC: Use a cord set should have the appropriate safety approvals for example, supported resolutions and corresponding timing. Mode On Power saving LED light Blue Amber The power saving mode will be switched to "power saving" mode by the amber-colored power LED. The DDC is activated. for the country...
... into an AC outlet. • For units using 120 V AC: Use a UL-listed cord set, type SVT wire and plug rated 10 A/125 V. • For units using 220/240 V AC: Use a cord set should have the appropriate safety approvals for example, supported resolutions and corresponding timing. Mode On Power saving LED light Blue Amber The power saving mode will be switched to "power saving" mode by the amber-colored power LED. The DDC is activated. for the country...
User Manual
Page 20
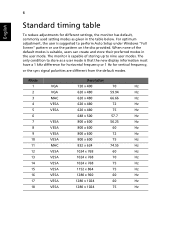
... table To reduce adjustments for vertical frequency, or the sync signal polarities are different from the default modes. The only condition to perform Auto Setup under Windows "Full Screen" pattern or use the pattern on the disc provided. When none of storing up to nine user modes. Mode 1 2 3 4 5 6 7 8 9 10 11 12 13 14 15 16 17 18 VGA VGA MAC VESA VESA VESA VESA VESA VESA MAC VESA VESA VESA VESA VESA VESA VESA Resolution 720 x 400 70 Hz 620 x 480 59.94...
... table To reduce adjustments for vertical frequency, or the sync signal polarities are different from the default modes. The only condition to perform Auto Setup under Windows "Full Screen" pattern or use the pattern on the disc provided. When none of storing up to nine user modes. Mode 1 2 3 4 5 6 7 8 9 10 11 12 13 14 15 16 17 18 VGA VGA MAC VESA VESA VESA VESA VESA VESA MAC VESA VESA VESA VESA VESA VESA VESA Resolution 720 x 400 70 Hz 620 x 480 59.94...
User Manual
Page 21
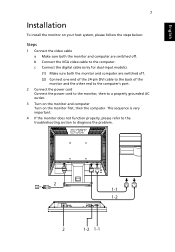
... computer's port. 2 Connect the power cord Connect the power cord to the monitor, then to a properly grounded AC outlet. 3 Turn on the monitor and computer Turn on your host system, please follow the steps below: Steps 1 Connect the video cable a Make sure both the monitor and computer are switched off. DVI D-Sub 2 1-1 1-2 2 1-2 1-1 This sequence is very important. 4 If the monitor does not function properly, please refer to the troubleshooting section...
... computer's port. 2 Connect the power cord Connect the power cord to the monitor, then to a properly grounded AC outlet. 3 Turn on the monitor and computer Turn on your host system, please follow the steps below: Steps 1 Connect the video cable a Make sure both the monitor and computer are switched off. DVI D-Sub 2 1-1 1-2 2 1-2 1-1 This sequence is very important. 4 If the monitor does not function properly, please refer to the troubleshooting section...

User Manual
Page 22
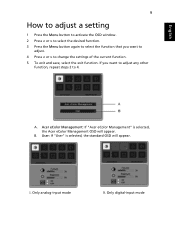
... OSD menu). b. Press < or > to change the settings of the current function. 5 Menu/Enter: Activate the OSD menu when the OSD is off or activate / deactivate the adjustment function when the OSD is on or off. 3.4 < / > : Press < or > to navigate to the desired function, press Enter to select the function. b. English 8 User controls Front panel controls 1 Power LED: Lights up to indicate the power is turned on. 2 Power Switch: Turn the power on . 6 Auto adjust button/Exit...
... OSD menu). b. Press < or > to change the settings of the current function. 5 Menu/Enter: Activate the OSD menu when the OSD is off or activate / deactivate the adjustment function when the OSD is on or off. 3.4 < / > : Press < or > to navigate to the desired function, press Enter to select the function. b. English 8 User controls Front panel controls 1 Power LED: Lights up to indicate the power is turned on. 2 Power Switch: Turn the power on . 6 Auto adjust button/Exit...
User Manual
Page 23
.... English 9 How to adjust a setting 1 Press the Menu button to activate the OSD window. 2 Press < or > to select the desired function. 3 Press the Menu button again to select the function that you want to adjust. 4 Press < or > to 4. Acer eColor Management: If "Acer eColor Management" is selected, the standard OSD will appear. B. User: If "User" is selected, the Acer eColor Management OSD will appear. I. Only analog-input mode II. A. Only digital-input mode
.... English 9 How to adjust a setting 1 Press the Menu button to activate the OSD window. 2 Press < or > to select the desired function. 3 Press the Menu button again to select the function that you want to adjust. 4 Press < or > to 4. Acer eColor Management: If "Acer eColor Management" is selected, the standard OSD will appear. B. User: If "User" is selected, the Acer eColor Management OSD will appear. I. Only analog-input mode II. A. Only digital-input mode

User Manual
Page 24
.... Optimal balance of brightness and contrast to read onscreen text. Settings can be fine-tuned to confirm the mode and run Auto Adjust. • Features and benefits Main menu icon Sub menu item User mode Text mode Standard mode Graphic mode Movie mode Description User-defined. Reflects native display capability. Enhances colors and emphasizes fine detail. English 10 Acer eColor Management • Operation instructions 1 Press the Empowering Key to open the Acer eColor Management OSD...
.... Optimal balance of brightness and contrast to read onscreen text. Settings can be fine-tuned to confirm the mode and run Auto Adjust. • Features and benefits Main menu icon Sub menu item User mode Text mode Standard mode Graphic mode Movie mode Description User-defined. Reflects native display capability. Enhances colors and emphasizes fine detail. English 10 Acer eColor Management • Operation instructions 1 Press the Empowering Key to open the Acer eColor Management OSD...

User Manual
Page 25
... brightness of the screen image. H. Adjusts red intensity. User/blue Adjusts blue intensity. V. ACM ACM (Adaptive Contrast Management) ACM On/Off switch, default Off. Focus Adjusts picture focus (available in analog mode only). N/A Warm N/A Cool User/red Sets the color temperature to cool white. Position Adjusts the vertical position (available in analog mode only). User/green Adjusts green intensity. Sets the color temperature to warm white. Clock Adjusts the picture clock (available in analog mode only). Position Adjusts the horizontal position...
... brightness of the screen image. H. Adjusts red intensity. User/blue Adjusts blue intensity. V. ACM ACM (Adaptive Contrast Management) ACM On/Off switch, default Off. Focus Adjusts picture focus (available in analog mode only). N/A Warm N/A Cool User/red Sets the color temperature to cool white. Position Adjusts the vertical position (available in analog mode only). User/green Adjusts green intensity. Sets the color temperature to warm white. Clock Adjusts the picture clock (available in analog mode only). Position Adjusts the horizontal position...
User Manual
Page 26
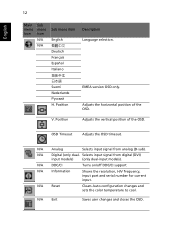
... Saves user changes and closes the OSD. English 12 Main menu icon Sub menu icon N/A N/A Sub menu item English Deutsch Français Español Italiano Suomi Nederlands H. N/A Reset Clears Auto-configuration changes and sets the color temperature to cool. V. N/A Analog Selects input signal from digital (DVI) input models) (only dual-input models). EMEA version OSD only. Adjusts the horizontal position of the OSD. N/A Digital (only dual- N/A DDC/CI Turns on/off DDC/CI support N/A Information Shows the resolution, H/V frequency, input port and serial number for...
... Saves user changes and closes the OSD. English 12 Main menu icon Sub menu icon N/A N/A Sub menu item English Deutsch Français Español Italiano Suomi Nederlands H. N/A Reset Clears Auto-configuration changes and sets the color temperature to cool. V. N/A Analog Selects input signal from digital (DVI) input models) (only dual-input models). EMEA version OSD only. Adjusts the horizontal position of the OSD. N/A Digital (only dual- N/A DDC/CI Turns on/off DDC/CI support N/A Information Shows the resolution, H/V frequency, input port and serial number for...
User Manual
Page 27
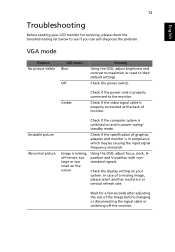
Check if the specification of a missing image, please select another resolution or vertical refresh rate. In case of graphics adapter and monitor is in power saving/ standby mode. Wait for servicing, please check the troubleshooting list below to the monitor. Check if the video signal cable is properly connected to see if you can self-diagnose the problem. Check the power switch. Check the display setting on and in compliance which may be causing the input signal frequency mismatch. Using the OSD, adjust focus, clock...
Check if the specification of a missing image, please select another resolution or vertical refresh rate. In case of graphics adapter and monitor is in power saving/ standby mode. Wait for servicing, please check the troubleshooting list below to the monitor. Check if the video signal cable is properly connected to see if you can self-diagnose the problem. Check the power switch. Check the display setting on and in compliance which may be causing the input signal frequency mismatch. Using the OSD, adjust focus, clock...

User Manual
Page 28
English 14 DVI mode Problem No picture visible LED status Blue Off Remedy Using the OSD, adjust brightness and contrast to maximum or reset to the monitor. Check that the computer system is properly connected at the back of monitor. Amber Check if the AC power cord is properly connected to their default settings. Check if the video signal cable is switched on and in power saving/ standby mode. Check the power switch.
English 14 DVI mode Problem No picture visible LED status Blue Off Remedy Using the OSD, adjust brightness and contrast to maximum or reset to the monitor. Check that the computer system is properly connected at the back of monitor. Amber Check if the AC power cord is properly connected to their default settings. Check if the video signal cable is switched on and in power saving/ standby mode. Check the power switch.

Brochure
Page 4
... and materials management distinctly meant to the work mode whether data, media, cinema or images. • Acer eDisplay Management Acer eDisplay Management is a powerful display tool enabling advanced color calibration and display management for previewing and adjusting all settings enabling winning results! • High quality and long term viewing The V193 integrates only Class A panel guaranteeing a consistent image, also certified by TCO 03 and ISO...
... and materials management distinctly meant to the work mode whether data, media, cinema or images. • Acer eDisplay Management Acer eDisplay Management is a powerful display tool enabling advanced color calibration and display management for previewing and adjusting all settings enabling winning results! • High quality and long term viewing The V193 integrates only Class A panel guaranteeing a consistent image, also certified by TCO 03 and ISO...

Brochure
Page 5
Specifications Panel Specifications Model Product name Display Type Dimensions (mm) Net Weight (kg) Colour Panel Technology Size cm/Inch Display Size (mm) Pixel Pitch (mm) Resolution Frequency PPI Rsp time (ms) Contrast Brightness (cd/m2) H/V° CR 10:1 Colors (M) NTSC (%) Input Signal Speaker VESA Wall Mounting Kensington Support Tilt Swivel degrees Hgt Adj (mm) Pivot degrees Off/Standby (W) Sleep (W) EnergyStar On (W) Service & Support Certificates Pallet Qty / Size Container 20"/40" V193 V193 Flat screen / TFT 408x406.8x180.4 3.9 Darkgrey TN+Film 48 cm...
Specifications Panel Specifications Model Product name Display Type Dimensions (mm) Net Weight (kg) Colour Panel Technology Size cm/Inch Display Size (mm) Pixel Pitch (mm) Resolution Frequency PPI Rsp time (ms) Contrast Brightness (cd/m2) H/V° CR 10:1 Colors (M) NTSC (%) Input Signal Speaker VESA Wall Mounting Kensington Support Tilt Swivel degrees Hgt Adj (mm) Pivot degrees Off/Standby (W) Sleep (W) EnergyStar On (W) Service & Support Certificates Pallet Qty / Size Container 20"/40" V193 V193 Flat screen / TFT 408x406.8x180.4 3.9 Darkgrey TN+Film 48 cm...

