
User Manual
Page 2
Acer Incorporated. Record the model number, serial number, purchase date and place of this publication without obligation to your unit should include the serial number, model number and purchase information. Acer LCD Monitor User Guide Original Issue: 10/2017 Changes may be reproduced, stored in a retrieval system, or transmitted, in new editions of purchase information in this manual or supplementary documents and publications. Acer LCD Monitor User Guide Model number Serial number Date of purchase Place...
Acer Incorporated. Record the model number, serial number, purchase date and place of this publication without obligation to your unit should include the serial number, model number and purchase information. Acer LCD Monitor User Guide Original Issue: 10/2017 Changes may be reproduced, stored in a retrieval system, or transmitted, in new editions of purchase information in this manual or supplementary documents and publications. Acer LCD Monitor User Guide Model number Serial number Date of purchase Place...

User Manual
Page 3
... instructions Read these guidelines when cleaning the monitor: • Always unplug the monitor before cleaning. • Use a soft cloth to wipe the screen and cabinet front and sides. computer are turned off the power switch and then turn it on again to the nature of information obtained from the power supplies. Keep this case, the screen is displayed for video and visual display of the fluorescent light, the screen may flicker...
... instructions Read these guidelines when cleaning the monitor: • Always unplug the monitor before cleaning. • Use a soft cloth to wipe the screen and cabinet front and sides. computer are turned off the power switch and then turn it on again to the nature of information obtained from the power supplies. Keep this case, the screen is displayed for video and visual display of the fluorescent light, the screen may flicker...
User Manual
Page 4
... the power outlet you plug the power cord into is easily accessible and located as close to rest on the power cord. These openings must not be placed near or over a radiator or heat register, or in a built-in a fire or electric shock. Warnings • Do not use it clearly and comfortably and without distortion. • After setting the volume...
... the power outlet you plug the power cord into is easily accessible and located as close to rest on the power cord. These openings must not be placed near or over a radiator or heat register, or in a built-in a fire or electric shock. Warnings • Do not use it clearly and comfortably and without distortion. • After setting the volume...
User Manual
Page 5
....auCdtolesnhttoadcuotledysonnuoortteelxeccetreidcia8thn0e%fofurosfe rtdahetetianpiglos..wer strip's input rating. • DThoisnportoodvuecrtl'osapdoawpeor wcoerrdoius telqetu,ipstpriepdowr irtehceapttharcele-wbyirpeluggroguinngdeind tpoloug. mThaenpylduegvoicnelsy. The plug only fits in performance, indicating a need for service • the product does not operate normally after following the operating instructions fTithseinovaegrarollusnysdteedmploowadermouusttlento. Make sure the power outlet is equipped with a three-wire grounded plug. Do not insert the pluWg...
....auCdtolesnhttoadcuotledysonnuoortteelxeccetreidcia8thn0e%fofurosfe rtdahetetianpiglos..wer strip's input rating. • DThoisnportoodvuecrtl'osapdoawpeor wcoerrdoius telqetu,ipstpriepdowr irtehceapttharcele-wbyirpeluggroguinngdeind tpoloug. mThaenpylduegvoicnelsy. The plug only fits in performance, indicating a need for service • the product does not operate normally after following the operating instructions fTithseinovaegrarollusnysdteedmploowadermouusttlento. Make sure the power outlet is equipped with a three-wire grounded plug. Do not insert the pluWg...

User Manual
Page 6
... require extensive work by the operating instructions, since improper adjustment of other products. Switch off your device in minimizing the burden placed on the features and benefits of our business and strive to identify and provide the best working procedures to this website: http://www.acer-group.com/public/Sustainability/ Visit www. We at service stations. acer-group .com...
... require extensive work by the operating instructions, since improper adjustment of other products. Switch off your device in minimizing the burden placed on the features and benefits of our business and strive to identify and provide the best working procedures to this website: http://www.acer-group.com/public/Sustainability/ Visit www. We at service stations. acer-group .com...
User Manual
Page 8
...aofbusleer use . Comp•uterWuasekres tmheaycocommppultaeirnforof meySelseterapinmaondde hbeyapduaschhiensgatfhteerpporwoleornbguetdtounse. . This product has been shipped enabled for power management: • Activate display's Sleep mode within 15 minutes of working in one fixed posture leaning backward Ff•tohinoedtfrosmyetolsalutuon,srwcdolcieruonsrpmgaiaftsoinipnrdstg:wzyooanlukerabsriytotauindngjduhsrteeiniggguhlttahrtleoyvatiocehwrieeimnvgeomvaenagtxhliemeousftmrtahcineommonfoonyroitt.uoOrr,bleusgesirnvge a • refrain from Sleep mode by pushing the power button...
...aofbusleer use . Comp•uterWuasekres tmheaycocommppultaeirnforof meySelseterapinmaondde hbeyapduaschhiensgatfhteerpporwoleornbguetdtounse. . This product has been shipped enabled for power management: • Activate display's Sleep mode within 15 minutes of working in one fixed posture leaning backward Ff•tohinoedtfrosmyetolsalutuon,srwcdolcieruonsrpmgaiaftsoinipnrdstg:wzyooanlukerabsriytotauindngjduhsrteeiniggguhlttahrtleoyvatiocehwrieeimnvgeomvaenagtxhliemeousftmrtahcineommonfoonyroitt.uoOrr,bleusgesirnvge a • refrain from Sleep mode by pushing the power button...
User Manual
Page 9
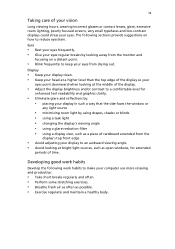
... care of your vision Long viewing hours, wearing incorrect glasses or contact lenses, glare, excessive room lighting, poorly focused screens, very small typefaces and low-contrast displays could stress your eyes point downward when looking at the middle of the display. • Adjust the display brightness and/or contrast to reduce eyestrain. Display • Keep your display clean. • Keep your head at a higher level...
... care of your vision Long viewing hours, wearing incorrect glasses or contact lenses, glare, excessive room lighting, poorly focused screens, very small typefaces and low-contrast displays could stress your eyes point downward when looking at the middle of the display. • Adjust the display brightness and/or contrast to reduce eyestrain. Display • Keep your display clean. • Keep your head at a higher level...
User Manual
Page 10
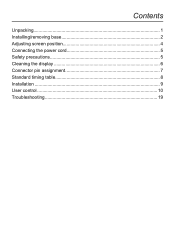
Contents Unpacking 1 Installing/removing base 2 Adjusting screen position 4 Connecting the power cord 5 Safety precautions 5 Cleaning the display 6 Connector pin assignment 7 Standard timing table 8 Installation 9 User control 10 Troubleshooting 19
Contents Unpacking 1 Installing/removing base 2 Adjusting screen position 4 Connecting the power cord 5 Safety precautions 5 Cleaning the display 6 Connector pin assignment 7 Standard timing table 8 Installation 9 User control 10 Troubleshooting 19
User Manual
Page 12
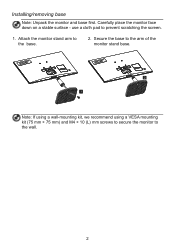
use a cloth pad to the base. 2. Carefully place the monitor face down on a stable surface - Attach the monitor stand arm to prevent scratching the screen. 1. Secure the base to the wall. 2 Note: If using a wall-mounting kit, we recommend using a VESA mounting kit (75 mm × 75 mm) and M4 × 10 (L) mm screws to secure the monitor to the arm of the monitor stand base. Installing/removing base Note: Unpack the monitor and base first.
use a cloth pad to the base. 2. Carefully place the monitor face down on a stable surface - Attach the monitor stand arm to prevent scratching the screen. 1. Secure the base to the wall. 2 Note: If using a wall-mounting kit, we recommend using a VESA mounting kit (75 mm × 75 mm) and M4 × 10 (L) mm screws to secure the monitor to the arm of the monitor stand base. Installing/removing base Note: Unpack the monitor and base first.

User Manual
Page 15
... power input, and plug the other light sources may cause fire or electric shock. • Do not cover slots or openings on the display surface. Cleaning the display When you are using is fragile. • To prevent damage to the monitor, do not scratch the screen surface. Connecting the power cord (I) AC power • Please first ensure the power cord you clean the monitor, follow the instructions carefully. • Before cleaning, unplug the monitor's power adapter...
... power input, and plug the other light sources may cause fire or electric shock. • Do not cover slots or openings on the display surface. Cleaning the display When you are using is fragile. • To prevent damage to the monitor, do not scratch the screen surface. Connecting the power cord (I) AC power • Please first ensure the power cord you clean the monitor, follow the instructions carefully. • Before cleaning, unplug the monitor's power adapter...
User Manual
Page 17
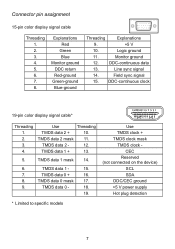
... +5 V power supply Hot plug detection * Limited to specific models 7 Monitor ground 12. TMDS data 2 - 12. Field sync signal 15. Connector pin assignment 15-pin color display signal cable Threading 1. 2. 3. 4. 5. 6. 7. 8. Use TMDS clock + TMDS clock mask TMDS clock - DDC-continuous data 13. Line sync signal 14. Use Threading TMDS data 2 + 10. TMDS data 2 mask 11. TMDS data 0 mask 17. 9. TMDS data 0 - 18. 19. TMDS data 1 - 15. 7. Explanations Red Green Blue Monitor ground...
... +5 V power supply Hot plug detection * Limited to specific models 7 Monitor ground 12. TMDS data 2 - 12. Field sync signal 15. Connector pin assignment 15-pin color display signal cable Threading 1. 2. 3. 4. 5. 6. 7. 8. Use TMDS clock + TMDS clock mask TMDS clock - DDC-continuous data 13. Line sync signal 14. Use Threading TMDS data 2 + 10. TMDS data 2 mask 11. TMDS data 0 mask 17. 9. TMDS data 0 - 18. 19. TMDS data 1 - 15. 7. Explanations Red Green Blue Monitor ground...
User Manual
Page 19
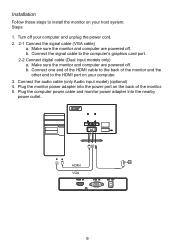
... signal cable to the HDMI port on your computer and unplug the power cord. 2. 2-1 Connect the signal cable (VGA cable) a. Connect one end of the HDMI cable to the back of the monitor. 5. HHDDMMII VVGGAA 9 Turn off . Make sure the monitor and computer are powered off your host system: Steps 1. b. Plug the computer power cable and monitor power adapter into the power port on the back of the monitor and the other end to the computer's graphics card port. 2-2 Connect digital cable (Dual input models...
... signal cable to the HDMI port on your computer and unplug the power cord. 2. 2-1 Connect the signal cable (VGA cable) a. Connect one end of the HDMI cable to the back of the monitor. 5. HHDDMMII VVGGAA 9 Turn off . Make sure the monitor and computer are powered off your host system: Steps 1. b. Plug the computer power cable and monitor power adapter into the power port on the back of the monitor and the other end to the computer's graphics card port. 2-2 Connect digital cable (Dual input models...
User Manual
Page 20
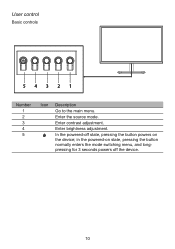
Enter the source mode. Enter brightness adjustment. in the powered-on state, pressing the button normally enters the mode switching menu, and longpressing for 3 seconds powers off state, pressing the button powers on the device; In the powered-off the device. 10 User control Basic controls 54321 Number 1 2 3 4 5 Icon Description Go to the main menu. Enter contrast adjustment.
Enter the source mode. Enter brightness adjustment. in the powered-on state, pressing the button normally enters the mode switching menu, and longpressing for 3 seconds powers off state, pressing the button powers on the device; In the powered-off the device. 10 User control Basic controls 54321 Number 1 2 3 4 5 Icon Description Go to the main menu. Enter contrast adjustment.
User Manual
Page 21
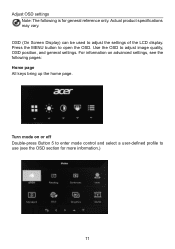
Actual product specifications may vary. OSD (On Screen Display) can be used to adjust image quality, OSD position, and general settings. For information on or off Double-press Button 5 to enter mode control and select a user-defined profile to open the OSD. Use the OSD to adjust the settings of the LCD display. Press the MENU button to use (see the following is for more information.) 11 Adjust OSD settings Note: The following pages: Home page All keys bring up the home page. Turn mode on advanced settings, see the OSD section for general reference only.
Actual product specifications may vary. OSD (On Screen Display) can be used to adjust image quality, OSD position, and general settings. For information on or off Double-press Button 5 to enter mode control and select a user-defined profile to open the OSD. Use the OSD to adjust the settings of the LCD display. Press the MENU button to use (see the following is for more information.) 11 Adjust OSD settings Note: The following pages: Home page All keys bring up the home page. Turn mode on advanced settings, see the OSD section for general reference only.

User Manual
Page 22
... OSD. Use Buttons 1/2 to select the Picture from 0 to 100. Use Buttons 1/2 to bring up the OSD. 2. Note: Adjusts the balance between light and dark areas. 12 Picture adjustment 1. Then double-press Button 3 to navigate to the setting you need. Feature page Double-press Button 1 to select the menu function, and then use Button 4 to return to the previous level or exit the menu. Double-press Button 1 to adjust the slider. 4. Brightness: Brightness...
... OSD. Use Buttons 1/2 to select the Picture from 0 to 100. Use Buttons 1/2 to bring up the OSD. 2. Note: Adjusts the balance between light and dark areas. 12 Picture adjustment 1. Then double-press Button 3 to navigate to the setting you need. Feature page Double-press Button 1 to select the menu function, and then use Button 4 to return to the previous level or exit the menu. Double-press Button 1 to adjust the slider. 4. Brightness: Brightness...
User Manual
Page 23
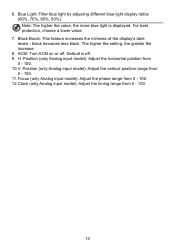
.... 8. Position (only Analog input model): Adjust the horizontal position from 0 - 100. 11. Position (only Analog input model): Adjust the vertical position range from 0 - 100. 10.V. Focus (only Analog input model): Adjust the phase range from 0 - 100. 12.Clock (only Analog input model): Adjust the timing range from 0 - 100. 13 For best protection, choose a lower value. 7. Black Boost: This feature increases the richness of the display's dark levels - H. Note: The higher the value, the more blue light is off . black becomes less black. Default...
.... 8. Position (only Analog input model): Adjust the horizontal position from 0 - 100. 11. Position (only Analog input model): Adjust the vertical position range from 0 - 100. 10.V. Focus (only Analog input model): Adjust the phase range from 0 - 100. 12.Clock (only Analog input model): Adjust the timing range from 0 - 100. 13 For best protection, choose a lower value. 7. Black Boost: This feature increases the richness of the display's dark levels - H. Note: The higher the value, the more blue light is off . black becomes less black. Default...

User Manual
Page 24
... the color matching display with peripherals such as DSC or printers. 8. Use Buttons 1/2 to open the OSD. 2. You can choose Cool, Warm, Normal, Blue Light or custom User Settings. 6. Color adjustment 1. Then double-press Button 3 to navigate to the setting you to adjust. 3. Gamma Mode allows you want to adjust the brightness and hue. Double-click Button 1 to select Color from the OSD. Grayscale Mode: Turn gray mode on or off. 9. 6-axis Hue: Adjust the red, green, blue...
... the color matching display with peripherals such as DSC or printers. 8. Use Buttons 1/2 to open the OSD. 2. You can choose Cool, Warm, Normal, Blue Light or custom User Settings. 6. Color adjustment 1. Then double-press Button 3 to navigate to the setting you to adjust. 3. Gamma Mode allows you want to adjust the brightness and hue. Double-click Button 1 to select Color from the OSD. Grayscale Mode: Turn gray mode on or off. 9. 6-axis Hue: Adjust the red, green, blue...
User Manual
Page 27
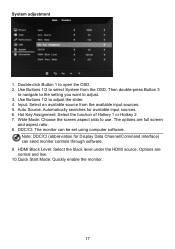
... low. 10.Quick Start Mode: Quickly enable the monitor. 17 Auto Source: Automatically searches for Display Data Channel/Command Interface) can be set using computer software. Note: DDC/CI (abbreviation for available input sources. 6. HDMI Black Level: Select the black level under the HDMI source. Input: Select an available source from the OSD. Use Buttons 1/2 to select System from the available input sources. 5. Use Buttons 1/2 to use. Double-click Button 1 to adjust. 3. DDC/CI: The monitor can send monitor controls through software. 9. Options are...
... low. 10.Quick Start Mode: Quickly enable the monitor. 17 Auto Source: Automatically searches for Display Data Channel/Command Interface) can be set using computer software. Note: DDC/CI (abbreviation for available input sources. 6. HDMI Black Level: Select the black level under the HDMI source. Input: Select an available source from the OSD. Use Buttons 1/2 to select System from the available input sources. 5. Use Buttons 1/2 to use. Double-click Button 1 to adjust. 3. DDC/CI: The monitor can send monitor controls through software. 9. Options are...
User Manual
Page 29
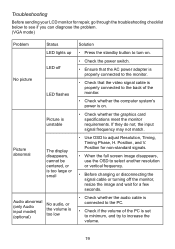
... problem. (VGA mode) Problem No picture Status LED lights up LED off LED flashes Picture is unstable Picture abnormal The display disappears, cannot be centered, or is too large or small Audio abnormal (only Audio input model) (optional) No audio, or the volume is too low Solution • Press the standby button to turn on. • Check the power switch. • Ensure that the AC power adapter is properly connected to the monitor. • Check that the video signal cable is properly connected...
... problem. (VGA mode) Problem No picture Status LED lights up LED off LED flashes Picture is unstable Picture abnormal The display disappears, cannot be centered, or is too large or small Audio abnormal (only Audio input model) (optional) No audio, or the volume is too low Solution • Press the standby button to turn on. • Check the power switch. • Ensure that the AC power adapter is properly connected to the monitor. • Check that the video signal cable is properly connected...
User Manual
Page 30
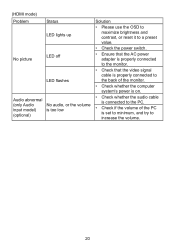
(HDMI mode) Problem Status LED lights up No picture LED off LED flashes Audio abnormal (only Audio input model) (optional) No audio, or the volume is too low Solution • Please use the OSD to maximize brightness and contrast, or reset it to a preset value. • Check the power switch. • Ensure that the AC power adapter is properly connected to the monitor. • Check that the video signal cable is properly connected to the back of the monitor. • Check whether the computer system...
(HDMI mode) Problem Status LED lights up No picture LED off LED flashes Audio abnormal (only Audio input model) (optional) No audio, or the volume is too low Solution • Please use the OSD to maximize brightness and contrast, or reset it to a preset value. • Check the power switch. • Ensure that the AC power adapter is properly connected to the monitor. • Check that the video signal cable is properly connected to the back of the monitor. • Check whether the computer system...


