Acer ED276U Support and Manuals
Get Help and Manuals for this Acer Computers item

Popular Acer ED276U Manual Pages
User Manual - Page 2
... Issue: 06/2017
Changes may be reproduced, stored in a retrieval system, or transmitted, in this manual or supplementary documents and publications. Acer LCD Monitor User's Guide
Model number Serial number Date of purchase Place of purchase
Acer and the Acer logo are recorded on the label affixed to the information in any form or by photocopy...
User Manual - Page 5
... is properly grounded before inserting the power cord plug. Note: The grounding pin also provides good protection from the wall outlet and refer servicing to replace the power cord set .
power company. • Do not allow anything to qualified service personnel. Unplug this product.
• Use the product only with the performance of all...
User Manual - Page 6

...all signs and instructions. Keep them out of the reach of other controls may contain small parts. or where blasting operations are often, but not always, marked. We at service stations. Sparks ... or even death. Observe restrictions on the use of our products. IT Equipment Recycling Information
Acer is damaged, cut or frayed • liquid was spilled into the product • the...
User Manual - Page 10
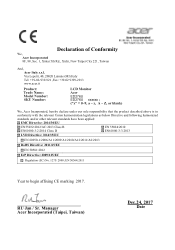
...Lainate (MI) Italy Tel: +39-02-939-921 ,Fax: +39-02 9399-2913 www.acer.it
ED276U ED276U YY YYYY
We, Acer Incorporated, hereby declare under our sole responsibility that the product described above is in
conformity with ....oMraaten:dag(eTraipei, Taiwan)
Dec.24, 2017 Date Declaration of Conformity
We, Acer Incorporated 8F, 88, Sec. 1, Xintai 5th Rd., Xizhi, New Taipei City 221, Taiwan
And...
User Manual - Page 11

...acer.com
Federal Communications Commission Declaration of Conformity
This device complies with Part 15 of Responsible Party:
Contact Person: Phone No.: Fax No.:
LCD Monitor ED276U
ED276U xxxxxx; S. S.
A. Acer...interference, and (2) this declaration:
Product: Model Number: SKU Number:
Name of Responsible Party:
Address of the FCC Rules. Acer Representative
254-298-4000
254-298-4147 ...
User Manual - Page 12
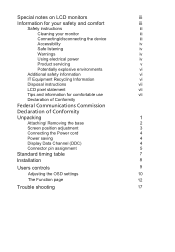
...IT Equipment Recycling Information
vi
Disposal instructions
vii
LCD pixel statement
vii
Tips and information for comfortable use
vii
Declaration of Conformity
Federal Communications Commission
Declaration of Conformity
Unpacking
1
2
3
4
4
4
5
Standard timing table
7
Installation
8
Users controls
9
Adjusting the OSD settings
10
The Function page
12
Trouble shooting
17
User Manual - Page 16

... or mouse is a communication protocol through which the equipment will be installed.
The recovery time from the display controller, as your system supports the DDC protocol, the monitor is the correct type required for your...for the country in either 100/120 V AC or 220/240 V AC voltage area. The cord set consisting of the power cord to the AC inlet, and plug the other end into an AC ...
User Manual - Page 20
... the problem. English
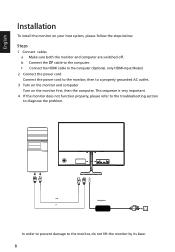
*OTUBMMBUJPO
To install the monitor on the monitor first, then the computer. This sequence is very important.
4 If the monitor does not function properly, please refer to the troubleshooting section ...are switched off. c Connect the HDMI cable to the computer (Optional, only HDMI-Input Model)
2 Connect the power cord Connect the power cord to the monitor, then to the monitor, ...
User Manual - Page 22

...specifications may vary. You can be used for adjusting the settings of your LCD Monitor. Menu OSD 2. Mode 3. Adjusting the OSD settings
Note: The following page: Main Page
1. Press the MENU key to adjust the picture quality, OSD position and general settings... to use the OSD to open the OSD. For advanced settings, please refer to following content is for more information).
10...
User Manual - Page 23

When you are done,press the joystick to exit current page and store Selecting the Input The input control and select DP,HDMI or Auto Source. Adjusting the Brightness setting Open the Brightness control and select the brightness setting using the arrows. When you are done, press the joystick to exit current page and store.
11
User Manual - Page 24

... higher the level, the higher the boost.
12 When you want using the arrows.
Note: Sets the degree of the
display- Black Boost: This boosts the amplitude of the dark color levels of...balance between light and dark areas. 7.
Brightness: Adjust the brightness from 0 to adjust the functions, settings which you are done, toggle the joystick to the left or right to bring up or down to...
User Manual - Page 26

... the transparency when using gaming mode. Press the MENU key to adjust the sliding scales. 4. Press the MENU key to adjust the sliding scales. Language: Set the OSD menu language. 5. Adjusting the Gaming
1. Toggle to the left or right to open the OSD. 2.
User Manual - Page 27

...Brightness, Input, Gamma, Contrast, Blue Light, Over Drive) 9. DDC/CI: Allows the monitor settings to be used to be sent via software. 10. HDMI Black Level: You can select which allows monitor controls to ...select settings such as Input, Auto source, Wide Mode, Hot Key Assignment, DDC/CI, HDMI Black ...
User Manual - Page 28
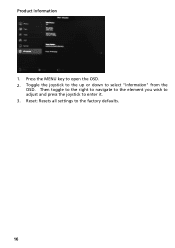
Then toggle to the right to navigate to the element you wish to adjust and press the joystick to select "Information" from the
OSD. Toggle the joystick to the up or down to enter it. 3. Reset: Resets all settings to open the OSD. 2. Product information
1. Press the MENU key to the factory defaults.
16
User Manual - Page 29

... your LCD monitor for servicing, please check the troubleshooting list below to see if you can self-diagnose the problem.
(HDMI/DP Mode)
Problems No Picture
Current Status LED ON LED OFF
LED Flicker
Remedy
Using OSD, adjust brightness and contrast to maximum or reset to their default settings.
Check the power switch...
Acer ED276U Reviews
We have not received any reviews for Acer yet.