
User Manual
Page 2
Acer LCD Monitor User's Guide Original Issue: 11/2015 Changes may be reproduced, stored in a retrieval system, or transmitted, in this publication without the prior written permission ... hereof and specifically disclaims the implied warranties of such revisions or changes. All correspondence concerning your computer. Acer Incorporated. No part of Acer Incorporated. Acer LCD Monitor User's Guide Model number Serial number Date of purchase Place of purchase Acer and the Acer logo are registered trademarks of this manual or supplementary documents and publications.
Acer LCD Monitor User's Guide Original Issue: 11/2015 Changes may be reproduced, stored in a retrieval system, or transmitted, in this publication without the prior written permission ... hereof and specifically disclaims the implied warranties of such revisions or changes. All correspondence concerning your computer. Acer Incorporated. No part of Acer Incorporated. Acer LCD Monitor User's Guide Model number Serial number Date of purchase Place of purchase Acer and the Acer logo are registered trademarks of this manual or supplementary documents and publications.
User Manual
Page 3
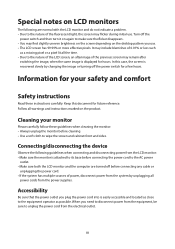
... on the product. Information for hours. Cleaning your safety and comfort Safety instructions Read these guidelines when cleaning the monitor: • Always unplug the monitor before cleaning. • Use a soft cloth to wipe the screen and cabinet front and sides. iii Special notes ...8226; The LCD screen has 99.99% or more effective pixels. When you plug the power cord into is displayed for your monitor Please carefully follow these instructions carefully. Connecting/disconnecting the device Observe the following are turned off before connecting any cable or unplugging the...
... on the product. Information for hours. Cleaning your safety and comfort Safety instructions Read these guidelines when cleaning the monitor: • Always unplug the monitor before cleaning. • Use a soft cloth to wipe the screen and cabinet front and sides. iii Special notes ...8226; The LCD screen has 99.99% or more effective pixels. When you plug the power cord into is displayed for your monitor Please carefully follow these instructions carefully. Connecting/disconnecting the device Observe the following are turned off before connecting any cable or unplugging the...
User Manual
Page 7
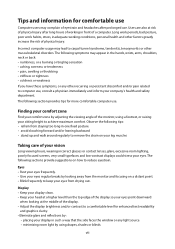
... use. The following sections provide suggestions on your leg muscles Taking care of the display so your eyes point downward when looking away from the monitor and focusing on a distant point. • Blink frequently to keep your eyes from staying too long in one fixed posture • avoid slouching forward and... tips for more comfortable computer use , consult a physician immediately and inform your company's health and safety department. Users are also at the middle of the monitor, using drapes, shades or blinds vii The following tips: • refrain from drying out.
... use. The following sections provide suggestions on your leg muscles Taking care of the display so your eyes point downward when looking away from the monitor and focusing on a distant point. • Blink frequently to keep your eyes from staying too long in one fixed posture • avoid slouching forward and... tips for more comfortable computer use , consult a physician immediately and inform your company's health and safety department. Users are also at the middle of the monitor, using drapes, shades or blinds vii The following tips: • refrain from drying out.
User Manual
Page 8
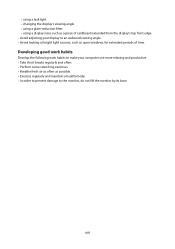
... a display visor, such as open windows, for extended periods of cardboard extended from the display's top front edge • Avoid adjusting your display to the monitor, do not lift the monitor by its base. viii
... a display visor, such as open windows, for extended periods of cardboard extended from the display's top front edge • Avoid adjusting your display to the monitor, do not lift the monitor by its base. viii

User Manual
Page 9
... Information for your safety and comfort iii Safety instructions iii Cleaning your monitor iii Connecting/disconnecting the device iii Accessibility iii Safe listening iv Warnings iv Using electrical power iv Product servicing v ...4 Power saving 4 Display Data Channel (DDC) 4 Connector pin assignment 5 Standard timing table 8 Installation 9 User controls 10 How to adjust a setting 11 Acer eColor Management 11 Adjusting the OSD settings 12 Adjusting the picture quality 12 Adjusting the OSD setting 13 Adjusting the setting 14 Product information 15...
... Information for your safety and comfort iii Safety instructions iii Cleaning your monitor iii Connecting/disconnecting the device iii Accessibility iii Safe listening iv Warnings iv Using electrical power iv Product servicing v ...4 Power saving 4 Display Data Channel (DDC) 4 Connector pin assignment 5 Standard timing table 8 Installation 9 User controls 10 How to adjust a setting 11 Acer eColor Management 11 Adjusting the OSD settings 12 Adjusting the picture quality 12 Adjusting the OSD setting 13 Adjusting the setting 14 Product information 15...
User Manual
Page 10
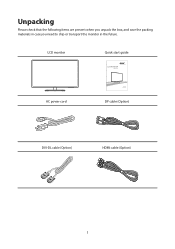
LCD monitor Quick start guide LCD MONITOR EB321HQU AC power cord DP cable (Option) DVI-DL cable (Option) HDMI cable (Option) 1 Unpacking Please check that the following items are present when you unpack the box, and save the packing materials in case you need to ship or transport the monitor in the future.
LCD monitor Quick start guide LCD MONITOR EB321HQU AC power cord DP cable (Option) DVI-DL cable (Option) HDMI cable (Option) 1 Unpacking Please check that the following items are present when you unpack the box, and save the packing materials in case you need to ship or transport the monitor in the future.

User Manual
Page 12
Screen position adjustment To optimize the viewing position, you can be adjusted to hold the edges of the monitor as shown below. The monitor can adjust the monitor tilt by using both of your hands to 10 degrees up or 5 degrees down. 5° 10° 3
Screen position adjustment To optimize the viewing position, you can be adjusted to hold the edges of the monitor as shown below. The monitor can adjust the monitor tilt by using both of your hands to 10 degrees up or 5 degrees down. 5° 10° 3
User Manual
Page 13
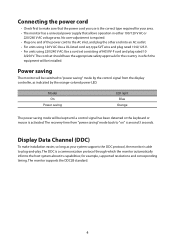
... to "power saving" mode by the orange-colored power LED. for your system supports the DDC protocol, the monitor is able to plug-and-play. Power saving The monitor will be installed. The DDC is a communication protocol through which the equipment will be kept until a control signal... one end of H05VV-F cord and plug rated 10 A/250 V. The recovery time from the display controller, as your area. • The monitor has a universal power supply that the power cord you use is the correct type required for example, supported resolutions and corresponding timing. Connecting the power...
... to "power saving" mode by the orange-colored power LED. for your system supports the DDC protocol, the monitor is able to plug-and-play. Power saving The monitor will be installed. The DDC is a communication protocol through which the equipment will be kept until a control signal... one end of H05VV-F cord and plug rated 10 A/250 V. The recovery time from the display controller, as your area. • The monitor has a universal power supply that the power cord you use is the correct type required for example, supported resolutions and corresponding timing. Connecting the power...
User Manual
Page 18
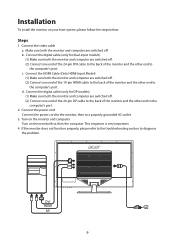
... end to the computer's port. Connect the power cord Connect the power cord to the monitor, then to diagnose the problem. Connect the digital cable (only for DP models). (1) Make sure both the monitor and computer are switched off . (2) Connect one end of the 24-pin DVI cable ...host system, please follow the steps below: Steps 1. b. c. DVI HDMI DP 9 Installation To install the monitor on the monitor first, then the computer. This sequence is very important. 4. Make sure both the monitor and computer are switched off . (2) Connect one end of the 20-pin DP cable to the back ...
... end to the computer's port. Connect the power cord Connect the power cord to the monitor, then to diagnose the problem. Connect the digital cable (only for DP models). (1) Make sure both the monitor and computer are switched off . (2) Connect one end of the 24-pin DVI cable ...host system, please follow the steps below: Steps 1. b. c. DVI HDMI DP 9 Installation To install the monitor on the monitor first, then the computer. This sequence is very important. 4. Make sure both the monitor and computer are switched off . (2) Connect one end of the 20-pin DP cable to the back ...

User Manual
Page 19
... shortcut menu. INPUT Input Key Use Input key to select from different video sources that may take 1 or 2 seconds for the image to open the Acer eColor Management OSD and accessthe scenario modes. D C B A POWER Using the Shortcut Menu Press the function button to appear. It may be connected to your... will see the following messages on right top side of screen to activate the OSD menu. USER CONTROLS Power Switch / Power LED: To turn the monitor ON or OFF. Volume Up / Down Press to indicate the power is selected ,but the HDMI and DVI-DL cables are not connected, a floating dialog...
... shortcut menu. INPUT Input Key Use Input key to select from different video sources that may take 1 or 2 seconds for the image to open the Acer eColor Management OSD and accessthe scenario modes. D C B A POWER Using the Shortcut Menu Press the function button to appear. It may be connected to your... will see the following messages on right top side of screen to activate the OSD menu. USER CONTROLS Power Switch / Power LED: To turn the monitor ON or OFF. Volume Up / Down Press to indicate the power is selected ,but the HDMI and DVI-DL cables are not connected, a floating dialog...
User Manual
Page 21
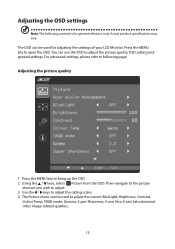
... only. You can be used to open the OSD. For advanced settings, please refer to following content is for adjusting the settings of your LCD Monitor. Press the MENU key to adjust the current BlueLight, Brightness, Contrast, Colour Temp, SRGB mode, Gamma, Super Sharpness, 6‐axis Hue, 6‐axis Saturationand other...
... only. You can be used to open the OSD. For advanced settings, please refer to following content is for adjusting the settings of your LCD Monitor. Press the MENU key to adjust the current BlueLight, Brightness, Contrast, Colour Temp, SRGB mode, Gamma, Super Sharpness, 6‐axis Hue, 6‐axis Saturationand other...
User Manual
Page 24
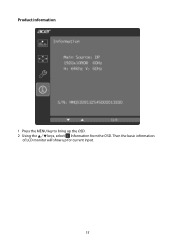
Product information 1 Press the MENU key to bring up for current input. 15 Then the basic information of LCD monitor will show up the OSD. 2 Using the / keys, select Information from the OSD.
Product information 1 Press the MENU key to bring up for current input. 15 Then the basic information of LCD monitor will show up the OSD. 2 Using the / keys, select Information from the OSD.
User Manual
Page 25
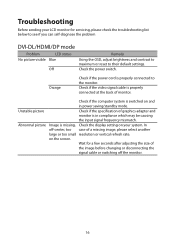
... resolution or vertical refresh rate. In off-center, too case of the image before changing or disconnecting the signal cable or switching off the monitor. 16 Abnormal picture Image is properly connected to their default settings. Check if the video signal cable is in power saving/standby mode. Orange...mode Problem LED status No picture visible Blue Off Remedy Using the OSD, adjust brightness and contrast to maximum or reset to the monitor. on the screen. Troubleshooting Before sending your system. Unstable picture Check if the specification of graphics adapter and...
... resolution or vertical refresh rate. In off-center, too case of the image before changing or disconnecting the signal cable or switching off the monitor. 16 Abnormal picture Image is properly connected to their default settings. Check if the video signal cable is in power saving/standby mode. Orange...mode Problem LED status No picture visible Blue Off Remedy Using the OSD, adjust brightness and contrast to maximum or reset to the monitor. on the screen. Troubleshooting Before sending your system. Unstable picture Check if the specification of graphics adapter and...


