User Manual
Page 2
... affixed to their respective companies. Acer LCD Monitor User's Guide Model number Serial number Date of purchase Place of purchase Acer and the Acer logo are used herein for a particular purpose. No part of this publication without the prior written permission of such revisions or changes. Acer LCD Monitor User's Guide Original Issue: 11/2015 Changes may be made periodically to the contents hereof and specifically disclaims the implied warranties of...
... affixed to their respective companies. Acer LCD Monitor User's Guide Model number Serial number Date of purchase Place of purchase Acer and the Acer logo are used herein for a particular purpose. No part of this publication without the prior written permission of such revisions or changes. Acer LCD Monitor User's Guide Original Issue: 11/2015 Changes may be made periodically to the contents hereof and specifically disclaims the implied warranties of...
User Manual
Page 3
... connecting and disconnecting power from the LCD monitor: • Make sure the monitor is attached to its base before connecting the power cord to wipe the screen and cabinet front and sides. Turn off the power switch for your monitor Please carefully follow these instructions carefully. Keep this case, the screen is displayed for future reference. It may include blemishes of the previous screen may find slightly uneven brightness on the screen...
... connecting and disconnecting power from the LCD monitor: • Make sure the monitor is attached to its base before connecting the power cord to wipe the screen and cabinet front and sides. Turn off the power switch for your monitor Please carefully follow these instructions carefully. Keep this case, the screen is displayed for future reference. It may include blemishes of the previous screen may find slightly uneven brightness on the screen...
User Manual
Page 4
... use this product near water. • Do not place this product on the marking label. These openings must not exceed 80% of the branch circuit rating. This product should not exceed 80% of the power strip's input rating. • This product's power cord is equipped with this product, make sure that the total rating of all products plugged into the wall outlet...
... use this product near water. • Do not place this product on the marking label. These openings must not exceed 80% of the branch circuit rating. This product should not exceed 80% of the power strip's input rating. • This product's power cord is equipped with this product, make sure that the total rating of all products plugged into the wall outlet...
User Manual
Page 5
... condition. Switch off your vehicle engine. chemical plants; They include below deck on the use of this product. • Use the product only with a potentially explosive atmosphere and obey all servicing to turn off your device in any area with the supplied power supply cord set , make sure that the new power cord meets the following the operating instructions Note: Adjust only those controls that may...
... condition. Switch off your vehicle engine. chemical plants; They include below deck on the use of this product. • Use the product only with a potentially explosive atmosphere and obey all servicing to turn off your device in any area with the supplied power supply cord set , make sure that the new power cord meets the following the operating instructions Note: Adjust only those controls that may...
User Manual
Page 6
... instructions Do not throw this website: http://www.acergroup.com/public/Sustainability/ Visit www.acer-group.com for power management: • Activate display's Sleep mode within 15 minutes of user inactivity. • Activate computer's Sleep mode within 30 minutes of user inactivity. • Wake the computer from Electrical and Electronics Equipment (WEEE) regulations, visit http://www.acergroup.com/public/Sustainability/ LCD pixel...
... instructions Do not throw this website: http://www.acergroup.com/public/Sustainability/ Visit www.acer-group.com for power management: • Activate display's Sleep mode within 15 minutes of user inactivity. • Activate computer's Sleep mode within 30 minutes of user inactivity. • Wake the computer from Electrical and Electronics Equipment (WEEE) regulations, visit http://www.acergroup.com/public/Sustainability/ LCD pixel...
User Manual
Page 7
... viewing hours, wearing incorrect glasses or contact lenses, glare, excessive room lighting, poorly focused screens, very small typefaces and low-contrast displays could stress your display in one fixed posture • avoid slouching forward and/or leaning backward • stand up and walk around regularly to remove the strain on your leg muscles Taking care of the display. • Adjust the display brightness...
... viewing hours, wearing incorrect glasses or contact lenses, glare, excessive room lighting, poorly focused screens, very small typefaces and low-contrast displays could stress your display in one fixed posture • avoid slouching forward and/or leaning backward • stand up and walk around regularly to remove the strain on your leg muscles Taking care of the display. • Adjust the display brightness...
User Manual
Page 8
• using a task light • changing the display's viewing angle • using a glare-reduction filter • using a display visor, such as a piece of cardboard extended from the display's top front edge • Avoid adjusting your display to an awkward viewing angle. • Avoid looking at bright light sources, such as possible. • Exercise regularly and maintain a healthy body. • In order to prevent damage to make your...
• using a task light • changing the display's viewing angle • using a glare-reduction filter • using a display visor, such as a piece of cardboard extended from the display's top front edge • Avoid adjusting your display to an awkward viewing angle. • Avoid looking at bright light sources, such as possible. • Exercise regularly and maintain a healthy body. • In order to prevent damage to make your...

User Manual
Page 9
...vi Disposal instructions vi LCD pixel statement vi Tips and information for comfortable use vii Unpacking 1 Attaching/removing the base 2 Screen position adjustment 3 Connecting the power cord 4 Power saving 4 Display Data Channel (DDC) 4 Connector pin assignment 5 Standard timing table 8 Installation 9 User controls 10 How to adjust a setting 11 Acer eColor Management 11 Adjusting the OSD settings 12 Adjusting the picture quality 12 Adjusting the OSD setting 13 Adjusting the setting 14 Product information 15 Troubleshooting 16 DVI-DL/HDMI/DP mode 16
...vi Disposal instructions vi LCD pixel statement vi Tips and information for comfortable use vii Unpacking 1 Attaching/removing the base 2 Screen position adjustment 3 Connecting the power cord 4 Power saving 4 Display Data Channel (DDC) 4 Connector pin assignment 5 Standard timing table 8 Installation 9 User controls 10 How to adjust a setting 11 Acer eColor Management 11 Adjusting the OSD settings 12 Adjusting the picture quality 12 Adjusting the OSD setting 13 Adjusting the setting 14 Product information 15 Troubleshooting 16 DVI-DL/HDMI/DP mode 16
User Manual
Page 10
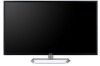
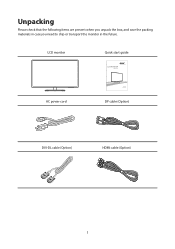
LCD monitor Quick start guide LCD MONITOR EB321HQU AC power cord DP cable (Option) DVI-DL cable (Option) HDMI cable (Option) 1 Unpacking Please check that the following items are present when you unpack the box, and save the packing materials in case you need to ship or transport the monitor in the future.
LCD monitor Quick start guide LCD MONITOR EB321HQU AC power cord DP cable (Option) DVI-DL cable (Option) HDMI cable (Option) 1 Unpacking Please check that the following items are present when you unpack the box, and save the packing materials in case you need to ship or transport the monitor in the future.
User Manual
Page 11
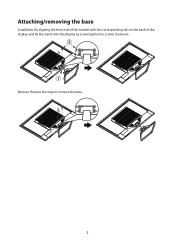
Attaching/removing the base Installation: By aligning the front-end of the bracket with the corresponding slot on the back of the display, and fix the stand onto the display by screwing the four screws clockwise. 2 1 Remove: Reverse the steps to remove the base. 2
Attaching/removing the base Installation: By aligning the front-end of the bracket with the corresponding slot on the back of the display, and fix the stand onto the display by screwing the four screws clockwise. 2 1 Remove: Reverse the steps to remove the base. 2

User Manual
Page 12
Screen position adjustment To optimize the viewing position, you can be adjusted to hold the edges of the monitor as shown below. The monitor can adjust the monitor tilt by using both of your hands to 10 degrees up or 5 degrees down. 5° 10° 3
Screen position adjustment To optimize the viewing position, you can be adjusted to hold the edges of the monitor as shown below. The monitor can adjust the monitor tilt by using both of your hands to 10 degrees up or 5 degrees down. 5° 10° 3
User Manual
Page 13
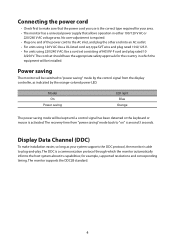
.... No user-adjustment is required. • Plug one end of H05VV-F cord and plug rated 10 A/250 V. The cord set consisting of the power cord to "on" is around 3 seconds. Model On Power saving LED light Blue Orange The power saving mode will be kept until a control signal has been detected or the keyboard or mouse is a communication protocol through which the equipment will be installed. Power saving The monitor will be switched to plug-and-play...
.... No user-adjustment is required. • Plug one end of H05VV-F cord and plug rated 10 A/250 V. The cord set consisting of the power cord to "on" is around 3 seconds. Model On Power saving LED light Blue Orange The power saving mode will be kept until a control signal has been detected or the keyboard or mouse is a communication protocol through which the equipment will be installed. Power saving The monitor will be switched to plug-and-play...
User Manual
Page 16
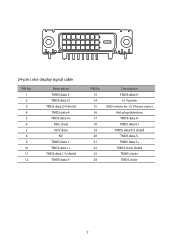
24-pin color display signal cable PIN No. 1 2 3 4 5 6 7 8 9 10 11 12 Description TMDS data 2TMDS data 2+ TMDS data 2/4 shield TMDS data 4TMDS data 4+ DDC clock DDC data NC TMDS data 1TMDS data 1+ TMDS data 1/3 shield TMDS data 3- PIN No. 13 14 15 16 17 18 19 20 21 22 23 24 Description TMDS data3+ +5 V power GND (return for +5 V hsync.vsync) Hot-plug detection TMDS data 0TMDS data 0+ TMDS data 0/5 shield TMDS data 5TMDS data 5+ TMDS clock shield TMDS clock+ TMDS clock- 7
24-pin color display signal cable PIN No. 1 2 3 4 5 6 7 8 9 10 11 12 Description TMDS data 2TMDS data 2+ TMDS data 2/4 shield TMDS data 4TMDS data 4+ DDC clock DDC data NC TMDS data 1TMDS data 1+ TMDS data 1/3 shield TMDS data 3- PIN No. 13 14 15 16 17 18 19 20 21 22 23 24 Description TMDS data3+ +5 V power GND (return for +5 V hsync.vsync) Hot-plug detection TMDS data 0TMDS data 0+ TMDS data 0/5 shield TMDS data 5TMDS data 5+ TMDS clock shield TMDS clock+ TMDS clock- 7
User Manual
Page 18
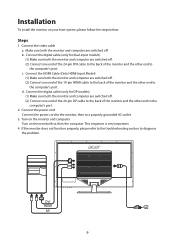
...'s port. 2. Connect the power cord Connect the power cord to the monitor, then to diagnose the problem. Installation To install the monitor on the monitor first, then the computer. d. Connect the digital cable (only for dual-input models). (1) Make sure both the monitor and computer are switched off . (2) Connect one end of the 19-pin HDMI cable to the back of the monitor and the other end to the computer's port. Turn on the monitor and computer Turn on...
...'s port. 2. Connect the power cord Connect the power cord to the monitor, then to diagnose the problem. Installation To install the monitor on the monitor first, then the computer. d. Connect the digital cable (only for dual-input models). (1) Make sure both the monitor and computer are switched off . (2) Connect one end of the 19-pin HDMI cable to the back of the monitor and the other end to the computer's port. Turn on the monitor and computer Turn on...

User Manual
Page 19
... your monitor. (a) DP input (b) HDMI input (b) DVI-DL input As you cycle through the sources you quickly select the most commonly accessed settings. USER CONTROLS Power Switch / Power LED: To turn the monitor ON or OFF. Lights up to adjust volume (Only Earphone Mode). MENU OSD functions Press this button to open the shortcut menu. The shortcut menu lets you will see the following messages on right top side of screen to open the Acer eColor Management OSD and accessthe scenario modes. D C B A POWER Using...
... your monitor. (a) DP input (b) HDMI input (b) DVI-DL input As you cycle through the sources you quickly select the most commonly accessed settings. USER CONTROLS Power Switch / Power LED: To turn the monitor ON or OFF. Lights up to adjust volume (Only Earphone Mode). MENU OSD functions Press this button to open the shortcut menu. The shortcut menu lets you will see the following messages on right top side of screen to open the Acer eColor Management OSD and accessthe scenario modes. D C B A POWER Using...
User Manual
Page 20
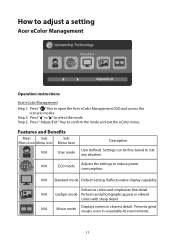
N/A Standard mode Default Setting. N/A Movie mode Displays scenes in vibrant colors with sharp detail. How to adjust a setting Acer eColor Management Operation instructions Acer eColor Management Step 1: Press " " Key to open the Acer eColor Management OSD and access the scenario modes Step 2: Press " " or " " to select the mode Step 3: Press " Adjust/Exit " Key to reduce power consumption. N/A Grahpic mode Pictures and photographs appear in clearest detail. Presents great visuals, even in...
N/A Standard mode Default Setting. N/A Movie mode Displays scenes in vibrant colors with sharp detail. How to adjust a setting Acer eColor Management Operation instructions Acer eColor Management Step 1: Press " " Key to open the Acer eColor Management OSD and access the scenario modes Step 2: Press " " or " " to select the mode Step 3: Press " Adjust/Exit " Key to reduce power consumption. N/A Grahpic mode Pictures and photographs appear in clearest detail. Presents great visuals, even in...
User Manual
Page 21
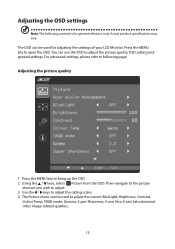
... settings of your LCD Monitor. The OSD can be used for general reference only. Then navigate to the picture element you wish to adjust. 3 Use the / keys to adjust the sliding scales. 4 The Picture menu can use the OSD to open the OSD. Press the MENU key to adjust the picture quality, OSD setting and general settings. Actual product specifications may vary. You can be used to adjust the current BlueLight, Brightness, Contrast, Colour Temp, SRGB mode...
... settings of your LCD Monitor. The OSD can be used for general reference only. Then navigate to the picture element you wish to adjust. 3 Use the / keys to adjust the sliding scales. 4 The Picture menu can use the OSD to open the OSD. Press the MENU key to adjust the picture quality, OSD setting and general settings. Actual product specifications may vary. You can be used to adjust the current BlueLight, Brightness, Contrast, Colour Temp, SRGB mode...
User Manual
Page 22
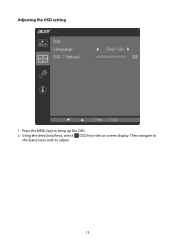
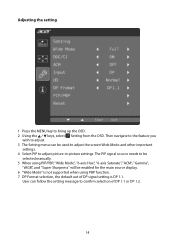
Then navigate to the feature you wish to bring up the OSD. 2 Using the directional keys, select OSD from the on screen display. Adjusting the OSD setting 1 Press the MENU key to adjust. 13
Then navigate to the feature you wish to bring up the OSD. 2 Using the directional keys, select OSD from the on screen display. Adjusting the OSD setting 1 Press the MENU key to adjust. 13
User Manual
Page 23
... be selected manually. 5 When using PIP/PBP, "Wide Mode", "6-axis Hue", "6-axis Saturate", "ACM", "Gamma", "sRGB", and "Super Sharpness" will be used to adjust the screen Wide Mode and other important settings. 4 Select PIP to bring up the OSD. 2 Using the / keys, select Setting from the OSD. User can be enabled for the main source display. 6 "Wide Mode" is not supported when using PBP function. 7 DP Format selection, the default out of...
... be selected manually. 5 When using PIP/PBP, "Wide Mode", "6-axis Hue", "6-axis Saturate", "ACM", "Gamma", "sRGB", and "Super Sharpness" will be used to adjust the screen Wide Mode and other important settings. 4 Select PIP to bring up the OSD. 2 Using the / keys, select Setting from the OSD. User can be enabled for the main source display. 6 "Wide Mode" is not supported when using PBP function. 7 DP Format selection, the default out of...
User Manual
Page 25
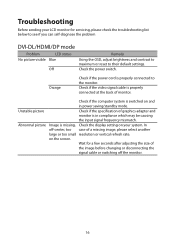
... problem DVI-DL/HDMI/DP mode Problem LED status No picture visible Blue Off Remedy Using the OSD, adjust brightness and contrast to maximum or reset to the monitor. In off the monitor. 16 Troubleshooting Before sending your system. Orange Check if the power cord is properly connected at the back of graphics adapter and monitor is missing, Check the display setting on the screen. Check if the video signal cable is properly connected to their default settings. Abnormal picture Image is in power saving/standby mode. on your LCD monitor...
... problem DVI-DL/HDMI/DP mode Problem LED status No picture visible Blue Off Remedy Using the OSD, adjust brightness and contrast to maximum or reset to the monitor. In off the monitor. 16 Troubleshooting Before sending your system. Orange Check if the power cord is properly connected at the back of graphics adapter and monitor is missing, Check the display setting on the screen. Check if the video signal cable is properly connected to their default settings. Abnormal picture Image is in power saving/standby mode. on your LCD monitor...


