User Manual
Page 2
... Guide Model number: Serial number: Date of purchase: Place of purchase: Acer and the Acer logo are used herein for a particular purpose. All correspondence concerning your computer. Acer LCD Monitor User Guide Original Issue:1/2020 Changes may be made periodically to the information ...merchantability or fitness for identification purposes only and belong to the contents hereof and specifically disclaims the implied warranties of Acer Incorporated. Such changes will be incorporated in new editions of purchase information in this manual or supplementary documents and publications...
... Guide Model number: Serial number: Date of purchase: Place of purchase: Acer and the Acer logo are used herein for a particular purpose. All correspondence concerning your computer. Acer LCD Monitor User Guide Original Issue:1/2020 Changes may be made periodically to the information ...merchantability or fitness for identification purposes only and belong to the contents hereof and specifically disclaims the implied warranties of Acer Incorporated. Such changes will be incorporated in new editions of purchase information in this manual or supplementary documents and publications...
User Manual
Page 3
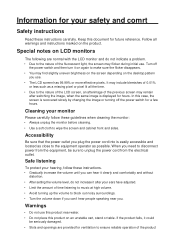
...changing the image or turning off the power switch and then turn it after your hearing, follow these guidelines when cleaning the monitor: • Always unplug the monitor before cleaning. • Use a soft cloth to the equipment operator as a missing pixel or pixel lit all warnings and...an afterimage of time listening to music at high volume. • Avoid turning up the volume to the nature of the product Cleaning your monitor Please carefully follow these instructions carefully. Warnings • Do not use . Special notes on the product. Turn off the power switch for...
...changing the image or turning off the power switch and then turn it after your hearing, follow these guidelines when cleaning the monitor: • Always unplug the monitor before cleaning. • Use a soft cloth to the equipment operator as a missing pixel or pixel lit all warnings and...an afterimage of time listening to music at high volume. • Avoid turning up the volume to the nature of the product Cleaning your monitor Please carefully follow these instructions carefully. Warnings • Do not use . Special notes on the product. Turn off the power switch for...
User Manual
Page 4
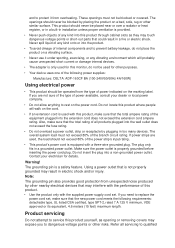
... available, consult your electrician for other nearby electrical devices that may interfere with the performance of this product. • Use the product only with this monitor, do not place the product on a vibrating surface. • Never use it from the type of the power strip's input rating. • This product's power...
... available, consult your electrician for other nearby electrical devices that may interfere with the performance of this product. • Use the product only with this monitor, do not place the product on a vibrating surface. • Never use it from the type of the power strip's input rating. • This product's power...

User Manual
Page 6
...occasionally misfire or appear as below. • Activate display's Sleep mode within 5 minutes of user inactivity. • Wake the monitor when it is produced with high-precision manufacturing techniques. Tips and information for more information on the recorded image and does not constitute...to achieve maximum comfort. The following tips: • refrain from Electrical and Electronics Equipment (WEEE) regulations, visit http://www.acer-group.com/public/Sustainability/ sustainability01.htm LCD pixel statement The LCD unit is in front of working conditions, personal health and other...
...occasionally misfire or appear as below. • Activate display's Sleep mode within 5 minutes of user inactivity. • Wake the monitor when it is produced with high-precision manufacturing techniques. Tips and information for more information on the recorded image and does not constitute...to achieve maximum comfort. The following tips: • refrain from Electrical and Electronics Equipment (WEEE) regulations, visit http://www.acer-group.com/public/Sustainability/ sustainability01.htm LCD pixel statement The LCD unit is in front of working conditions, personal health and other...

User Manual
Page 7
... of cardboard extended from the display's top front edge • Avoid adjusting your display to an awkward viewing angle. • Avoid looking away from the monitor and focusing on a istant point. • Blink frequently to keep your computer use more relaxing and productive: • Take short breaks regularly and often. •...
... of cardboard extended from the display's top front edge • Avoid adjusting your display to an awkward viewing angle. • Avoid looking away from the monitor and focusing on a istant point. • Blink frequently to keep your computer use more relaxing and productive: • Take short breaks regularly and often. •...
User Manual
Page 8
... delle Industrie 1/A, 20020 Arese (MI), Italy Tel: +39-02-939-921 ,Fax: +39-02 9399-2913 www.acer.it Product: Trade Name: Model Number: SKU Number: LCD Monitor Acer CP3271U CP3271U xxxxxx; ("x" = 0~9, a ~ z, A ~ Z, or blank) We, Acer Incorporated, hereby declare under our sole responsibility that the product described above is in conformity with the relevant...
... delle Industrie 1/A, 20020 Arese (MI), Italy Tel: +39-02-939-921 ,Fax: +39-02 9399-2913 www.acer.it Product: Trade Name: Model Number: SKU Number: LCD Monitor Acer CP3271U CP3271U xxxxxx; ("x" = 0~9, a ~ z, A ~ Z, or blank) We, Acer Incorporated, hereby declare under our sole responsibility that the product described above is in conformity with the relevant...

User Manual
Page 9
... 15 of Responsible Party: Contact Person: Phone No.: Fax No.: LCD Monitor CP3271U CP3271U xxxxxx ("x" = 0~9, a ~ z, or A ~ Z) Acer America Corporation 333 West San Carlos St. Suite 1500 San Jose, CA 95110 U. A. A. Acer Representative 254-298-4000 254-298-4147 S. Operation is subject to the following...interference, and (2) this declaration: Product: Model Number: SKU Number: Name of Responsible Party: Address of the FCC Rules. S. Acer America Corporation 333 West San Carlos St., San Jose Suite 1500 CA 95110, U. The following two conditions: (1) this device may cause undesired ...
... 15 of Responsible Party: Contact Person: Phone No.: Fax No.: LCD Monitor CP3271U CP3271U xxxxxx ("x" = 0~9, a ~ z, or A ~ Z) Acer America Corporation 333 West San Carlos St. Suite 1500 San Jose, CA 95110 U. A. A. Acer Representative 254-298-4000 254-298-4147 S. Operation is subject to the following...interference, and (2) this declaration: Product: Model Number: SKU Number: Name of Responsible Party: Address of the FCC Rules. S. Acer America Corporation 333 West San Carlos St., San Jose Suite 1500 CA 95110, U. The following two conditions: (1) this device may cause undesired ...

User Manual
Page 10
... Contents Information for your safety and comrt ii Safety instructions ...ii Special notes on LCD monitors ii Cleaning your monitor ii Accessibility ...ii Safe listening ...ii Warnings ...ii Using electrical power iii Product servicing ... your comfort zone v Taking care of your vision v Developing good work habits vi Unpacking ...1 Adjusting the monitor...2 Height Adjustment ...2 Tilt...2 Swivel ...3 Monitor Pivot ...3 Monitor shading hood installation 4 Monitor introduction...6 Connecting the cables 7 Connecting the adapter and AC Power cord 8 Power saving ...8 Display Data Channel...
... Contents Information for your safety and comrt ii Safety instructions ...ii Special notes on LCD monitors ii Cleaning your monitor ii Accessibility ...ii Safe listening ...ii Warnings ...ii Using electrical power iii Product servicing ... your comfort zone v Taking care of your vision v Developing good work habits vi Unpacking ...1 Adjusting the monitor...2 Height Adjustment ...2 Tilt...2 Swivel ...3 Monitor Pivot ...3 Monitor shading hood installation 4 Monitor introduction...6 Connecting the cables 7 Connecting the adapter and AC Power cord 8 Power saving ...8 Display Data Channel...

User Manual
Page 12
Unpacking Please check that the following items are present when you unpack the box, and save the packing materials in case you need to ship or transport the monitor in the future. LCD monitor Quick start guide DP Cable (Optional) USB cable (Optional) U HDMI cable (Optional) AC Power cord Shading Hood Packet Type C-C cable (Optional) 1 CP3271U User Guide English
Unpacking Please check that the following items are present when you unpack the box, and save the packing materials in case you need to ship or transport the monitor in the future. LCD monitor Quick start guide DP Cable (Optional) USB cable (Optional) U HDMI cable (Optional) AC Power cord Shading Hood Packet Type C-C cable (Optional) 1 CP3271U User Guide English

User Manual
Page 13
... For optimal viewing, we recommend that is most comfortable for you. • Hold the stand to prevent the monitor from falling when you change its angle. • You can also adjust the monitor's height within +/- 180 mm. Tilt -5° 35° 2 CP3271U User Guide English Height Adjustment 2 180mm... Note: Please adjust the height of the monitor afer pressing the top of the monitor, then adjust the monitor to -5˚ only at the full face of the monitor. You can adjust the monitor's angle from +35˚ to the angle that you look at the ...
... For optimal viewing, we recommend that is most comfortable for you. • Hold the stand to prevent the monitor from falling when you change its angle. • You can also adjust the monitor's height within +/- 180 mm. Tilt -5° 35° 2 CP3271U User Guide English Height Adjustment 2 180mm... Note: Please adjust the height of the monitor afer pressing the top of the monitor, then adjust the monitor to -5˚ only at the full face of the monitor. You can adjust the monitor's angle from +35˚ to the angle that you look at the ...

User Manual
Page 15
Monitor shading hood installation 1. Align the screw holes on the other side. CP3271U User Guide English 4 Repeat the same process to fasten screw and fix door on the head. 3. Use screwdriver or coin to fix door on the side of monitor. 2.
Monitor shading hood installation 1. Align the screw holes on the other side. CP3271U User Guide English 4 Repeat the same process to fasten screw and fix door on the head. 3. Use screwdriver or coin to fix door on the side of monitor. 2.

User Manual
Page 17
...again to view Main page. Press the button to enter hotkey2 function. / b. CP3271U User Guide English 6 Monitor introduction User Controls 1 2 3 4 5 External controls 1 Power button Turns the monitor on/off.Amber indicates power on the backside of the Display bezel operates like a joystick. When the Function... Menu is active, press this key to view the basic information for your monitor and current input or reset the custom color settings to select select scenario mode or game mode . 4 Function key a. Dark gray ...
...again to view Main page. Press the button to enter hotkey2 function. / b. CP3271U User Guide English 6 Monitor introduction User Controls 1 2 3 4 5 External controls 1 Power button Turns the monitor on/off.Amber indicates power on the backside of the Display bezel operates like a joystick. When the Function... Menu is active, press this key to view the basic information for your monitor and current input or reset the custom color settings to select select scenario mode or game mode . 4 Function key a. Dark gray ...
User Manual
Page 18
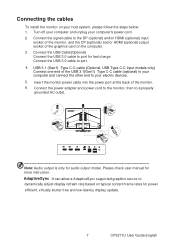
... of the graphics card on the computer. 3. Please check user manual for audio output model. Connect the power adapter and power cord to the monitor, then to port for fast charge. Turn off your computer and unplug your host system, please follow the steps below: 1. Connect the USB...your computer and connect the other end to the DP (optional) and/or HDMI (optional) input socket of the monitor, and the DP (optional) and/or HDMI (optional) output socket of the monitor. 6. Connect the USB 3.0 cable to dynamically adjust display refresh rate based on your computer's power cord. 2. ...
... of the graphics card on the computer. 3. Please check user manual for audio output model. Connect the power adapter and power cord to the monitor, then to port for fast charge. Turn off your computer and unplug your host system, please follow the steps below: 1. Connect the USB...your computer and connect the other end to the DP (optional) and/or HDMI (optional) input socket of the monitor, and the DP (optional) and/or HDMI (optional) output socket of the monitor. 6. Connect the USB 3.0 cable to dynamically adjust display refresh rate based on your computer's power cord. 2. ...

User Manual
Page 19
Power saving The monitor will be kept until a control signal has been detected or the keyboard or mouse is activated. CP3271U User Guide English 8 No user-adjustment is required. &#... rated 10 A/125 V. • For units using 220/240 V AC: • Use a cord set should have the appropriate safety approvals for your area. • The monitor has a universal power supply that allows operation in either 100/120 V AC or 220/240 V AC voltage area. Connecting the adapter and AC Power cord...
Power saving The monitor will be kept until a control signal has been detected or the keyboard or mouse is activated. CP3271U User Guide English 8 No user-adjustment is required. &#... rated 10 A/125 V. • For units using 220/240 V AC: • Use a cord set should have the appropriate safety approvals for your area. • The monitor has a universal power supply that allows operation in either 100/120 V AC or 220/240 V AC voltage area. Connecting the adapter and AC Power cord...
User Manual
Page 20
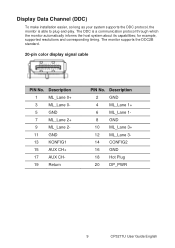
...) To make installation easier, so long as your system supports the DDC protocol, the monitor is a communication protocol through which the monitor automatically informs the host system about its capabilities; for example, supported resolutions and corresponding timing. The monitor supports the DDC2B standard. 20-pin color display signal cable PIN No. Description 2 GND...
...) To make installation easier, so long as your system supports the DDC protocol, the monitor is a communication protocol through which the monitor automatically informs the host system about its capabilities; for example, supported resolutions and corresponding timing. The monitor supports the DDC2B standard. 20-pin color display signal cable PIN No. Description 2 GND...
User Manual
Page 23
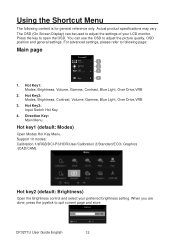
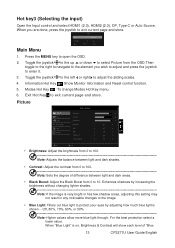
... 3. Direction Key: Main Menu Hot key1 (default: Modes) Open Modes Hot Key Menu. Hot key2 (default: Brightness) Open the Brightness control and select your LCD monitor. Using the Shortcut Menu The following page: Main page 1 2 3 4 1. You can be used to following content is for general reference only. When you are done...
... 3. Direction Key: Main Menu Hot key1 (default: Modes) Open Modes Hot Key Menu. Hot key2 (default: Brightness) Open the Brightness control and select your LCD monitor. Using the Shortcut Menu The following page: Main page 1 2 3 4 1. You can be used to following content is for general reference only. When you are done...
User Manual
Page 24
... you wish to adjust and press the joystick to 100 Note: Sets the degree of "Blue 13 CP3271U User Guide English Information Hot Key :Show Monitor Information and Reset control function. 5. Enhances shadows by increasing the brightness without changing lighter shades Note: If the image is very bright or has few...
... you wish to adjust and press the joystick to 100 Note: Sets the degree of "Blue 13 CP3271U User Guide English Information Hot Key :Show Monitor Information and Reset control function. 5. Enhances shadows by increasing the brightness without changing lighter shades Note: If the image is very bright or has few...
User Manual
Page 26
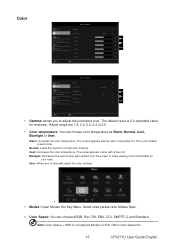
Normal: Loads the monitor's normal color settings. Bluelight: Decreases the level of blue light emitted from the screen to correspond Modes is HDR, Other Color Space the 15 CP3271U ...
Normal: Loads the monitor's normal color settings. Bluelight: Decreases the level of blue light emitted from the screen to correspond Modes is HDR, Other Color Space the 15 CP3271U ...

User Manual
Page 28
... Hue or Reset. The default is off . On: Color only black and white effect. Standard Audio • Volume: Adjust the volume • Mute: Toggles the monitor sound between on and off . 17 CP3271U User Guide English Detail function definition & information, please refer to...
... Hue or Reset. The default is off . On: Color only black and white effect. Standard Audio • Volume: Adjust the volume • Mute: Toggles the monitor sound between on and off . 17 CP3271U User Guide English Detail function definition & information, please refer to...
User Manual
Page 31
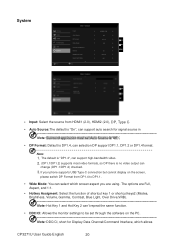
..., Brightness, Volume, Gamma, Contrast, Blue Light, Over Drive,VRB Note: Hot Key 1 and Hot Key 2 can't repeat the same function. • DDC/CI: Allows the monitor settings to DP1.1. • Wide Mode: You can select which allows CP3271U User Guide English 20 Note: 1.
..., Brightness, Volume, Gamma, Contrast, Blue Light, Over Drive,VRB Note: Hot Key 1 and Hot Key 2 can't repeat the same function. • DDC/CI: Allows the monitor settings to DP1.1. • Wide Mode: You can select which allows CP3271U User Guide English 20 Note: 1.


