User Manual
Page 3
... and openings are normal with the LCD monitor and do not increase it clearly and comfortably and without distortion. • After setting the volume level, do not indicate a problem. • Due to the nature of the fluorescent light, the screen may flicker during initial use. When you plug the power cord into is recovered slowly by changing the image or turning off the power switch and then turn it...
... and openings are normal with the LCD monitor and do not increase it clearly and comfortably and without distortion. • After setting the volume level, do not indicate a problem. • Due to the nature of the fluorescent light, the screen may flicker during initial use. When you plug the power cord into is recovered slowly by changing the image or turning off the power switch and then turn it...
User Manual
Page 4
... this product through cabinet slots as opening or removing covers may touch dangerous voltage points or short-out parts that the total ampere rating of the equipment plugged into the product. • To avoid dmage of internal components and to prevent battery leakage, do not be used with the supplied power supply cord set , make sure that the total rating of any kind onto or...
... this product through cabinet slots as opening or removing covers may touch dangerous voltage points or short-out parts that the total ampere rating of the equipment plugged into the product. • To avoid dmage of internal components and to prevent battery leakage, do not be used with the supplied power supply cord set , make sure that the total rating of any kind onto or...
User Manual
Page 5
Switch off your vehicle engine. Areas with a potentially explosive atmosphere and obey all signs and instructions. Keep them out of the reach of the global environment, Disposal instructions Do not throw this product from the wall outlet and refer servicing to qualified service personnel when: • the power cord or plug is strongly committed to environmental protection and views recycling, in progress...
Switch off your vehicle engine. Areas with a potentially explosive atmosphere and obey all signs and instructions. Keep them out of the reach of the global environment, Disposal instructions Do not throw this product from the wall outlet and refer servicing to qualified service personnel when: • the power cord or plug is strongly committed to environmental protection and views recycling, in progress...

User Manual
Page 6
... of a computer. The following section provides tips for comfortable use . Nevertheless, some pixels may lead to reduce Power management statement should be as black or red dots. Finding your comfort zone Find your comfort zone by adjusting the viewing angle of the monitor, using a footrest, or raising your sitting height to remove the strain on how to carpal tunnel syndrome, tendonitis...
... of a computer. The following section provides tips for comfortable use . Nevertheless, some pixels may lead to reduce Power management statement should be as black or red dots. Finding your comfort zone Find your comfort zone by adjusting the viewing angle of the monitor, using a footrest, or raising your sitting height to remove the strain on how to carpal tunnel syndrome, tendonitis...

User Manual
Page 10
... Disposal instructions iv LCD pixel statement v Tips and information for comfortable use v Finding your comfort zone v Taking care of your vision v Developing good work habits vi Unpacking ...1 Adjusting the monitor...2 Height Adjustment ...2 Tilt...2 Swivel ...3 Monitor Pivot ...3 Monitor shading hood installation 4 Monitor introduction...6 Connecting the cables 7 Connecting the adapter and AC Power cord 8 Power saving ...8 Display Data Channel (DDC 9 Standard timing table 11 Using the Shortcut Menu 12 Main page...12 Hot key1 (default: Modes 12 Hot key2 (default: Brightness...
... Disposal instructions iv LCD pixel statement v Tips and information for comfortable use v Finding your comfort zone v Taking care of your vision v Developing good work habits vi Unpacking ...1 Adjusting the monitor...2 Height Adjustment ...2 Tilt...2 Swivel ...3 Monitor Pivot ...3 Monitor shading hood installation 4 Monitor introduction...6 Connecting the cables 7 Connecting the adapter and AC Power cord 8 Power saving ...8 Display Data Channel (DDC 9 Standard timing table 11 Using the Shortcut Menu 12 Main page...12 Hot key1 (default: Modes 12 Hot key2 (default: Brightness...

User Manual
Page 17
... inoperable. Blinking amber indicates (Standby/ Power Saving mode/ OSD locked). 2 Function key a. Press to view Main page.Press again to enter hotkey1 function. / b. Press to view Main page.Press again to view Main page. b. When the Function Menu is active, press this key to view the basic information for your monitor and current input or reset the custom color settings to select select scenario mode or game mode...
... inoperable. Blinking amber indicates (Standby/ Power Saving mode/ OSD locked). 2 Function key a. Press to view Main page.Press again to enter hotkey1 function. / b. Press to view Main page.Press again to view Main page. b. When the Function Menu is active, press this key to view the basic information for your monitor and current input or reset the custom color settings to select select scenario mode or game mode...
User Manual
Page 18
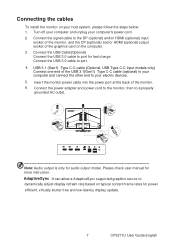
... only for more instruction. Connecting the cables To install the monitor on your computer's power cord. 2. AdaptiveSync :It can allow a AdaptiveSync supported graphics source to port. 4. Connect the USB 3.0 cable to dynamically adjust display refresh rate based on the computer. 3. Turn off your computer and unplug your host system, please follow the steps below: 1. Connect the signal cable to port for power efficient, virtually stutter free and low-latency display update. 7 CP3271U User Guide English Connect the USB Cable(Optional) Connect the USB 3.0 cable to the...
... only for more instruction. Connecting the cables To install the monitor on your computer's power cord. 2. AdaptiveSync :It can allow a AdaptiveSync supported graphics source to port. 4. Connect the USB 3.0 cable to dynamically adjust display refresh rate based on the computer. 3. Turn off your computer and unplug your host system, please follow the steps below: 1. Connect the signal cable to port for power efficient, virtually stutter free and low-latency display update. 7 CP3271U User Guide English Connect the USB Cable(Optional) Connect the USB 3.0 cable to the...

User Manual
Page 19
... user-adjustment is activated. The cord set consisting of the AC power cord to the Adapter, and plug the other end into "Power Saving" mode by amber -color power LED. State ON Power Saving Mode LED Light Amber Blinking amber The power saving states will be kept until a control signal has been detected or the keyboard or mouse is required. • Plug one end of H05VV-F cord and plug rated 10 A/250 V. Connecting the adapter and AC Power cord • Check first to make...
... user-adjustment is activated. The cord set consisting of the AC power cord to the Adapter, and plug the other end into "Power Saving" mode by amber -color power LED. State ON Power Saving Mode LED Light Amber Blinking amber The power saving states will be kept until a control signal has been detected or the keyboard or mouse is required. • Plug one end of H05VV-F cord and plug rated 10 A/250 V. Connecting the adapter and AC Power cord • Check first to make...
User Manual
Page 20
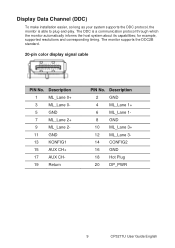
... 16 GND 18 Hot Plug 20 DP_PWR 9 CP3271U User Guide English Description 1 ML_Lane 0+ 3 ML_Lane 0- 5 GND 7 ML_Lane 2+ 9 ML_Lane 2- 11 GND 13 KONFIG1 15 AUX CH+ 17 AUX CH- 19 Return PIN No. for example, supported resolutions and corresponding timing. Display Data Channel (DDC) To make installation easier, so long as your system supports the DDC protocol, the monitor is a communication protocol through...
... 16 GND 18 Hot Plug 20 DP_PWR 9 CP3271U User Guide English Description 1 ML_Lane 0+ 3 ML_Lane 0- 5 GND 7 ML_Lane 2+ 9 ML_Lane 2- 11 GND 13 KONFIG1 15 AUX CH+ 17 AUX CH- 19 Return PIN No. for example, supported resolutions and corresponding timing. Display Data Channel (DDC) To make installation easier, so long as your system supports the DDC protocol, the monitor is a communication protocol through...
User Manual
Page 22
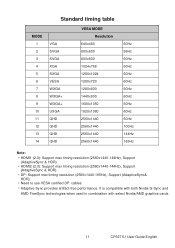
It is compatible with both Nvidia G-Sync and AMD FreeSync technologies when used in combination with select Nvidia/AMD graphics cards. 11 CP3271U User Guide English Standard timing table MODE 1 2 3 4 5 6 7 8 9 10 11 12 13 14 VGA SVGA SVGA XGA SXGA VESA WXGA WXGA+ WXGA+ UXGA QHD QHD QHD QHD VESA MODE Resolution 640x480 800x600 800x600 1024x768 1280x1024 1280x720 1280x800 1440x900 1680x1050 1920x1080 2560x1440 2560x1440...
It is compatible with both Nvidia G-Sync and AMD FreeSync technologies when used in combination with select Nvidia/AMD graphics cards. 11 CP3271U User Guide English Standard timing table MODE 1 2 3 4 5 6 7 8 9 10 11 12 13 14 VGA SVGA SVGA XGA SXGA VESA WXGA WXGA+ WXGA+ UXGA QHD QHD QHD QHD VESA MODE Resolution 640x480 800x600 800x600 1024x768 1280x1024 1280x720 1280x800 1440x900 1680x1050 1920x1080 2560x1440 2560x1440...
User Manual
Page 23
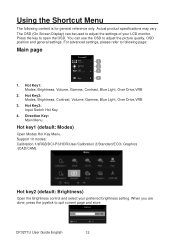
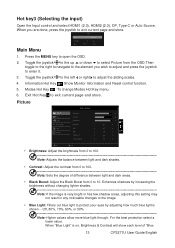
...: Main Menu Hot key1 (default: Modes) Open Modes Hot Key Menu. Hot key2 (default: Brightness) Open the Brightness control and select your LCD monitor. Using the Shortcut Menu The following page: Main page 1 2 3 4 1. Hot Key3: Input Switch Hot Key 4. Support 10 modes: Calibration 1/sRGB/DCI-P3/HDR/User/Calibration 2/Standard/ECO/ Graphics /(CAD/CAM). The OSD (On Screen Display) can use the OSD to adjust the picture quality, OSD position and general settings. You can be used to open the OSD. Hot Key2: Modes, Brightness, Contrast, Volume, Gamma, Blue Light, Over...
...: Main Menu Hot key1 (default: Modes) Open Modes Hot Key Menu. Hot key2 (default: Brightness) Open the Brightness control and select your LCD monitor. Using the Shortcut Menu The following page: Main page 1 2 3 4 1. Hot Key3: Input Switch Hot Key 4. Support 10 modes: Calibration 1/sRGB/DCI-P3/HDR/User/Calibration 2/Standard/ECO/ Graphics /(CAD/CAM). The OSD (On Screen Display) can use the OSD to adjust the picture quality, OSD position and general settings. You can be used to open the OSD. Hot Key2: Modes, Brightness, Contrast, Volume, Gamma, Blue Light, Over...
User Manual
Page 24
... difference between light and dark shades. • Contrast: Adjust the contrast from 0 to enter it. 3. Information Hot Key :Show Monitor Information and Reset control function. 5. Exit Hot Key X to adjust the sliding scales. 4. When "Blue Light" is very bright or has few shadow areas, adjusting this setting may not result in any noticeable changes to the image. • Blue Light: Filters out blue light to open the OSD. 2. Auto Source Main Menu 1. Toggle the...
... difference between light and dark shades. • Contrast: Adjust the contrast from 0 to enter it. 3. Information Hot Key :Show Monitor Information and Reset control function. 5. Exit Hot Key X to adjust the sliding scales. 4. When "Blue Light" is very bright or has few shadow areas, adjusting this setting may not result in any noticeable changes to the image. • Blue Light: Filters out blue light to open the OSD. 2. Auto Source Main Menu 1. Toggle the...

User Manual
Page 25
... based on or off , set to make images sharper and clearer. When HDR=Auto, some parameters: (ACM, Gamma, Contrast, Blue Light, Black Boost...) functions is gray out and disable, and if you change other adjustable parameters, the "Modes" will be automatically set to auto will automatically detect and deal with HDR signal. Note: 1. Light" value. • ACM: Turn ACM on the current screen to dynamic contrast adjustment. • HDR: Can control (off / Auto...
... based on or off , set to make images sharper and clearer. When HDR=Auto, some parameters: (ACM, Gamma, Contrast, Blue Light, Black Boost...) functions is gray out and disable, and if you change other adjustable parameters, the "Modes" will be automatically set to auto will automatically detect and deal with HDR signal. Note: 1. Light" value. • ACM: Turn ACM on the current screen to dynamic contrast adjustment. • HDR: Can control (off / Auto...
User Manual
Page 26
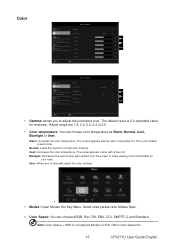
... of blue light emitted from the screen to adjust the luminance tone. Color • Gamma: allows you to manually adjust the color settings. • • Modes: Open Modes Hot Key Menu. Adjust range are 1.8, 2.0, 2.2, 2.4 or 2.6. • Color temperature: You can choose sRGB, Rec.709, EBU, DCI, SMPTE-C and Standard Note: Color Space = HDR to correspond Modes is HDR, Other Color Space the 15 CP3271U User Guide English Detail rules please refer Modes Spec. • Color...
... of blue light emitted from the screen to adjust the luminance tone. Color • Gamma: allows you to manually adjust the color settings. • • Modes: Open Modes Hot Key Menu. Adjust range are 1.8, 2.0, 2.2, 2.4 or 2.6. • Color temperature: You can choose sRGB, Rec.709, EBU, DCI, SMPTE-C and Standard Note: Color Space = HDR to correspond Modes is HDR, Other Color Space the 15 CP3271U User Guide English Detail rules please refer Modes Spec. • Color...
User Manual
Page 29
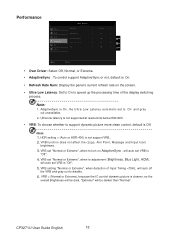
.... • Refresh Rate Num: Display the panel's current refresh rate on AdaptiveSync , will auto set "Normal or Extreme", when to On and gray out unavailable. 2. Standard Picture Color Audio Pertormance OSD System Over Drive AdaptiveSync Refresh Rate Num Ultra-Low Latency VRB Normal On Off On Off X Move Enter • Over Driver: Select Off, Normal, or Extreme. • AdaptiveSync : To control support AdaptiveSync or not, default is "Off...
.... • Refresh Rate Num: Display the panel's current refresh rate on AdaptiveSync , will auto set "Normal or Extreme", when to On and gray out unavailable. 2. Standard Picture Color Audio Pertormance OSD System Over Drive AdaptiveSync Refresh Rate Num Ultra-Low Latency VRB Normal On Off On Off X Move Enter • Over Driver: Select Off, Normal, or Extreme. • AdaptiveSync : To control support AdaptiveSync or not, default is "Off...
User Manual
Page 31
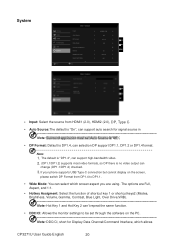
System • Input: Select the source from DP1.4 to be set Auto Source is "Off". • DP Format: Default is no video output can change (DP1.1/DP1.2) checked. 3. If your phone supports USB Type-C connection but cannot display on the screen, please switch DP Format from HDMI1 (2.0), HDMI2 (2.0), DP, Type C. • Auto Source:The default is "On", can support auto search for signal source in order Note: Surround application must set through the software on...
System • Input: Select the source from DP1.4 to be set Auto Source is "Off". • DP Format: Default is no video output can change (DP1.1/DP1.2) checked. 3. If your phone supports USB Type-C connection but cannot display on the screen, please switch DP Format from HDMI1 (2.0), HDMI2 (2.0), DP, Type C. • Auto Source:The default is "On", can support auto search for signal source in order Note: Surround application must set through the software on...

User Manual
Page 32
... Key LED. • USB Port Select Function USB Port Select OSD USB Port Select Rules Rules When MNT Input is "Off" . • Power-off mode can to control Keyboard and C-Type (Default) Mouse. B-Type When MNT Input is : (VGA/HDMI/DP/DP ALT), you need to connect C to C cable or C to A cable to electrify for USB port. 21 CP3271U User Guide English When MNT Input is : (VGA/HDMI/DP/DP ALT), connect to C to C cable or C to set HDMI black level. • Quick start mode: Select...
... Key LED. • USB Port Select Function USB Port Select OSD USB Port Select Rules Rules When MNT Input is "Off" . • Power-off mode can to control Keyboard and C-Type (Default) Mouse. B-Type When MNT Input is : (VGA/HDMI/DP/DP ALT), you need to connect C to C cable or C to A cable to electrify for USB port. 21 CP3271U User Guide English When MNT Input is : (VGA/HDMI/DP/DP ALT), connect to C to C cable or C to set HDMI black level. • Quick start mode: Select...
User Manual
Page 34
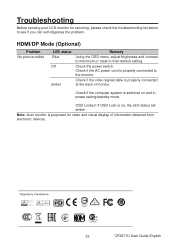
... video signal cable is on and in power saving/standby mode. OSD Locked: If OSD Lock is properly connected at the back of information obtained from electronic devices. 23 CP3271U User Guide English Check if the computer system is purposed for servicing, please check the troubleshooting list below to the monitor. Note: Acer monitor is switched on , the LED status set amber . Troubleshooting Before sending your LCD monitor for video and visual display of monitor. HDMI/DP Mode (Optional) Problem No picture visible LED status Blue...
... video signal cable is on and in power saving/standby mode. OSD Locked: If OSD Lock is properly connected at the back of information obtained from electronic devices. 23 CP3271U User Guide English Check if the computer system is purposed for servicing, please check the troubleshooting list below to the monitor. Note: Acer monitor is switched on , the LED status set amber . Troubleshooting Before sending your LCD monitor for video and visual display of monitor. HDMI/DP Mode (Optional) Problem No picture visible LED status Blue...
Quick Start Guide
Page 1
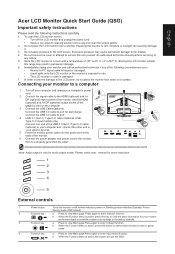
...; F). English Acer LCD Monitor Quick Start Guide (QSG) Important safety instructions Please read the following circumstances occur: • Monitor-to-PC signal cable is frayed or damaged. • Liquid spills onto the LCD monitor or the monitor is exposed to rain. • The LCD monitor or case is active, press this button to select select scenario mode or game / mode . 4 Function key a. Blinking amber indicates (Standby/ Power Saving mode/ OSD locked). 2 Function key a. Press to view...
...; F). English Acer LCD Monitor Quick Start Guide (QSG) Important safety instructions Please read the following circumstances occur: • Monitor-to-PC signal cable is frayed or damaged. • Liquid spills onto the LCD monitor or the monitor is exposed to rain. • The LCD monitor or case is active, press this button to select select scenario mode or game / mode . 4 Function key a. Blinking amber indicates (Standby/ Power Saving mode/ OSD locked). 2 Function key a. Press to view...
Quick Start Guide
Page 2
... between the device and receiver. • Connect the device into an outlet on typical content frame rates for power virtually stutter free and low-latency display update. Press the button to Part 15 of waste equipment by user in private household in interference to radio communications...button in compliance with Part 15 of your waste equipment by handing it is in four directions. English Note: Acer monitor is no guarantee that may cause harmful interference to radio and TV reception. AdaptiveSync : It can radiate radio frequency energy and, if not installed and used...
... between the device and receiver. • Connect the device into an outlet on typical content frame rates for power virtually stutter free and low-latency display update. Press the button to Part 15 of waste equipment by user in private household in interference to radio communications...button in compliance with Part 15 of your waste equipment by handing it is in four directions. English Note: Acer monitor is no guarantee that may cause harmful interference to radio and TV reception. AdaptiveSync : It can radiate radio frequency energy and, if not installed and used...


