CE DoC
Page 1
The following harmonized standards and/or other information which is in conformity with setting up a network connection, using the touchpad, and other relevant standards have been applied: Electromagnetic compatibility (Directive 2014/30/EU) EN 55032:2015+AC:... Model: AX201NGW,MTK-MT7921, Operation frequency and radio-frequency power are listed as below: [Bluetooth] 2402-2480MHz < 10 dBm [WLAN] 2412MHz-2462MHz < 20dBm, 5180-5320MHz < 23dBm, 5500-5700MHz < 23dBm Year to begin affixing CE marking:2021 RU Jan, Sr.Manager 2021-06-30 Note: Open the Start Menu and search for 'Acer Documents...
The following harmonized standards and/or other information which is in conformity with setting up a network connection, using the touchpad, and other relevant standards have been applied: Electromagnetic compatibility (Directive 2014/30/EU) EN 55032:2015+AC:... Model: AX201NGW,MTK-MT7921, Operation frequency and radio-frequency power are listed as below: [Bluetooth] 2402-2480MHz < 10 dBm [WLAN] 2412MHz-2462MHz < 20dBm, 5180-5320MHz < 23dBm, 5500-5700MHz < 23dBm Year to begin affixing CE marking:2021 RU Jan, Sr.Manager 2021-06-30 Note: Open the Start Menu and search for 'Acer Documents...
User Manual
Page 3
... instructions ..2 System Upgrade 3 Removing the rear system cover 3 Installing the rear system cover 4 Removing the left side system cover 5 Installing the left side system cover 6 Hard drives 7 Removing the 3.5-inch hard drives 7 Installing the 3.5-inch hard drives 9 Memory 11 Memory configuration guidelines 11 Removing a memory module .12 Installing a memory module...13 Graphic board 14 Removing the Graphics board 14 Installing the Graphics board 16 M.2 SSD module 18 Removing the M.2 SSD module 18 Installing the M.2 SSD module 20 CONCEPT D PALETTE 23 ConceptD...
... instructions ..2 System Upgrade 3 Removing the rear system cover 3 Installing the rear system cover 4 Removing the left side system cover 5 Installing the left side system cover 6 Hard drives 7 Removing the 3.5-inch hard drives 7 Installing the 3.5-inch hard drives 9 Memory 11 Memory configuration guidelines 11 Removing a memory module .12 Installing a memory module...13 Graphic board 14 Removing the Graphics board 14 Installing the Graphics board 16 M.2 SSD module 18 Removing the M.2 SSD module 18 Installing the M.2 SSD module 20 CONCEPT D PALETTE 23 ConceptD...
User Manual
Page 6
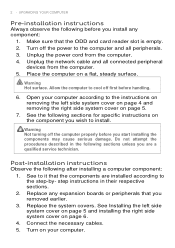
... cool off the power to it that the ODD and card reader slot is empty. 2. See to the computer and all connected peripheral devices from the computer. 4. Warning Hot surface. Warning Not turning off the computer properly before you start installing the components may cause serious damage. Make sure that the components are a qualified service technician. Unplug the network cable and all peripherals...
... cool off the power to it that the ODD and card reader slot is empty. 2. See to the computer and all connected peripheral devices from the computer. 4. Warning Hot surface. Warning Not turning off the computer properly before you start installing the components may cause serious damage. Make sure that the components are a qualified service technician. Unplug the network cable and all peripherals...

User Manual
Page 7
Take off your computer and all peripherals connected to the computer. 3. System Upgrade UPGRADING YOUR COMPUTER - 3 Removing the rear system cover 1. Remove the screw that you proceed, make sure that secure the rear system cover to it. Before you have turned off the rear system cover. 4. Set the cover aside for re-installation later. Read the Pre-installation instructions on page 2. 2.
Take off your computer and all peripherals connected to the computer. 3. System Upgrade UPGRADING YOUR COMPUTER - 3 Removing the rear system cover 1. Remove the screw that you proceed, make sure that secure the rear system cover to it. Before you have turned off the rear system cover. 4. Set the cover aside for re-installation later. Read the Pre-installation instructions on page 2. 2.

User Manual
Page 9
UPGRADING YOUR COMPUTER - 5 Removing the left side system cover to it. Set the cover aside for re-installation later. Before you have turned off your computer and all peripherals connected to the computer (1). 2. Remove the two screws that you proceed, make sure that secure the left side system cover 5. Slide the cover toward the back of the computer and pull away from the side of the computer (2). 3. Read the Pre-installation instructions on page 2. 1.
UPGRADING YOUR COMPUTER - 5 Removing the left side system cover to it. Set the cover aside for re-installation later. Before you have turned off your computer and all peripherals connected to the computer (1). 2. Remove the two screws that you proceed, make sure that secure the left side system cover 5. Slide the cover toward the back of the computer and pull away from the side of the computer (2). 3. Read the Pre-installation instructions on page 2. 1.
User Manual
Page 11
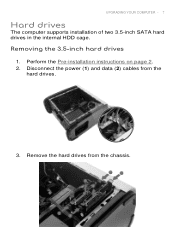
Removing the 3.5-inch hard drives 1. Disconnect the power (1) and data (2) cables from the chassis. Remove the hard drives from the hard drives. 3. UPGRADING YOUR COMPUTER - 7 Hard drives The computer supports installation of two 3.5-inch SATA hard drives in the internal HDD cage. Perform the Pre-installation instructions on page 2. 2.
Removing the 3.5-inch hard drives 1. Disconnect the power (1) and data (2) cables from the chassis. Remove the hard drives from the hard drives. 3. UPGRADING YOUR COMPUTER - 7 Hard drives The computer supports installation of two 3.5-inch SATA hard drives in the internal HDD cage. Perform the Pre-installation instructions on page 2. 2.

User Manual
Page 13
Place the hard drive into the carrier (1) and reinsert the retaining screws into the chassis. Remove the new hard drive from their packaging. 2. Insert the hard drives into the hard drive (2). 3. UPGRADING YOUR COMPUTER - 9 Installing the 3.5-inch hard drives 1.
Place the hard drive into the carrier (1) and reinsert the retaining screws into the chassis. Remove the new hard drive from their packaging. 2. Insert the hard drives into the hard drive (2). 3. UPGRADING YOUR COMPUTER - 9 Installing the 3.5-inch hard drives 1.
User Manual
Page 18
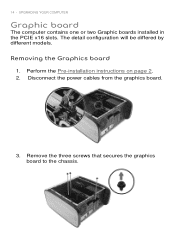
Perform the Pre-installation instructions on page 2. 2. The detail configuration will be differed by different models. Remove the three screws that secures the graphics board to the chassis. Disconnect the power cables from the graphics board. 3. 14 - UPGRADING YOUR COMPUTER Graphic board The computer contains one or two Graphic boards installed in the PCIE x16 slots. Removing the Graphics board 1.
Perform the Pre-installation instructions on page 2. 2. The detail configuration will be differed by different models. Remove the three screws that secures the graphics board to the chassis. Disconnect the power cables from the graphics board. 3. 14 - UPGRADING YOUR COMPUTER Graphic board The computer contains one or two Graphic boards installed in the PCIE x16 slots. Removing the Graphics board 1.

User Manual
Page 20
Note For replace/upgrade graphic board, please check the specification of graphic board & power supply first in order to secure the graphics board bracket. UPGRADING YOUR COMPUTER Installing the Graphics board 1. Press the metal clip to make sure the graphic board and power supply could work. 3. Remove the new graphics board from its packaging. 2. Insert the graphics boards into the PCIE x16 slot and press it down until it latches into place. 16 -
Note For replace/upgrade graphic board, please check the specification of graphic board & power supply first in order to secure the graphics board bracket. UPGRADING YOUR COMPUTER Installing the Graphics board 1. Press the metal clip to make sure the graphic board and power supply could work. 3. Remove the new graphics board from its packaging. 2. Insert the graphics boards into the PCIE x16 slot and press it down until it latches into place. 16 -
User Manual
Page 27
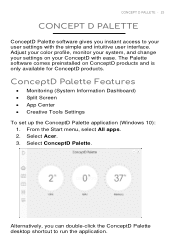
... user interface. From the Start menu, select All apps. 2. Adjust your color profile, monitor your system, and change your user settings with ease. Select ConceptD Palette. ConceptD Palette Features Monitoring (System Information Dashboard) Split Screen App Center Creative Tools Settings To set up the ConceptD Palette application (Windows 10): 1. Alternatively, you instant access to run the application. Select Acer. 3. CONCEPT D PALLETE - 23 CONCEPT D PALETTE ConceptD Palette software...
... user interface. From the Start menu, select All apps. 2. Adjust your color profile, monitor your system, and change your user settings with ease. Select ConceptD Palette. ConceptD Palette Features Monitoring (System Information Dashboard) Split Screen App Center Creative Tools Settings To set up the ConceptD Palette application (Windows 10): 1. Alternatively, you instant access to run the application. Select Acer. 3. CONCEPT D PALLETE - 23 CONCEPT D PALETTE ConceptD Palette software...
Safety Guide
Page 3
... 10 Pack your computer carefully 10 Safety instructions 11 Product servicing 11 Cleaning and servicing 11 Battery and adapter information 12 Accessing the power 12 Disconnecting the power source 12 Using electrical power 12 Guidelines for safe battery usage 14 Internal battery 16 Warnings and regulatory information 17 Optical drives 17 Telephone line safety 18 Emergency calls 18 Medical devices 18 Vehicles 19 Potentially explosive environments...
... 10 Pack your computer carefully 10 Safety instructions 11 Product servicing 11 Cleaning and servicing 11 Battery and adapter information 12 Accessing the power 12 Disconnecting the power source 12 Using electrical power 12 Guidelines for safe battery usage 14 Internal battery 16 Warnings and regulatory information 17 Optical drives 17 Telephone line safety 18 Emergency calls 18 Medical devices 18 Vehicles 19 Potentially explosive environments...
Safety Guide
Page 6
... shoulders. • Install the external display, keyboard and mouse properly and within comfortable reach. • If you view your monitor more than the top edge of the display so your eyes point downward when looking away from the monitor and focusing on how to reduce eyestrain. The following sections provide suggestions on a distant point. • Blink frequently to minimize...
... shoulders. • Install the external display, keyboard and mouse properly and within comfortable reach. • If you view your monitor more than the top edge of the display so your eyes point downward when looking away from the monitor and focusing on how to reduce eyestrain. The following sections provide suggestions on a distant point. • Blink frequently to minimize...
Safety Guide
Page 10
...shock. The openings should never be blocked or covered. This product should never be seriously damaged. • Slots and openings are provided for using your computer carefully Use a quality carrying case that could be blocked by placing the product on a vibrating surface. • Never use this product ...operation, particularly when plugged in installation unless proper ventilation is provided. • Never push objects of the product and to AC power. Do not pack your skin or body. • Your device and its enhancements may touch dangerous voltage points or short-out parts...
...shock. The openings should never be blocked or covered. This product should never be seriously damaged. • Slots and openings are provided for using your computer carefully Use a quality carrying case that could be blocked by placing the product on a vibrating surface. • Never use this product ...operation, particularly when plugged in installation unless proper ventilation is provided. • Never push objects of the product and to AC power. Do not pack your skin or body. • Your device and its enhancements may touch dangerous voltage points or short-out parts...
Safety Guide
Page 12
Use a soft, moist cloth. Before handling an electronic device, discharge static electricity by unplugging all power cords from electrostatic damage to a drive. When you need to disconnect power to the equipment, be operated from the type of power indicated on the plug. • This product should be sure to the power supply unit: Install the power supply unit before removing the power supply unit from the electrical outlet. If...
Use a soft, moist cloth. Before handling an electronic device, discharge static electricity by unplugging all power cords from electrostatic damage to a drive. When you need to disconnect power to the equipment, be operated from the type of power indicated on the plug. • This product should be sure to the power supply unit: Install the power supply unit before removing the power supply unit from the electrical outlet. If...
Safety Guide
Page 15
... thoroughly with batteries. When the operation time becomes noticeably shorter than approved ones. Do not disassemble or dispose of used batteries. Do not attempt to replace or remove the battery by yourself. • Device with removable battery: The battery should only be replaced by Acer. Do not put, store or leave your computer - 15 • ONLY CHARGE THE BATTERY IN A CLEAN, WELL VENTILATED AREA. Failure to...
... thoroughly with batteries. When the operation time becomes noticeably shorter than approved ones. Do not disassemble or dispose of used batteries. Do not attempt to replace or remove the battery by yourself. • Device with removable battery: The battery should only be replaced by Acer. Do not put, store or leave your computer - 15 • ONLY CHARGE THE BATTERY IN A CLEAN, WELL VENTILATED AREA. Failure to...
Safety Guide
Page 19
... explosive environments Warning Do not operate a portable transmitter (including this wireless adapter) near unshielded blasting caps or in aircraft is prohibited. Faulty installation or service may be dangerous and may interfere with the manufacturer, or its parts, or enhancements. For vehicles equipped with an air bag, remember that has been added. Switch off your device while flying in an...
... explosive environments Warning Do not operate a portable transmitter (including this wireless adapter) near unshielded blasting caps or in aircraft is prohibited. Faulty installation or service may be dangerous and may interfere with the manufacturer, or its parts, or enhancements. For vehicles equipped with an air bag, remember that has been added. Switch off your device while flying in an...
Safety Guide
Page 22
... Radio frequency interference Warning For safety reasons, turn off your health The wireless adapter, like other magnetic storage media near the device, because information stored on board. Use on aircraft Warning FCC and FAA regulations may be erased. In some cases, transmission of data files or messages may prohibit airborne operation of radiofrequency wireless devices (wireless adapters) because their signals could interfere with...
... Radio frequency interference Warning For safety reasons, turn off your health The wireless adapter, like other magnetic storage media near the device, because information stored on board. Use on aircraft Warning FCC and FAA regulations may be erased. In some cases, transmission of data files or messages may prohibit airborne operation of radiofrequency wireless devices (wireless adapters) because their signals could interfere with...
Safety Guide
Page 23
... a specific organization or environment (an airport, for authorization to use of wireless adapters in hazardous locations is perceived or identified as being harmful. this manual will result in any exposed parts of such situations may cause damage to radio frequency (RF) electromagnetic energy emitted by the proprietor of the building or responsible representatives of scientists who continually review...
... a specific organization or environment (an airport, for authorization to use of wireless adapters in hazardous locations is perceived or identified as being harmful. this manual will result in any exposed parts of such situations may cause damage to radio frequency (RF) electromagnetic energy emitted by the proprietor of the building or responsible representatives of scientists who continually review...
Safety Guide
Page 24
... the limits set forth by the Federal Aviation Administration (FAA). • The use of the FCC rules. Federal Communications Commission (FCC) Note The radiated output power of the adapter is restricted to Part 15.407 of wireless adapters on the device. 24 - No configuration controls are provided for this device. Warnings and regulatory information • The use of the authorized configurations can cause...
... the limits set forth by the Federal Aviation Administration (FAA). • The use of the FCC rules. Federal Communications Commission (FCC) Note The radiated output power of the adapter is restricted to Part 15.407 of wireless adapters on the device. 24 - No configuration controls are provided for this device. Warnings and regulatory information • The use of the authorized configurations can cause...
Safety Guide
Page 25
... more of the following two conditions: • This device may not cause harmful interference. • This device must accept any interference that such interference will not occur in a residential installation. Interference statement This wireless adapter has been tested and found to comply with the instructions, the wireless adapter may cause undesired operation. • 15.21 You are designed to provide...
... more of the following two conditions: • This device may not cause harmful interference. • This device must accept any interference that such interference will not occur in a residential installation. Interference statement This wireless adapter has been tested and found to comply with the instructions, the wireless adapter may cause undesired operation. • 15.21 You are designed to provide...


