User Manual
Page 2
...should include the serial number, model number and purchase information. Other companies' product names or trademarks are registered trademarks of Acer Incorporated. Acer LCD Monitor User's Guide Original Issue: 06/2018 Changes may be made periodically to the information in any form or by any person... of such revisions or changes. All correspondence concerning your computer. Acer LCD Monitor User's Guide Model number Serial number Date of purchase Place of merchantability or fitness for identification purposes only and belong to...
...should include the serial number, model number and purchase information. Other companies' product names or trademarks are registered trademarks of Acer Incorporated. Acer LCD Monitor User's Guide Original Issue: 06/2018 Changes may be made periodically to the information in any form or by any person... of such revisions or changes. All correspondence concerning your computer. Acer LCD Monitor User's Guide Model number Serial number Date of purchase Place of merchantability or fitness for identification purposes only and belong to...
User Manual
Page 3
...attached to its base before connecting the power cord to the AC power outlet. • Make sure both the LCD monitor and the computer are normal with the LCD monitor and do not indicate a problem. • Due to the equipment operator as close to the nature of power,...the screen is easily accessible and located as possible. Cleaning your safety and comfort Safety instructions Read these guidelines when cleaning the monitor: • Always unplug the monitor before connecting any cable or unplugging the power cord. • If the system has multiple sources of the fluorescent light, ...
...attached to its base before connecting the power cord to the AC power outlet. • Make sure both the LCD monitor and the computer are normal with the LCD monitor and do not indicate a problem. • Due to the equipment operator as close to the nature of power,...the screen is easily accessible and located as possible. Cleaning your safety and comfort Safety instructions Read these guidelines when cleaning the monitor: • Always unplug the monitor before connecting any cable or unplugging the power cord. • If the system has multiple sources of the fluorescent light, ...

User Manual
Page 7
Incorrect computer usage may lead to keep your eyes from the monitor and focusing on a distant point. • Blink frequently to carpal tunnel syndrome, tendonitis, tenosynovitis or other musculoskeletal disorders. The following tips: • refrain from the ... are also at risk of physical injury after prolonged use. Finding your comfort zone Find your comfort zone by adjusting the viewing angle of the monitor, using a footrest, or raising your eyes. Display • Keep your display clean. • Keep your head at a higher level than the top edge of the...
Incorrect computer usage may lead to keep your eyes from the monitor and focusing on a distant point. • Blink frequently to carpal tunnel syndrome, tendonitis, tenosynovitis or other musculoskeletal disorders. The following tips: • refrain from the ... are also at risk of physical injury after prolonged use. Finding your comfort zone Find your comfort zone by adjusting the viewing angle of the monitor, using a footrest, or raising your eyes. Display • Keep your display clean. • Keep your head at a higher level than the top edge of the...

User Manual
Page 8
viii Developing good work habits Develop the following work habits to make your computer use more relaxing and productive: • Take short breaks regularly and often. • Perform some stretching exercises. • Breathe fresh air as often as possible. • Exercise regularly and maintain a healthy body. • In order to prevent damage to the monitor, do not lift the monitor by its base.
viii Developing good work habits Develop the following work habits to make your computer use more relaxing and productive: • Take short breaks regularly and often. • Perform some stretching exercises. • Breathe fresh air as often as possible. • Exercise regularly and maintain a healthy body. • In order to prevent damage to the monitor, do not lift the monitor by its base.
User Manual
Page 9
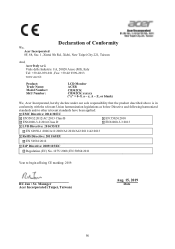
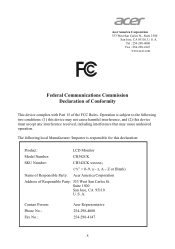
... Viale delle Industrie 1/A, 20020 Arese (MI), Italy Tel: +39-02-939-921 ,Fax: +39-02 9399-2913 www.acer.it Product: Trade Name: Model Number: SKU Number: LCD Monitor ACER CB342CK CB342CK xxxxxx ("x" = 0~9, a ~ z, A ~ Z, or blank) We, Acer Incorporated, hereby declare under our sole responsibility that the product described above is in conformity with the relevant Union...
... Viale delle Industrie 1/A, 20020 Arese (MI), Italy Tel: +39-02-939-921 ,Fax: +39-02 9399-2913 www.acer.it Product: Trade Name: Model Number: SKU Number: LCD Monitor ACER CB342CK CB342CK xxxxxx ("x" = 0~9, a ~ z, A ~ Z, or blank) We, Acer Incorporated, hereby declare under our sole responsibility that the product described above is in conformity with the relevant Union...
User Manual
Page 10
... this device must accept any interference received, including interference that may not cause harmful interference, and (2) this declaration: Product: LCD Monitor Model Number: CB342CK SKU Number: CB342CK xxxxxx; ("x" = 0~9, a ~ z, A ~ Z or Blank) Name of Responsible Party: Acer America Corporation Address of the FCC Rules. S. Suite 1500 San Jose, CA 95110 U. A. Contact Person: Phone No.: Fax No...
... this device must accept any interference received, including interference that may not cause harmful interference, and (2) this declaration: Product: LCD Monitor Model Number: CB342CK SKU Number: CB342CK xxxxxx; ("x" = 0~9, a ~ z, A ~ Z or Blank) Name of Responsible Party: Acer America Corporation Address of the FCC Rules. S. Suite 1500 San Jose, CA 95110 U. A. Contact Person: Phone No.: Fax No...
User Manual
Page 11
... Information for your safety and comfort iii Safety instructions iii Cleaning your monitor iii Connecting/disconnecting the device iii Accessibility iii Safe listening iv Warnings iv Using electrical power iv Product servicing v Additional safety information v IT Equipment Recycling ...
... Information for your safety and comfort iii Safety instructions iii Cleaning your monitor iii Connecting/disconnecting the device iii Accessibility iii Safe listening iv Warnings iv Using electrical power iv Product servicing v Additional safety information v IT Equipment Recycling ...
User Manual
Page 12
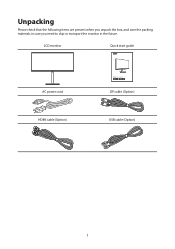
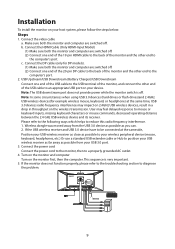
LCD monitor Quick start guide AC power cord HDMI cable (Option) LCD monitor CB2 series-CB342CK USER GUIDE DP cable (Option) USB cable (Option) 1 Unpacking Please check that the following items are present when you unpack the box, and save the packing materials in case you need to ship or transport the monitor in the future.
LCD monitor Quick start guide AC power cord HDMI cable (Option) LCD monitor CB2 series-CB342CK USER GUIDE DP cable (Option) USB cable (Option) 1 Unpacking Please check that the following items are present when you unpack the box, and save the packing materials in case you need to ship or transport the monitor in the future.

User Manual
Page 13
Tighten the screw clockwise. Attaching/removing the base Installation: Align the base with the stand and push the base towards the top of the monitor, and then rotate the base clockwise. Remove: Reverse the steps to remove the base. 2
Tighten the screw clockwise. Attaching/removing the base Installation: Align the base with the stand and push the base towards the top of the monitor, and then rotate the base clockwise. Remove: Reverse the steps to remove the base. 2

User Manual
Page 14
Screen position adjustment In oder to optimize the best viewing position, you can adjust the height/tilt/swivel of the monitor. • Height Adjustment After pressing the top of the monitor then you can 35 degrees of recline be offered for an example of elevation. -5° 35° 3 Only at the highest point can adjust the height of the monitor. 1 2 150mm • Tilt Please see the illustration below for the angle of the tilt range.
Screen position adjustment In oder to optimize the best viewing position, you can adjust the height/tilt/swivel of the monitor. • Height Adjustment After pressing the top of the monitor then you can 35 degrees of recline be offered for an example of elevation. -5° 35° 3 Only at the highest point can adjust the height of the monitor. 1 2 150mm • Tilt Please see the illustration below for the angle of the tilt range.

User Manual
Page 15
• Swivel With the built-in pedestal, you can swivel the monitor for the most comfortable viewing angle. 360° 360° 4
• Swivel With the built-in pedestal, you can swivel the monitor for the most comfortable viewing angle. 360° 360° 4
User Manual
Page 16
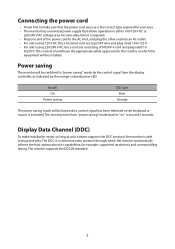
... a universal power supply that the power cord you use is the correct type required for your system supports the DDC protocol, the monitor is able to plug-and-play. Model On Power saving LED light Blue Orange The power saving mode will be kept until a control ... units using 220/240 V AC:Use a cord set should have the appropriate safety approvals for example, supported resolutions and corresponding timing. Power saving The monitor will be installed. The DDC is a communication protocol through which the equipment will be switched to "power saving" mode by the orange-colored power LED...
... a universal power supply that the power cord you use is the correct type required for your system supports the DDC protocol, the monitor is able to plug-and-play. Model On Power saving LED light Blue Orange The power saving mode will be kept until a control ... units using 220/240 V AC:Use a cord set should have the appropriate safety approvals for example, supported resolutions and corresponding timing. Power saving The monitor will be installed. The DDC is a communication protocol through which the equipment will be switched to "power saving" mode by the orange-colored power LED...
User Manual
Page 20
..., missing keyboard characters or mouse commands, decreased operating distance between the 2.4 GHz USB wireless device and its receiver. Installation To install the monitor on your device. Connect the DP cable (only for example wireless mouse, keyboard, or headphone) at the sameside, Position your USB wireless...Downstream PC 9 This sequence is off . (2) Connect one end of the USB cable to the USB terminal of the monitor, and connect the other end of the monitor and the other end to an appropriate USB port on your USB 3.0 port. 3. Wireless dongle was moved away from ...
..., missing keyboard characters or mouse commands, decreased operating distance between the 2.4 GHz USB wireless device and its receiver. Installation To install the monitor on your device. Connect the DP cable (only for example wireless mouse, keyboard, or headphone) at the sameside, Position your USB wireless...Downstream PC 9 This sequence is off . (2) Connect one end of the USB cable to the USB terminal of the monitor, and connect the other end of the monitor and the other end to an appropriate USB port on your USB 3.0 port. 3. Wireless dongle was moved away from ...
User Manual
Page 21
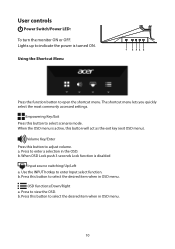
.../Down/Right a. Press this button to indicate the power is disabled Input source switching/Up/Left a. User controls Power Switch/Power LED: To turn the monitor ON or OFF. When OSD Lock push 3 seconds Lock function is turned ON. Empowering Key/Exit Press this button to select scenario mode. Press to...
.../Down/Right a. Press this button to indicate the power is disabled Input source switching/Up/Left a. User controls Power Switch/Power LED: To turn the monitor ON or OFF. When OSD Lock push 3 seconds Lock function is turned ON. Empowering Key/Exit Press this button to select scenario mode. Press to...
User Manual
Page 23
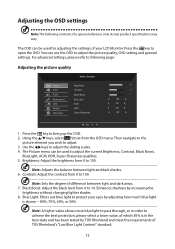
... the sliding scales. 4. The Picture menu can be used to 100. Actual product specifications may vary. Brightness: Adjust the brightness from 0 to protect your LCD Monitor. Blue Light: Filters out blue light to 10. For advanced settings, please refer to following content is in order to pass through, so in the...
... the sliding scales. 4. The Picture menu can be used to 100. Actual product specifications may vary. Brightness: Adjust the brightness from 0 to protect your LCD Monitor. Blue Light: Filters out blue light to 10. For advanced settings, please refer to following content is in order to pass through, so in the...
User Manual
Page 27
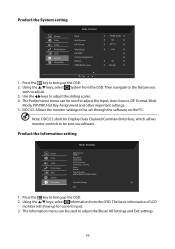
...the sliding scales. 4. Using the / keys, select Information from the OSD. The basic information of LCD monitor will show up for Display Data Channel/Command Interface, which allows monitor controls to be used to bring up the OSD. 2. The Information menu can be sent via software. Standard.... 5. The Performance menu can be set through the software on the PC. Standard Main Source HDMI 1 Resolution 3440x1440. DDC/CI: Allows the monitor settings to be used to bring up the OSD. 2. Note: DDC/CI, short for current input. 3. Product the System setting Picture Color ...
...the sliding scales. 4. Using the / keys, select Information from the OSD. The basic information of LCD monitor will show up for Display Data Channel/Command Interface, which allows monitor controls to be used to bring up the OSD. 2. The Information menu can be sent via software. Standard.... 5. The Performance menu can be set through the software on the PC. Standard Main Source HDMI 1 Resolution 3440x1440. DDC/CI: Allows the monitor settings to be used to bring up the OSD. 2. Note: DDC/CI, short for current input. 3. Product the System setting Picture Color ...
User Manual
Page 28
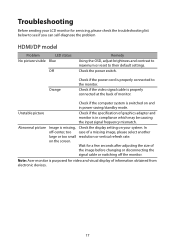
...status No picture visible Blue Off Remedy Using the OSD, adjust brightness and contrast to maximum or reset to the monitor. In off the monitor. Note: Acer monitor is properly connected to their default settings. Check if the video signal cable is in power saving/standby mode. ...Unstable picture Check if the specification of graphics adapter and monitor is properly connected at the back of a missing image, please select...
...status No picture visible Blue Off Remedy Using the OSD, adjust brightness and contrast to maximum or reset to the monitor. In off the monitor. Note: Acer monitor is properly connected to their default settings. Check if the video signal cable is in power saving/standby mode. ...Unstable picture Check if the specification of graphics adapter and monitor is properly connected at the back of a missing image, please select...


