
User Manual
Page 3
... switch for hours. It may remain after switching the image, when the same image is recovered slowly by changing the image or turning off the power switch and then turn it on again to the nature of the LCD screen, an afterimage of the previous screen may include blemishes of the fluorescent...
... switch for hours. It may remain after switching the image, when the same image is recovered slowly by changing the image or turning off the power switch and then turn it on again to the nature of the LCD screen, an afterimage of the previous screen may include blemishes of the fluorescent...
User Manual
Page 4
... fire or electric shock. If you . The openings should be operated from the type of time listening to music at high volume. • Avoid turning up the volume to the equipment operator as possible. Never spill liquid of any kind onto or into is only used for this monitor, do...cause unexpected short current or damage internal devices. • The adapter is easily accessible and located as close to block out noisy surroundings. • Turn the volume down if you can hear it clearly and comfortably and without distortion. • After setting the volume level, do not place the ...
... fire or electric shock. If you . The openings should be operated from the type of time listening to music at high volume. • Avoid turning up the volume to the equipment operator as possible. Never spill liquid of any kind onto or into is only used for this monitor, do...cause unexpected short current or damage internal devices. • The adapter is easily accessible and located as close to block out noisy surroundings. • Turn the volume down if you can hear it clearly and comfortably and without distortion. • After setting the volume level, do not place the ...
User Manual
Page 6
...bodily injury or even death. To minimize pollution and ensure utmost protection of our other controls may contain small parts. IT Equipment Recycling Information Acer is strongly committed to environmental protection and views recycling, in minimizing the burden placed on boats, chemical transfer or storage facilities, vehicles using ...not always, marked. Potentially explosive environments Switch off your vehicle engine. Potentially explosive atmospheres include areas where you would normally be advised to turn off the device near depots, storage and distribution areas;
...bodily injury or even death. To minimize pollution and ensure utmost protection of our other controls may contain small parts. IT Equipment Recycling Information Acer is strongly committed to environmental protection and views recycling, in minimizing the burden placed on boats, chemical transfer or storage facilities, vehicles using ...not always, marked. Potentially explosive environments Switch off your vehicle engine. Potentially explosive atmospheres include areas where you would normally be advised to turn off the device near depots, storage and distribution areas;
User Manual
Page 19
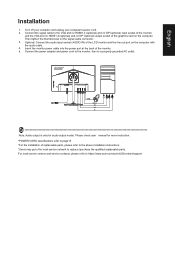
... more instruction. *POWER CORD specifications refer to page15 *For the installation of the graphics card on the computer. Connect the signal cable to https://www.acer.com/ac/en/US/content/support Please check user manual for audio output model. For local service centers and service contacts, please refer to the...-out port on the signal cable connector. 3. Connect the power adapter and power cord to the monitor, then to replace /purchase the qualified replaceable parts. Turn off your computer and unplug your computer's power cord. 2. English Installation 1.
... more instruction. *POWER CORD specifications refer to page15 *For the installation of the graphics card on the computer. Connect the signal cable to https://www.acer.com/ac/en/US/content/support Please check user manual for audio output model. For local service centers and service contacts, please refer to the...-out port on the signal cable connector. 3. Connect the power adapter and power cord to the monitor, then to replace /purchase the qualified replaceable parts. Turn off your computer and unplug your computer's power cord. 2. English Installation 1.
User Manual
Page 20
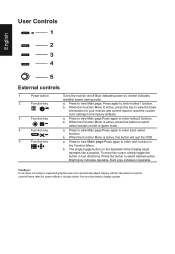
User Controls 1 English 2 3 4 5 External controls 1 Power button 2 Function key / 3 Function key / 4 Function key /X 5 Function key / Turns the monitor on/off.Blue indicates power on the backside of the Display bezel operates like a joystick. b. b. FreeSync: It can allow a FreeSync supported graphics source ...
User Controls 1 English 2 3 4 5 External controls 1 Power button 2 Function key / 3 Function key / 4 Function key /X 5 Function key / Turns the monitor on/off.Blue indicates power on the backside of the Display bezel operates like a joystick. b. b. FreeSync: It can allow a FreeSync supported graphics source ...

User Manual
Page 23
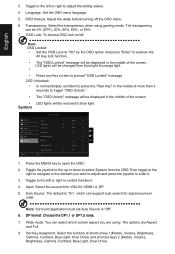
...System Modes sRGB Mode Grayscale Mode 6-axis Hue 6-axis Saturate Off Off X Move Enter Position,Focus and Clock. 5. Super Sharpness: Turn the Super Sharpness On or Off. Black Boost: Adjust the black level from 0 to 10. Position,V. Brightness: Adjust the brightness from 0 ...right to achieve the best protection, please select a lower value, of TÜV Rheinland's "Low Blue Light Content" standard. 9. ACM: Turn ACM on the current screen to adjust the Brightness, Contrast, Black Boost, Blue Light, ACM,Super Sharpness,Auto Config,H. Enhances shadows by T&#...
...System Modes sRGB Mode Grayscale Mode 6-axis Hue 6-axis Saturate Off Off X Move Enter Position,Focus and Clock. 5. Super Sharpness: Turn the Super Sharpness On or Off. Black Boost: Adjust the black level from 0 to 10. Position,V. Brightness: Adjust the brightness from 0 ...right to achieve the best protection, please select a lower value, of TÜV Rheinland's "Low Blue Light Content" standard. 9. ACM: Turn ACM on the current screen to adjust the Brightness, Contrast, Black Boost, Blue Light, ACM,Super Sharpness,Auto Config,H. Enhances shadows by T&#...
User Manual
Page 24
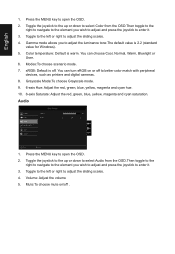
... the OSD.Then toggle to the right to navigate to the element you to adjust the sliding scales. 4. Color temperature: Default is off. You can turn sRGB on /off to adjust the sliding scales. 4. Audio Picture Color Audio Performance OSD System Mode - Stardard Volume Mute 70 Off X Move Enter 1. Toggle to...
... the OSD.Then toggle to the right to navigate to the element you to adjust the sliding scales. 4. Color temperature: Default is off. You can turn sRGB on /off to adjust the sliding scales. 4. Audio Picture Color Audio Performance OSD System Mode - Stardard Volume Mute 70 Off X Move Enter 1. Toggle to...
User Manual
Page 25
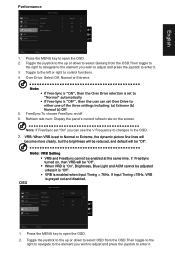
Over Drive: Select Off, Normal or Extreme. 5. Toggle to the left or right to open the OSD. 2. If FreeSync turned on the screen. If Input Timing Standard Picture Color Audio Performance OSD System Over Drive F reeSync V RB Refresh Rate Num Normal Off Off Off X Move ...
Over Drive: Select Off, Normal or Extreme. 5. Toggle to the left or right to open the OSD. 2. If FreeSync turned on the screen. If Input Timing Standard Picture Color Audio Performance OSD System Over Drive F reeSync V RB Refresh Rate Num Normal Off Off Off X Move ...
User Manual
Page 26
... keys 2 (Modes, Volume, Brightness, Gamma, Contrast, Blue Light, Over Drive). LED lights will be restored to open the OSD. 2. OSD timeout: Adjust the delay before turning off . Press the MENU key to blue light. Auto Source: The default is "Off". 6. English 3. Transparency: Select the transparency when using . OSD Lock: To choose...
... keys 2 (Modes, Volume, Brightness, Gamma, Contrast, Blue Light, Over Drive). LED lights will be restored to open the OSD. 2. OSD timeout: Adjust the delay before turning off . Press the MENU key to blue light. Auto Source: The default is "Off". 6. English 3. Transparency: Select the transparency when using . OSD Lock: To choose...
User Manual
Page 27
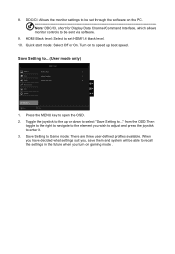
Turn on the PC Note: DDC/CI, short for Display Data Channel/Command Interface, which allows monitor controls to ..." Save Setting to ... HDMI Black level: Select ... be set HDMI1.4 black level. 10. DDC/CI: Allows the monitor settings to the up boot speed. When you have decided what settings suit you turn on gaming mode . 8. Toggle the joystick to be able to open the OSD. 2.
Turn on the PC Note: DDC/CI, short for Display Data Channel/Command Interface, which allows monitor controls to ..." Save Setting to ... HDMI Black level: Select ... be set HDMI1.4 black level. 10. DDC/CI: Allows the monitor settings to the up boot speed. When you have decided what settings suit you turn on gaming mode . 8. Toggle the joystick to be able to open the OSD. 2.


