
User Manual
Page 2
... unit should include the serial number, model number and purchase information. Record the model number, serial number, purchase date and place of purchase information in any form or by photocopy, recording or otherwise, without obligation to the contents hereof and specifically disclaims the implied warranties of such revisions or changes. Acer Incorporated. Acer LCD Monitor User's Guide Model number Serial number Date of purchase Place of Acer Incorporated. Acer LCD Monitor User's Guide Original Issue: 07...
... unit should include the serial number, model number and purchase information. Record the model number, serial number, purchase date and place of purchase information in any form or by photocopy, recording or otherwise, without obligation to the contents hereof and specifically disclaims the implied warranties of such revisions or changes. Acer Incorporated. Acer LCD Monitor User's Guide Model number Serial number Date of purchase Place of Acer Incorporated. Acer LCD Monitor User's Guide Original Issue: 07...
User Manual
Page 3
... comfort Safety instructions Read these guidelines when cleaning the monitor: • Always unplug the monitor before cleaning. • Use a soft cloth to the nature of the fluorescent light, the screen may remain after switching the image, when the same image is displayed for hours. Keep this case, the screen is attached to its base before connecting the power cord to the AC power outlet. • Make sure both the LCD monitor and...
... comfort Safety instructions Read these guidelines when cleaning the monitor: • Always unplug the monitor before cleaning. • Use a soft cloth to the nature of the fluorescent light, the screen may remain after switching the image, when the same image is displayed for hours. Keep this case, the screen is attached to its base before connecting the power cord to the AC power outlet. • Make sure both the LCD monitor and...

User Manual
Page 4
...Turn the volume down if you can hear it after your hearing, follow these instructions. • Gradually increase the volume until you need to disconnect power from overheating. Using electrical power • This product should be operated from the type of the product and to protect it could result in installation... openings should never be placed near water. • Do not place this product, make sure that could be sure to the equipment operator as they may touch dangerous voltage points or short-out parts that the total This product should never be blocked or covered....
...Turn the volume down if you can hear it after your hearing, follow these instructions. • Gradually increase the volume until you need to disconnect power from overheating. Using electrical power • This product should be operated from the type of the product and to protect it could result in installation... openings should never be placed near water. • Do not place this product, make sure that could be sure to the equipment operator as they may touch dangerous voltage points or short-out parts that the total This product should never be blocked or covered....
User Manual
Page 5
... a safety feature. If power strips are used, the load should not exceed 80% of this product from unexpected noise produced by plugging in performance, indicating a need for details. Also, make sure that the total rating of the branch circuit rating. Make sure the power outlet is equipped with the supplied power supply cord set , make sure that the new power cord meets the following the operating instructions Warning!
... a safety feature. If power strips are used, the load should not exceed 80% of this product from unexpected noise produced by plugging in performance, indicating a need for details. Also, make sure that the total rating of the branch circuit rating. Make sure the power outlet is equipped with the supplied power supply cord set , make sure that the new power cord meets the following the operating instructions Warning!

User Manual
Page 6
...advised to turn off the device near gas pumps at Acer are very conscious of the environmental effects of our business and strive to identify and provide the best working procedures to reduce the environmental impact of our other controls may contain small parts. or where...using liquefied petroleum gas (such as propane or butane), and areas where the air contains chemicals or particles such as one of other products. Potentially explosive environments Switch off your vehicle engine. chemical plants; Areas with a potentially explosive atmosphere and obey all signs and instructions...
...advised to turn off the device near gas pumps at Acer are very conscious of the environmental effects of our business and strive to identify and provide the best working procedures to reduce the environmental impact of our other controls may contain small parts. or where...using liquefied petroleum gas (such as propane or butane), and areas where the air contains chemicals or particles such as one of other products. Potentially explosive environments Switch off your vehicle engine. chemical plants; Areas with a potentially explosive atmosphere and obey all signs and instructions...

User Manual
Page 7
... LCD unit is too strong. For more information on the recorded image and does not constitute a malfunction. are sensitive to magnetic fields and may occasionally misfire or appear as hard drives, USB devices, tablet computers, laptops, cellphones, watches, earphones, speakers, credit cards, magnetic ID cards, etc. Warning Message for Magnet Certain electronic devices such as black or red...
... LCD unit is too strong. For more information on the recorded image and does not constitute a malfunction. are sensitive to magnetic fields and may occasionally misfire or appear as hard drives, USB devices, tablet computers, laptops, cellphones, watches, earphones, speakers, credit cards, magnetic ID cards, etc. Warning Message for Magnet Certain electronic devices such as black or red...
User Manual
Page 8
... from Sleep mode by adjusting the viewing angle of the monitor, using a footrest, or raising your sitting height to achieve maximum comfort. viii This product has been shipped enabled for power management: • Activate display's Sleep mode within 15 minutes of user inactivity. • Activate computer's Sleep mode within 30 minutes of user inactivity. • Wake the computer from staying too long in one fixed posture...
... from Sleep mode by adjusting the viewing angle of the monitor, using a footrest, or raising your sitting height to achieve maximum comfort. viii This product has been shipped enabled for power management: • Activate display's Sleep mode within 15 minutes of user inactivity. • Activate computer's Sleep mode within 30 minutes of user inactivity. • Wake the computer from staying too long in one fixed posture...
User Manual
Page 9
... the window or any light source • minimizing room light by using drapes, shades or blinds • using a task light • changing the display's viewing angle • using a glare-reduction filter • using a display visor, such as a piece of cardboard extended from the display's top front edge • Avoid adjusting your eyes regular breaks by looking at the middle of the display. • Adjust the display brightness and/or contrast...
... the window or any light source • minimizing room light by using drapes, shades or blinds • using a task light • changing the display's viewing angle • using a glare-reduction filter • using a display visor, such as a piece of cardboard extended from the display's top front edge • Avoid adjusting your eyes regular breaks by looking at the middle of the display. • Adjust the display brightness and/or contrast...
User Manual
Page 12
... Safe listening Warnings Using electrical power Product servicing Additional safety information IT equipment recycling information Disposal instructions LCD pixel statement Tips and information for comfortable use Federal Communications Commission Declaration of Conformity Unpacking Attaching/removing the base Screen position adjustment Connecting the power cord Power saving Display Data Channel (DDC) Connector pin assignment Standard timing table Installation User controls How to adjust a setting Acer eColor Management User Troubleshooting HDMI mode DVI mode DP/Mini-DP mode 1 iii iii iii...
... Safe listening Warnings Using electrical power Product servicing Additional safety information IT equipment recycling information Disposal instructions LCD pixel statement Tips and information for comfortable use Federal Communications Commission Declaration of Conformity Unpacking Attaching/removing the base Screen position adjustment Connecting the power cord Power saving Display Data Channel (DDC) Connector pin assignment Standard timing table Installation User controls How to adjust a setting Acer eColor Management User Troubleshooting HDMI mode DVI mode DP/Mini-DP mode 1 iii iii iii...

User Manual
Page 13
LCD monitor Quick start guide DP cable (Option) LCD monitor HDMI Cable (Optional) DVI cable (Option) AC power cord Audio Cable (Option) USB cable (Option) MHL cable (Optional) MHL MiniDP-DP cable (optional) English 1 Unpacking Please check that the following items are present when you unpack the box, and save the packing materials in case you need to ship or transport the monitor in the future.
LCD monitor Quick start guide DP cable (Option) LCD monitor HDMI Cable (Optional) DVI cable (Option) AC power cord Audio Cable (Option) USB cable (Option) MHL cable (Optional) MHL MiniDP-DP cable (optional) English 1 Unpacking Please check that the following items are present when you unpack the box, and save the packing materials in case you need to ship or transport the monitor in the future.
User Manual
Page 14
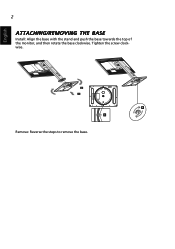
English 2 ATTACHING/REMOVING THE BASE Install: Align the base with the stand and push the base towards the top of the monitor, and then rotate the base clockwise. Remove: Reverse the steps to remove the base. Tighten the screw clockwise.
English 2 ATTACHING/REMOVING THE BASE Install: Align the base with the stand and push the base towards the top of the monitor, and then rotate the base clockwise. Remove: Reverse the steps to remove the base. Tighten the screw clockwise.

User Manual
Page 15
English 3 SCREEN POSITION ADJUSTMENT In oder to optimize the best viewing position, you can adjust the height/tilt/ swivel/pivot of the monitor. • Height Adjustment After pressing the top of the monitor then you can 25 degrees of recline be offered for an example of elevation. 5o 25o Only at the highest point can adjust the height of the monitor. 1 2 150mm • Tilt Please see the illustration below for the angle of the tilt range.
English 3 SCREEN POSITION ADJUSTMENT In oder to optimize the best viewing position, you can adjust the height/tilt/ swivel/pivot of the monitor. • Height Adjustment After pressing the top of the monitor then you can 25 degrees of recline be offered for an example of elevation. 5o 25o Only at the highest point can adjust the height of the monitor. 1 2 150mm • Tilt Please see the illustration below for the angle of the tilt range.

User Manual
Page 17
... which the equipment will be installed. The DDC is activated. The monitor supports the DDC2B standard. The recovery time from the display controller, as your area. • The monitor has a universal power supply that the power cord you use is required. • Plug one end of H05VV-F cord and plug rated 10 A/250 V. Power saving The monitor will be switched to "power saving" mode by the control signal from "power saving" mode back to "on" is able...
... which the equipment will be installed. The DDC is activated. The monitor supports the DDC2B standard. The recovery time from the display controller, as your area. • The monitor has a universal power supply that the power cord you use is required. • Plug one end of H05VV-F cord and plug rated 10 A/250 V. Power saving The monitor will be switched to "power saving" mode by the control signal from "power saving" mode back to "on" is able...
User Manual
Page 18
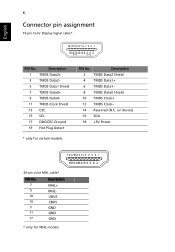
on device) 16 SDA 18 +5V Power Description 1 TMDS Data2+ 3 TMDS Data2- 5 TMDS Data1 Shield 7 TMDS Data0+ 9 TMDS Data0- 11 TMDS Clock Shield 13 CEC 15 SCL 17 DDC/CEC Ground 19 Hot Plug Detect * only for certain models PIN No. Description 2 TMDS Data2 Shield 4 TMDS Data1+ 6 TMDS Data1- 8 TMDS Data0 Shield 10 TMDS Clock+ 12 TMDS Clock- 14 Reserved (N.C. English 6 Connector pin assignment 19-pin Color Display Signal cable* 1917151311 9 7 5 3 1 1816141210 8 6 4 2 PIN No.
on device) 16 SDA 18 +5V Power Description 1 TMDS Data2+ 3 TMDS Data2- 5 TMDS Data1 Shield 7 TMDS Data0+ 9 TMDS Data0- 11 TMDS Clock Shield 13 CEC 15 SCL 17 DDC/CEC Ground 19 Hot Plug Detect * only for certain models PIN No. Description 2 TMDS Data2 Shield 4 TMDS Data1+ 6 TMDS Data1- 8 TMDS Data0 Shield 10 TMDS Clock+ 12 TMDS Clock- 14 Reserved (N.C. English 6 Connector pin assignment 19-pin Color Display Signal cable* 1917151311 9 7 5 3 1 1816141210 8 6 4 2 PIN No.
User Manual
Page 22
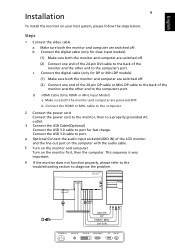
... digital cable (only for dual-input models). (1) Make sure both the monitor and computer are switched off . Connect the HDMI or MHL cable to the computer. 2 Connect the power cord Connect the power cord to the monitor, then to a properly grounded AC outlet. 3 Connect the USB Cable(Optional) Connect the USB 3.0 cable to diagnose the problem. Make sure both the monitor and computer are powered-OFF. POWER AUDIO IN DVI-D IN HDMI (MHL) DP MIni DP Mini DP DP HDMI / MHL DVI-D IN POWER AUDIO...
... digital cable (only for dual-input models). (1) Make sure both the monitor and computer are switched off . Connect the HDMI or MHL cable to the computer. 2 Connect the power cord Connect the power cord to the monitor, then to a properly grounded AC outlet. 3 Connect the USB Cable(Optional) Connect the USB 3.0 cable to diagnose the problem. Make sure both the monitor and computer are powered-OFF. POWER AUDIO IN DVI-D IN HDMI (MHL) DP MIni DP Mini DP DP HDMI / MHL DVI-D IN POWER AUDIO...
User Manual
Page 23
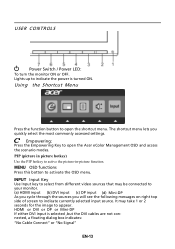
... top side of screen to indicate the power is selected ,but the DVI cables are not connected, a floating dialog box indicates: "No Cable Connect" or "No Signal" EN-13 PIP (picture in -picture function. Lights up to indicate currently selected input source. Empowering: Press the Empowering Key to active the picture-in picture hotkey) Use the PIP hotkey to open the shortcut menu. USER CONTROLS Power Switch / Power LED: To turn the monitor ON or OFF...
... top side of screen to indicate the power is selected ,but the DVI cables are not connected, a floating dialog box indicates: "No Cable Connect" or "No Signal" EN-13 PIP (picture in -picture function. Lights up to indicate currently selected input source. Empowering: Press the Empowering Key to active the picture-in picture hotkey) Use the PIP hotkey to open the shortcut menu. USER CONTROLS Power Switch / Power LED: To turn the monitor ON or OFF...
User Manual
Page 24
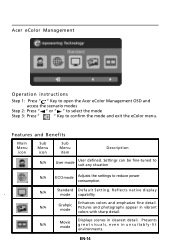
... Menu icon Sub Menu item Description N/A User mode User defined. Pictures and photographs appear in unsuitably-lit environments. N/A Movie mode Displays scenes in clearest detail. N/A Standard D efau lt Settin g . Settings can be fine-tuned to suit any situation N/A ECO mode Adjusts the settings to confirm the mode and exit the eColor menu. EN-14 Acer eColor Management Operation instructions Step 1: Press " " Key to open the Acer eColor Management OSD...
... Menu icon Sub Menu item Description N/A User mode User defined. Pictures and photographs appear in unsuitably-lit environments. N/A Movie mode Displays scenes in clearest detail. N/A Standard D efau lt Settin g . Settings can be fine-tuned to suit any situation N/A ECO mode Adjusts the settings to confirm the mode and exit the eColor menu. EN-14 Acer eColor Management Operation instructions Step 1: Press " " Key to open the Acer eColor Management OSD...
User Manual
Page 25
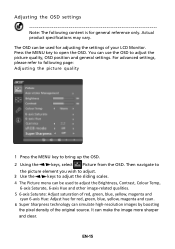
It can use the OSD to adjust the picture quality, OSD position and general settings. The OSD can be used for red, green, blue, yellow, magenta and cyan. 6 Super Sharpness technology can be used to adjust the sliding scales. 4 The Picture menu can simulate high-resolution images by boosting the pixel density of your LCD Monitor. Then navigate to the picture element you wish to adjust. 3 Use the / keys to adjust the Brightness, Contrast, Colour Temp, 6‐axis...
It can use the OSD to adjust the picture quality, OSD position and general settings. The OSD can be used for red, green, blue, yellow, magenta and cyan. 6 Super Sharpness technology can be used to adjust the sliding scales. 4 The Picture menu can simulate high-resolution images by boosting the pixel density of your LCD Monitor. Then navigate to the picture element you wish to adjust. 3 Use the / keys to adjust the Brightness, Contrast, Colour Temp, 6‐axis...
User Manual
Page 28
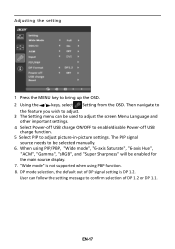
... Sharpness" will be selected manually. 6. Then navigate to the feature you wish to adjust. 3 The Setting menu can follow the setting message to adjust picture‐in‐picture settings. DP mode selection, the default out of DP 1.2 or DP 1.1. Adjusting the setting 1 Press the MENU key to be enabled for the main source display. 7. The PIP signal source needs to bring up the OSD. 2 Using the / keys, select Setting from the...
... Sharpness" will be selected manually. 6. Then navigate to the feature you wish to adjust. 3 The Setting menu can follow the setting message to adjust picture‐in‐picture settings. DP mode selection, the default out of DP 1.2 or DP 1.1. Adjusting the setting 1 Press the MENU key to be enabled for the main source display. 7. The PIP signal source needs to bring up the OSD. 2 Using the / keys, select Setting from the...
User Manual
Page 30
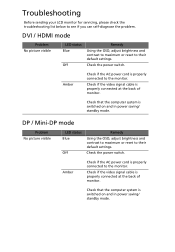
... monitor. Check if the video signal cable is properly connected at the back of monitor. Check that the computer system is switched on and in power saving/ standby mode. Check that the computer system is switched on and in power saving/ standby mode. Amber Check if the AC power cord is properly connected to the monitor. DVI / HDMI mode Problem No picture visible LED status Blue Off Remedy Using the OSD, adjust brightness and contrast to maximum or reset to the monitor. Check the power switch. Check the power switch. Problem No picture visible LED...
... monitor. Check if the video signal cable is properly connected at the back of monitor. Check that the computer system is switched on and in power saving/ standby mode. Check that the computer system is switched on and in power saving/ standby mode. Amber Check if the AC power cord is properly connected to the monitor. DVI / HDMI mode Problem No picture visible LED status Blue Off Remedy Using the OSD, adjust brightness and contrast to maximum or reset to the monitor. Check the power switch. Check the power switch. Problem No picture visible LED...


