User Manual
Page 1
TABLE OF CONTENTS Special notes on LCD monitors 1 Information for your safety and comfort 2 Unpacking 5 Attaching/Removing the base 6 Screen position adjustment 7 Connecting the power cord 9 Safety precaution 9 Cleaning your monitor 9 Power saving 1 0 DDC 1 0 Connector Pin Assignment 1 1 Standard Timing Table 13 Installation 14 User controls 15 How to adjust a setting 16 Troubleshooting 20
TABLE OF CONTENTS Special notes on LCD monitors 1 Information for your safety and comfort 2 Unpacking 5 Attaching/Removing the base 6 Screen position adjustment 7 Connecting the power cord 9 Safety precaution 9 Cleaning your monitor 9 Power saving 1 0 DDC 1 0 Connector Pin Assignment 1 1 Standard Timing Table 13 Installation 14 User controls 15 How to adjust a setting 16 Troubleshooting 20
User Manual
Page 2
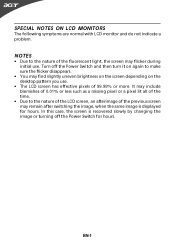
... find slightly uneven brightness on the screen depending on the desktop pattern you use . Turn off the Power Switch for hours. SPECIAL NOTES ON LCD MONITORS The following symptoms are normal with LCD...
... find slightly uneven brightness on the screen depending on the desktop pattern you use . Turn off the Power Switch for hours. SPECIAL NOTES ON LCD MONITORS The following symptoms are normal with LCD...
User Manual
Page 4
... tensing your muscles or shrugging your company's health and safety department. Long work periods, bad posture, poor work by adjusting the viewing angle of the monitor, using a footrest, or raising your comfort zone by a qualified technician to restore the product to normal condition. The following section provides tips for more comfortable...
... tensing your muscles or shrugging your company's health and safety department. Long work periods, bad posture, poor work by adjusting the viewing angle of the monitor, using a footrest, or raising your comfort zone by a qualified technician to restore the product to normal condition. The following section provides tips for more comfortable...
User Manual
Page 5
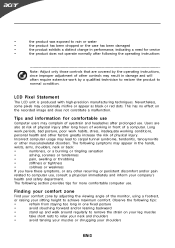
....com/public/Sustainability/sustainability01.htm http://www.acer-group.com/public/Sustainability/sustainability04.htm EN-4 • install the external display, keyboard and mouse properly and within comfort able reach • if you view your monitor more information and help in such a way that the side faces the... window or any light source • minimizing room light by looking away from the monitor and focusing on a distant point. • Blink frequently to keep your eyes from the display's top front edge • Avoid adjusting ...
....com/public/Sustainability/sustainability01.htm http://www.acer-group.com/public/Sustainability/sustainability04.htm EN-4 • install the external display, keyboard and mouse properly and within comfort able reach • if you view your monitor more information and help in such a way that the side faces the... window or any light source • minimizing room light by looking away from the monitor and focusing on a distant point. • Blink frequently to keep your eyes from the display's top front edge • Avoid adjusting ...
User Manual
Page 6
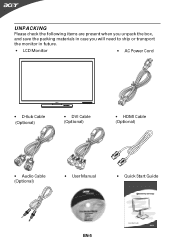
UNPACKING Please check the following items are present when you unpack the box, and save the packing materials in case you will need to ship or transport the monitor in future. • LCD Monitor • AC Power Cord • D-Sub Cable (Optional) • DVI Cable (Optional) • HDMI Cable (Optional) • Audio Cable (Optional) • User Manual • Quick Start Guide EN-5
UNPACKING Please check the following items are present when you unpack the box, and save the packing materials in case you will need to ship or transport the monitor in future. • LCD Monitor • AC Power Cord • D-Sub Cable (Optional) • DVI Cable (Optional) • HDMI Cable (Optional) • Audio Cable (Optional) • User Manual • Quick Start Guide EN-5

User Manual
Page 7
EN-6 Tighten the screw clockwise. ATTACHING/REMOVING THE BASE Install: Align the base with the stand and push the base towards the top of the monitor, and then rotate the base clockwise until it stops. Remove: Reverse the steps to remove the base.
EN-6 Tighten the screw clockwise. ATTACHING/REMOVING THE BASE Install: Align the base with the stand and push the base towards the top of the monitor, and then rotate the base clockwise until it stops. Remove: Reverse the steps to remove the base.
User Manual
Page 8
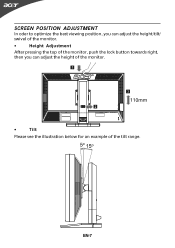
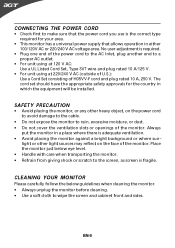
EN-7 SCREEN POSITION ADJUSTMENT In oder to optimize the best viewing position, you can adjust the height/tilt/ swivel of the monitor. • Height Adjustment After pressing the top of the monitor, push the lock button towards right, then you can adjust the height of the monitor. 110mm • Tilt Please see the illustration below for an example of the tilt range.
EN-7 SCREEN POSITION ADJUSTMENT In oder to optimize the best viewing position, you can adjust the height/tilt/ swivel of the monitor. • Height Adjustment After pressing the top of the monitor, push the lock button towards right, then you can adjust the height of the monitor. 110mm • Tilt Please see the illustration below for an example of the tilt range.

User Manual
Page 9
• Swivel With the built-in pedestal, you can swivel the monitor for the most comfortable viewing angle. EN-8
• Swivel With the built-in pedestal, you can swivel the monitor for the most comfortable viewing angle. EN-8
User Manual
Page 10
... • Check first to make sure that allows operation in either 100/120V AC or 220/240 V AC voltage area. EN-9 Always put the monitor in a place where there is required. • Plug one end of the power cord to the AC Inlet, plug another end to rain, excessive... moisture, or dust. • Do not cover the ventilation slots or openings of the monitor. Place the monitor just below guidelines when cleaning the monitor. • Always unplug the monitor before cleaning. • Use a soft cloth to wipe the screen and cabinet front and sides. The cord set...
... • Check first to make sure that allows operation in either 100/120V AC or 220/240 V AC voltage area. EN-9 Always put the monitor in a place where there is required. • Plug one end of the power cord to the AC Inlet, plug another end to rain, excessive... moisture, or dust. • Do not cover the ventilation slots or openings of the monitor. Place the monitor just below guidelines when cleaning the monitor. • Always unplug the monitor before cleaning. • Use a soft cloth to wipe the screen and cabinet front and sides. The cord set...

User Manual
Page 11
... your system if your system also supports DDC protocol. EN-10 The DDC (Display Data Channel) is activated. The monitor supports DDC2B standard. Power saving The monitor will be driven into Power Saving" mode by the amber-color power LED. State ON Power Saving Mode LED Light ... will be kept until a control signal has been detected or the keyboard or mouse is a communication protocol through which the monitor automatically informs the host system about its capabilities, for example, supported resolutions and corresponding timing. DDC To make your installation easier, the...
... your system if your system also supports DDC protocol. EN-10 The DDC (Display Data Channel) is activated. The monitor supports DDC2B standard. Power saving The monitor will be driven into Power Saving" mode by the amber-color power LED. State ON Power Saving Mode LED Light ... will be kept until a control signal has been detected or the keyboard or mouse is a communication protocol through which the monitor automatically informs the host system about its capabilities, for example, supported resolutions and corresponding timing. DDC To make your installation easier, the...

User Manual
Page 12
DESCRIPTION +5V Logic Ground Monitor Ground DDC-Serial Data H-Sync V-Sync DDC-Serial Clock EN-11 CONNECTOR PIN ASSIGNMENT 15-Pin Color Display Signal Cable PIN NO. 1. 2. 3. 4. 5. 6. 7. 8. DESCRIPTION Red Green Blue Monitor Ground DDC-return R-Ground G-Ground B-Ground PIN NO. 9. 10. 11. 12. 13. 14. 15.
DESCRIPTION +5V Logic Ground Monitor Ground DDC-Serial Data H-Sync V-Sync DDC-Serial Clock EN-11 CONNECTOR PIN ASSIGNMENT 15-Pin Color Display Signal Cable PIN NO. 1. 2. 3. 4. 5. 6. 7. 8. DESCRIPTION Red Green Blue Monitor Ground DDC-return R-Ground G-Ground B-Ground PIN NO. 9. 10. 11. 12. 13. 14. 15.
User Manual
Page 15
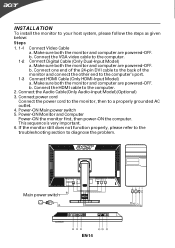
...Connect the HDMI cable to a properly grounded AC outlet. 4. Connect power cord Connect the power cord to the monitor, then to the computer. 2. Power-ON Monitor and Computer Power-ON the monitor first, then power-ON the computer. Main power switch EN-14 b. b. Connect the Audio Cable(Only Audio-Input... Model)(Optional) 3. This sequence is very important. 6. Power-ON Main power switch 5. Make sure both the monitor and computer are powered-OFF. Make sure both the monitor and computer are powered-OFF. b. Connect one end of the 24-pin DVI cable to the back of the...
...Connect the HDMI cable to a properly grounded AC outlet. 4. Connect power cord Connect the power cord to the monitor, then to the computer. 2. Power-ON Monitor and Computer Power-ON the monitor first, then power-ON the computer. Main power switch EN-14 b. b. Connect the Audio Cable(Only Audio-Input... Model)(Optional) 3. This sequence is very important. 6. Power-ON Main power switch 5. Make sure both the monitor and computer are powered-OFF. Make sure both the monitor and computer are powered-OFF. b. Connect one end of the 24-pin DVI cable to the back of the...
User Manual
Page 21
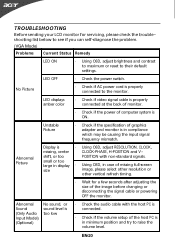
... small or too large in display · Using OSD, in minimum position and try to their default settings. TROUBLESHOOTING Before sending your LCD monitor for a few seconds after adjusting the size of the image before changing or disconnecting the signal cable or powering OFF the... OFF · Check the power switch. LED displays amber color · Check if video signal cable is properly connected at the back of monitor. · Check if the power of computer system is · Using OSD, adjust RESOLUTION, CLOCK, missing, center CLOCK-PHASE, H-POSITION and V- Abnormal Sound (...
... small or too large in display · Using OSD, in minimum position and try to their default settings. TROUBLESHOOTING Before sending your LCD monitor for a few seconds after adjusting the size of the image before changing or disconnecting the signal cable or powering OFF the... OFF · Check the power switch. LED displays amber color · Check if video signal cable is properly connected at the back of monitor. · Check if the power of computer system is · Using OSD, adjust RESOLUTION, CLOCK, missing, center CLOCK-PHASE, H-POSITION and V- Abnormal Sound (...
User Manual
Page 22
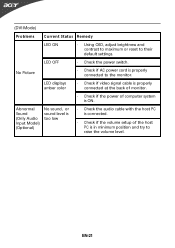
... is ON. EN-21 (DVI Mode) Problems Current Status Remedy LED ON · Using OSD, adjust brightness and contrast to maximum or reset to the monitor. LED OFF · Check the power switch. LED displays amber color · Check if video signal cable is properly connected at the back of...
... is ON. EN-21 (DVI Mode) Problems Current Status Remedy LED ON · Using OSD, adjust brightness and contrast to maximum or reset to the monitor. LED OFF · Check the power switch. LED displays amber color · Check if video signal cable is properly connected at the back of...
User Manual
Page 23
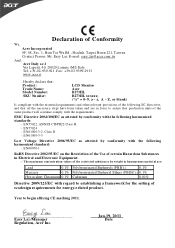
... the restricted substa nces by w eight in homogenous materi al are in Electrical and E lectronic Equipment: -. Easy Lai /Manager Regulation, Acer Inc. E N60950-1 RoHS Directive 2002/95/EC on the Restri ction of the Use of certain Hazardous Sub stances in force to assure...s.r.l Via Lepetit, 40, 20020 Lainate (MI) Italy Tel: +39-02-939-921 ,Fax: +39-02 9399-2913 www.acer.i t Hereby declare that: P roduct : T rade Name: M odel Number: SKU Nu mb er: LCD Monitor Acer B273HL B273HL xxxxxx; ("x" = 0~9, a ~ z, A ~ Z , or blank) Is compliant with the essential requirements and other relevant ...
... the restricted substa nces by w eight in homogenous materi al are in Electrical and E lectronic Equipment: -. Easy Lai /Manager Regulation, Acer Inc. E N60950-1 RoHS Directive 2002/95/EC on the Restri ction of the Use of certain Hazardous Sub stances in force to assure...s.r.l Via Lepetit, 40, 20020 Lainate (MI) Italy Tel: +39-02-939-921 ,Fax: +39-02 9399-2913 www.acer.i t Hereby declare that: P roduct : T rade Name: M odel Number: SKU Nu mb er: LCD Monitor Acer B273HL B273HL xxxxxx; ("x" = 0~9, a ~ z, A ~ Z , or blank) Is compliant with the essential requirements and other relevant ...
User Manual
Page 24
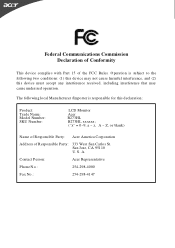
... following two conditions: (1) this device may not cause harmful interference, and (2) this declaration: P roduct: Trade N ame: Model Number: SKU Number: LCD Monitor Acer B273HL B273HL xxxxxx; ("x" = 0~9, a ~ z, A ~ Z, or blank) Na me of Responsible Party: Acer America Corporation Address of the FCC Rules. S. O peration is subject to the following local Manufacturer /Importer is responsible for this device...
... following two conditions: (1) this device may not cause harmful interference, and (2) this declaration: P roduct: Trade N ame: Model Number: SKU Number: LCD Monitor Acer B273HL B273HL xxxxxx; ("x" = 0~9, a ~ z, A ~ Z, or blank) Na me of Responsible Party: Acer America Corporation Address of the FCC Rules. S. O peration is subject to the following local Manufacturer /Importer is responsible for this device...


