User Manual
Page 2
... and place of purchase information in any form or by any person of Acer Incorporated. Acer LCD Monitor User's Guide Model number Serial number Date of purchase Place of purchase Acer and the Acer logo are registered trademarks of merchantability or fitness for identification purposes only and..., recording or otherwise, without obligation to their respective companies. All correspondence concerning your computer. All Rights Reserved. Acer LCD Monitor User's Guide Original Issue: 08/2008 Changes may be incorporated in this manual or supplementary documents and publications.
... and place of purchase information in any form or by any person of Acer Incorporated. Acer LCD Monitor User's Guide Model number Serial number Date of purchase Place of purchase Acer and the Acer logo are registered trademarks of merchantability or fitness for identification purposes only and..., recording or otherwise, without obligation to their respective companies. All correspondence concerning your computer. All Rights Reserved. Acer LCD Monitor User's Guide Original Issue: 08/2008 Changes may be incorporated in this manual or supplementary documents and publications.

User Manual
Page 3
... depending on the product. In this document for hours. Cleaning your safety and comfort Safety instructions Read these guidelines when cleaning the monitor: • Always unplug the monitor before cleaning. • Use a soft cloth to the nature of the LCD screen, an afterimage of the fluorescent light, the...flicker during initial use . • The LCD screen has 99.99% or more effective pixels. Turn off the power switch for your monitor Please carefully follow these instructions carefully. Follow all the time. • Due to wipe the screen and cabinet front and sides.
... depending on the product. In this document for hours. Cleaning your safety and comfort Safety instructions Read these guidelines when cleaning the monitor: • Always unplug the monitor before cleaning. • Use a soft cloth to the nature of the LCD screen, an afterimage of the fluorescent light, the...flicker during initial use . • The LCD screen has 99.99% or more effective pixels. Turn off the power switch for your monitor Please carefully follow these instructions carefully. Follow all the time. • Due to wipe the screen and cabinet front and sides.

User Manual
Page 7
...LCD pixel statement The LCD unit is committed to offer our customers products with high-precision manufacturing techniques. ENERGY STAR ® Acer's ENERGY STAR qualified products save through energy efficiency, the more information on the recorded image and does not constitute a malfunction...on the Waste from Electrical and Electronics Equipment (WEEE) regulations, visit http://global.acer.com/about/sustainability.htm Mercury advisory For projectors or electronic products containing an LCD/CRT monitor or display: lamp(s) inside this electronic device into the trash when discarding. The...
...LCD pixel statement The LCD unit is committed to offer our customers products with high-precision manufacturing techniques. ENERGY STAR ® Acer's ENERGY STAR qualified products save through energy efficiency, the more information on the recorded image and does not constitute a malfunction...on the Waste from Electrical and Electronics Equipment (WEEE) regulations, visit http://global.acer.com/about/sustainability.htm Mercury advisory For projectors or electronic products containing an LCD/CRT monitor or display: lamp(s) inside this electronic device into the trash when discarding. The...
User Manual
Page 8
...greatly increase the risk of physical injury. The following tips: • refrain from Sleep mode by adjusting the viewing angle of the monitor, using a footrest, or raising your company's health and safety department. Users are registered U.S. Long work periods, bad posture, ...poor work habits, stress, inadequate working in front of a computer. viii Acer ENERGY STAR qualified products: •Produce less heat and reduce cooling loads, and warmer climates. •Automatically go into "display sleep"...
...greatly increase the risk of physical injury. The following tips: • refrain from Sleep mode by adjusting the viewing angle of the monitor, using a footrest, or raising your company's health and safety department. Users are registered U.S. Long work periods, bad posture, ...poor work habits, stress, inadequate working in front of a computer. viii Acer ENERGY STAR qualified products: •Produce less heat and reduce cooling loads, and warmer climates. •Automatically go into "display sleep"...

User Manual
Page 9
... of cardboard extended from the display's top front edge • Avoid adjusting your display to an awkward viewing angle. • Avoid looking away from the monitor and focusing on how to reduce eyestrain. ix Taking care of your vision Long viewing hours, wearing incorrect glasses or contact lenses, glare, excessive room...
... of cardboard extended from the display's top front edge • Avoid adjusting your display to an awkward viewing angle. • Avoid looking away from the monitor and focusing on how to reduce eyestrain. ix Taking care of your vision Long viewing hours, wearing incorrect glasses or contact lenses, glare, excessive room...

User Manual
Page 11
Year to assure that production units of the same product will continue comply with the requirements. Easy Lai / Director Acer Computer (Shanghai) Limited Feb. 27, 2009 Date ix We, Acer Incorporated 8F, 88, Sec. 1, Hsin Tai Wu Rd., Hsichih, Taipei Hsien 221, Taiwan Contact Person: Mr.... Easy Lai Tel: 886-2-8691-3089 Fax: 886-2-8691-3120 E-mail: easy_lai@acer.com.tw Hereby declare that: Product: 20" LCD Monitor Trade Name: Acer or eMachines or Gateway or packard bell Model Number: B203H SKU Number: B203H xxx ("x" =0~9, a~ z, orA ~Z) or blank Is compliant with the essential requirements...
Year to assure that production units of the same product will continue comply with the requirements. Easy Lai / Director Acer Computer (Shanghai) Limited Feb. 27, 2009 Date ix We, Acer Incorporated 8F, 88, Sec. 1, Hsin Tai Wu Rd., Hsichih, Taipei Hsien 221, Taiwan Contact Person: Mr.... Easy Lai Tel: 886-2-8691-3089 Fax: 886-2-8691-3120 E-mail: easy_lai@acer.com.tw Hereby declare that: Product: 20" LCD Monitor Trade Name: Acer or eMachines or Gateway or packard bell Model Number: B203H SKU Number: B203H xxx ("x" =0~9, a~ z, orA ~Z) or blank Is compliant with the essential requirements...

User Manual
Page 12
... pedestal's ID color. San Jose, CA 95110 USA Contact person: Acer Representative Tel: 1-254-298-4000 Fax: 1-254-298-4147 Operation is subject to the following local manufacturer/importer is responsible for this declaration: Product name: 20" LCD Monitor Model number: B203H SKU number: B203Hxxxx The first x shows the front frame's ID and.... xi Federal Communications Commission Declaration of Conformity This device complies with Part 15 of responsible party: 333 West San Carlos St. Name of responsible party: Acer America Corporation Address of the FCC Rules.
... pedestal's ID color. San Jose, CA 95110 USA Contact person: Acer Representative Tel: 1-254-298-4000 Fax: 1-254-298-4147 Operation is subject to the following local manufacturer/importer is responsible for this declaration: Product name: 20" LCD Monitor Model number: B203H SKU number: B203Hxxxx The first x shows the front frame's ID and.... xi Federal Communications Commission Declaration of Conformity This device complies with Part 15 of responsible party: 333 West San Carlos St. Name of responsible party: Acer America Corporation Address of the FCC Rules.
User Manual
Page 14
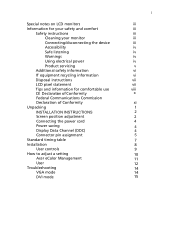
... for your safety and comfort Safety instructions Cleaning your monitor Connecting/disconnecting the device Accessibility Safe listening Warnings Using electrical power Product servicing Additional safety information IT equipment recycling information Disposal instructions ... position adjustment Connecting the power cord Power saving Display Data Channel (DDC) Connector pin assignment Standard timing table Installation User controls How to adjust a setting Acer eColor Management User Troubleshooting VGA mode DVI mode 1 iii iii iii iii iii iv iv iv iv v vi vi vii vii viii x xi 1 2 2 4 4 4 5 7 8 ...
... for your safety and comfort Safety instructions Cleaning your monitor Connecting/disconnecting the device Accessibility Safe listening Warnings Using electrical power Product servicing Additional safety information IT equipment recycling information Disposal instructions ... position adjustment Connecting the power cord Power saving Display Data Channel (DDC) Connector pin assignment Standard timing table Installation User controls How to adjust a setting Acer eColor Management User Troubleshooting VGA mode DVI mode 1 iii iii iii iii iii iv iv iv iv v vi vi vii vii viii x xi 1 2 2 4 4 4 5 7 8 ...

User Manual
Page 16
LCD monitor User's guide Quick start guide D-sub cable DVI cable (only dualinput models) AC power cord Audio Cable (Option) English 1 Unpacking Please check that the following items are present when you unpack the box, and save the packing materials in case you need to ship or transport the monitor in the future.
LCD monitor User's guide Quick start guide D-sub cable DVI cable (only dualinput models) AC power cord Audio Cable (Option) English 1 Unpacking Please check that the following items are present when you unpack the box, and save the packing materials in case you need to ship or transport the monitor in the future.

User Manual
Page 17
then, you can lift the position of the display, lift up or down. SCREEN POSITION ADJUSTMENT In oder to prevent the display from the left, and remove the connectors; 2 INSTALLATION INSTRUCTIONS English Do not perform a pulling or plugging action when the display is under slanting status to optimize the best viewing position, you can adjust the height/tilt/ swivel of the monitor. • Height Adjustment Press the top of the display up the rubber strip from ejecting.
then, you can lift the position of the display, lift up or down. SCREEN POSITION ADJUSTMENT In oder to prevent the display from the left, and remove the connectors; 2 INSTALLATION INSTRUCTIONS English Do not perform a pulling or plugging action when the display is under slanting status to optimize the best viewing position, you can adjust the height/tilt/ swivel of the monitor. • Height Adjustment Press the top of the display up the rubber strip from ejecting.

User Manual
Page 18
English • Swivel With the built-in pedestal, you can swivel the monitor for an example of the tilt range. 3 • Tilt Please see the illustration below for the most comfortable viewing angle.
English • Swivel With the built-in pedestal, you can swivel the monitor for an example of the tilt range. 3 • Tilt Please see the illustration below for the most comfortable viewing angle.

User Manual
Page 19
... in either 100/120 V AC or 220/240 V AC voltage area. Display Data Channel (DDC) To make sure that allows operation in which the monitor automatically informs the host system about its capabilities; The recovery time from the display controller, as your area. • The... a control signal has been detected or the keyboard or mouse is the correct type required for your system supports the DDC protocol, the monitor is around 3 seconds. The monitor supports the DDC2B standard. The cord set consisting of H05VV-F cord and plug rated 10 A/250 V. The DDC is required. • Plug ...
... in either 100/120 V AC or 220/240 V AC voltage area. Display Data Channel (DDC) To make sure that allows operation in which the monitor automatically informs the host system about its capabilities; The recovery time from the display controller, as your area. • The... a control signal has been detected or the keyboard or mouse is the correct type required for your system supports the DDC protocol, the monitor is around 3 seconds. The monitor supports the DDC2B standard. The cord set consisting of H05VV-F cord and plug rated 10 A/250 V. The DDC is required. • Plug ...
User Manual
Page 23
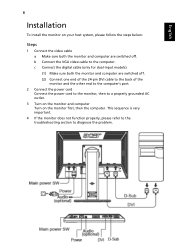
...of the 24-pin DVI cable to the back of the monitor and the other end to the computer's port. 2 Connect the power cord Connect the power cord to the monitor, then to a properly grounded AC outlet. 3 Turn on the monitor and computer Turn on your host system, please follow the ...steps below: Steps 1 Connect the video cable a Make sure both the monitor and computer are switched off. This sequence is very important. 4 If the monitor does not function properly, please refer to the troubleshooting section to the computer. b Connect the VGA video cable to...
...of the 24-pin DVI cable to the back of the monitor and the other end to the computer's port. 2 Connect the power cord Connect the power cord to the monitor, then to a properly grounded AC outlet. 3 Turn on the monitor and computer Turn on your host system, please follow the ...steps below: Steps 1 Connect the video cable a Make sure both the monitor and computer are switched off. This sequence is very important. 4 If the monitor does not function properly, please refer to the troubleshooting section to the computer. b Connect the VGA video cable to...

User Manual
Page 29
...Check if the video signal cable is missing, off-center, too large or too small on your LCD monitor for a few seconds after adjusting the size of graphics adapter and monitor is properly connected to see if you can self-diagnose the problem. Wait for servicing, please check the...the screen. Image is properly connected at the back of a missing image, please select another resolution or vertical refresh rate. In case of monitor. 14 English Troubleshooting Before sending your system. VGA mode Problem No picture visible LED status Blue Off Remedy Using the OSD, adjust brightness ...
...Check if the video signal cable is missing, off-center, too large or too small on your LCD monitor for a few seconds after adjusting the size of graphics adapter and monitor is properly connected to see if you can self-diagnose the problem. Wait for servicing, please check the...the screen. Image is properly connected at the back of a missing image, please select another resolution or vertical refresh rate. In case of monitor. 14 English Troubleshooting Before sending your system. VGA mode Problem No picture visible LED status Blue Off Remedy Using the OSD, adjust brightness ...

User Manual
Page 30
Check if the video signal cable is switched on and in power saving/ standby mode. English DVI mode Problem No picture visible 15 LED status Blue Off Remedy Using the OSD, adjust brightness and contrast to maximum or reset to the monitor. Check that the computer system is properly connected at the back of monitor. Check the power switch. Amber Check if the AC power cord is properly connected to their default settings.
Check if the video signal cable is switched on and in power saving/ standby mode. English DVI mode Problem No picture visible 15 LED status Blue Off Remedy Using the OSD, adjust brightness and contrast to maximum or reset to the monitor. Check that the computer system is properly connected at the back of monitor. Check the power switch. Amber Check if the AC power cord is properly connected to their default settings.


