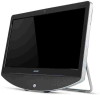
Acer Aspire Z1100 Desktop Service Guide
Page 6
... System Power Management 1-31 Card Reader 1-31 System LED Indicator 1-31 CHAPTER 2 System Utilities BIOS Setup Utility 2-3 Navigating the BIOS Utility 2-3 BIOS 2-4 Main 2-4 Advanced 2-6 Power 2-7 Security 2-8 Boot Options 2-13 Exit 2-14 BIOS Flash Utilities 2-15 DOS Flash Utility 2-16 Wflash4M Utility 2-17 Clearing BIOS Passwords 2-20 Using DMI Tools 2-22 Using...
Acer Aspire Z1100 Desktop Service Guide
Page 16
...CERTIFIED™ LAN: Gigabit Ethernet Webcam: 2.0 MP stand-alone webcam with 1600 x 1200 resolution TV Tuner 0 Acer TV-tuner options: Hybrid TV-tuner supporting worldwide analog/DVB-T (Digital Video Broadcasting-Terrestrial) Hybrid TV-tuner ...-in jack for digital/TV antenna cable input Card Reader 0 Multi-in-1 card reader, supporting: MultiMediaCard (MMC) Secure Digital™ (SD) Card SDHC™ Card Memory Stick™ Memory Stick PRO Duo™ ...
Acer Aspire Z1100 Desktop Service Guide
Page 18
...; Flash® Player Bing™ Bar Skype™ Multimedia Nero® 10 Essentials Cyberlink® YouCam Security Norton Internet Security™ 2011 Gateway Edition Entertainment Wild Tangent WW Gateway Edition Utilities Gateway Recovery Management 1-8 Hardware Specifications and Configurations
Acer Aspire Z1100 Desktop Service Guide
Page 20
Left View Table 1-2. Left View 0 1 2 3 Figure 1-2. NOTE: Push to audio devices (e.g., speakers, Jack headphones). Only one card can operate at any time. 2 USB 2.0 Ports Connect to USB 2.0 devices (e.g., USB mouse, USB camera, USB keyboard). 3 Headphones/Speaker Connects to remove/install the card. Microphone Jack Accepts inputs from external microphones. 1-10 Hardware Specifications and Configurations Left View # Icon Item Description 1 Multi-in-1 card reader Accepts Secure Digital (SD), MultiMediaCard (MMC), Memory Stick PRO (MS PRO), xD-Picture Card (xD).
Acer Aspire Z1100 Desktop Service Guide
Page 41
... state Off - System saves all system states and data onto the disc prior to Disk (S4) Specification All devices in 1 card reader, supporting: Secure Digital™ (SD) Card, MultiMediaCard™ (MMC) Storage cards with adapter: miniSD™ System LED Indicator Item Lock System state HDD access state Wireless...
Acer Aspire Z1100 Desktop Service Guide
Page 46
BIOS Setup Utility 2-3 Navigating the BIOS Utility 2-3 BIOS 2-4 Main 2-4 Advanced 2-6 Power 2-7 Security 2-8 Boot Options 2-13 Exit 2-14 BIOS Flash Utilities 2-15 DOS Flash Utility 2-16 Wflash4M Utility 2-17 Clearing BIOS Passwords 2-20 Using DMI Tools 2-22 Using the LAN MAC EEPROM Utility 2-24 2-2
Acer Aspire Z1100 Desktop Service Guide
Page 47
... a computer's BIOS (Basic Input/Output System). Navigating the BIOS Utility 0 Six menu options are: Main Advanced Power Security Boot Options Exit To navigate through the following: Screen - press F8 Optimized Defaults - use the up and...
Acer Aspire Z1100 Desktop Service Guide
Page 48
Actual values may differ by model. Copyright (C) 2002-2010, Acer Inc. F7: Load User-defined Defaults F8: Save as User-defined F9: Optimized Defaults (When Access Level is a description of the tabs found on the ... MB ZX4251 [Sun XX/XX/2011] [XX:XX:XX] Select Screen Select Item Enter: |Select +/-: 11||Change Opt. Main 0 BIOS Setup Utility Main Advanced Power Security Boot Options Exit System BIOS Version Build Date EC Firmware Processor AMD E-350 Processor Core Frequency Count Memory Size Product Name System Serial Number Asset...
Acer Aspire Z1100 Desktop Service Guide
Page 50
Advanced 0 BIOS Setup Utility Main Advanced Power Security Boot Options Exit Miscellaneous Advanced Chipset Configuration Integrated Peripherals PC Health Status Miscellaneous Select Screen Select Item Enter: |Select +/-: 11||Change Opt. Figure 2-2. BIOS Advanced ... User-defined Defaults F8: Save as User-defined F9: Optimized Defaults (When Access Level is Administrator) F10: Save & Exit Version 2.10.1208. Copyright (C) 2002-2010, Acer Inc.
Acer Aspire Z1100 Desktop Service Guide
Page 51
...On AC Power Loss [Disabled] [Enabled] [Last State] Select Screen Select Item Enter: |Select +/-: 11||Change Opt. Copyright (C) 2002-2010, Acer Inc. F7: Load User-defined Defaults F8: Save as User-defined F9: Optimized Defaults (When Access Level is pressed. BIOS Power Table 2-3 describes... the parameters shown in Figure 2-3. Power 0 BIOS Setup Utility Main Advanced Power Security Boot Options Exit Deep Power Off Mode [Enabled] Power On RTC Wakeup Support [Disabled] Select the highest ACPI sleep state the system will...
Acer Aspire Z1100 Desktop Service Guide
Page 52
...& Exit Version 2.10.1208. Copyright (C) 2002-2010, Acer Inc. Resetting BIOS password may require computer be returned to enter password, three attempts are allowed before system halts. Security 0 The Security tab shows parameters that safeguard and protect the computer from unauthorized... use. BIOS Setup Utility Main Advanced Power Security Boot Options Exit Supervisor Password : User Password : Change...
Acer Aspire Z1100 Desktop Service Guide
Page 54
... 2-7) Setup Warning Passwords do not match, the Setup Warning dialog is not, go to the BIOS Setup Utility Security menu. Press Enter to return to step 5. b. Press F10 to the BIOS Setup Utility Security menu. If new password and confirm new password strings do not match. Re-enter password. [Continue] Figure 2-7. Press...
Acer Aspire Z1100 Desktop Service Guide
Page 55
... exit BIOS Setup Utility. 6. c. Press Enter twice without typing anything in Confirm New Password field and press Enter. 5. Press F10 to the BIOS Setup Utility Security menu. Use the and keys to step 7. Type current password in Enter New Password field and press Enter. 4. Setup Notice Changes have...
Acer Aspire Z1100 Desktop Service Guide
Page 56
... is shown as Clear. c. c. Re-enter password. [Continue] Figure 2-12. Changing a Password: Passwords Do Not Match a. Press Enter to return to the BIOS Setup Utility Security menu. b. The Supervisor Password parameter is shown (Figure 2-12). b. To try to change the password again, repeat steps 1 through 4. 7. To try to change the password...
Acer Aspire Z1100 Desktop Service Guide
Page 57
... devices include the: Onboard hard disk drive Optical disk drive in the module bay BIOS Setup Utility Main Advanced Power Security Boot Options Exit Boot Priority Order 1st Boot Device 2nd Boot Device 3rd Boot Device 4th Boot Device 5th Boot Device Set Boot Priority [UEFI... Defaults F8: Save as User-defined F9: Optimized Defaults (When Access Level is Administrator) F10: Save & Exit Version 2.10.1208. Copyright (C) 2002-2010, Acer Inc. Boot Options 0 The Boot Options tab allows changes to the order of boot devices used to load the operating system.
Acer Aspire Z1100 Desktop Service Guide
Page 58
...Enter: |Select +/-: 11||Change Opt. Figure 2-14. Table 2-5. Load values for user default settings. BIOS Setup Utility Main Advanced Power Security Boot Options Exit Save & Exit Setup Discard Changes and Exit Save Changes Discard Changes Load Default Settings Save as User-defined F9: Optimized ... item changes to system. Exit BIOS utility without saving setup item changes to save setup item changes to system. Copyright (C) 2002-2010, Acer Inc. BIOS Exit Table 2-5 describes the parameters in Figure 2-14. Load previous values of all setup items. Load default values for all...
Acer Aspire Z1100 Desktop Service Guide
Page 60
Copyright (C) 2002-2010, Acer Inc. Copy the BIOS file to modify boot priority order. 3. When flash is Administrator) F10: Save & Exit Version 2.10.1208. Change BIOS Boot priority Order 4. .... 6. Move Removal Device to 1st Boot Device position (Figure 2-15). (Refer to update BIOS. Execute A to Boot Options menu) BIOS Setup Utility Main Advanced Power Security Boot Options Exit Boot Priority Order 1st Boot Device 2nd Boot Device 3rd Boot Device 4th Boot Device 5th Boot Device Set Boot Priority [Removable...
Acer Aspire Z1100 Desktop Service Guide
Page 81
Install and secure screws (B) to back cover. ID Size B M4.0x7.0 Quantity 6 Screw Type Machine Maintenance Procedures 3-11 Install stand covers (A) to back cover. (Figure 3-5) 3. Align and install rear stand (C) with guidepins (D) on back cover. (Figure 3-4) 2. Rear Stand Installation 0 1.
Acer Aspire Z1100 Desktop Service Guide
Page 83
Lift back cover (C) until there is no gap between back cover and front bezel. 4. Back Cover Installation 0 1. C D Figure 3-8. Remove back cover. Install and secure screw (A) to TV tuner connector. 4. CAUTION: Use caution when lifting or removing back cover to prevent damage to front bezel. Align slots (D) of mainboard connectors, ...
Acer Aspire Z1100 Desktop Service Guide
Page 85
Function board Installation 0 1. Install and secure screws (F) to function board connector (H) 4. Install back cover. Connect the following cables: Right function board cable (C) to function board connector (B) Left function board cable (D) to function board connector (E) function board cable (G) to middle frame. 3. ID Size F M3.0x5.0 Quantity 2 Screw Type Machine Maintenance Procedures 3-15 Install function board (A) to middle frame. (Figure 3-9) 2.