
Service Guide
Page 7
... 54 Power System Check 54 System External Inspection 54 System Internal Inspection 54 Checkpoints 55 Viewing BIOS checkpoints 55 Bootblock Initialization Code Checkpoints 55 Bootblock Recovery Code Checkpoints 56 POST Code Checkpoints 57 DIM Code Checkpoints 59 ACPI Runtime Checkpoints 59 Error Messages 60 Memory 60 Boot 60 Storage Device 61...
... 54 Power System Check 54 System External Inspection 54 System Internal Inspection 54 Checkpoints 55 Viewing BIOS checkpoints 55 Bootblock Initialization Code Checkpoints 55 Bootblock Recovery Code Checkpoints 56 POST Code Checkpoints 57 DIM Code Checkpoints 59 ACPI Runtime Checkpoints 59 Error Messages 60 Memory 60 Boot 60 Storage Device 61...
Service Guide
Page 63
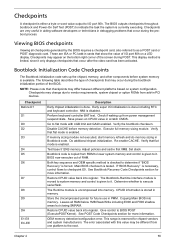
... developers or technicians in memory. Go to the next. Adjust policies and cache first 8MB. Determine whether to determine if "BIOS Recovery" is reserved for more information. This range is forced. Perform keyboard controller BAT test. Set stack. Re-enable CACHE. Both ... out of the screen during the bootblock initialization portion of I/O port 80h on CPUID value in PCI devices. See Bootblock Recovery Code Checkpoints section for chipset vendors and system manufacturers. The following table describes the type of checkpoints that occur after the video...
... developers or technicians in memory. Go to the next. Adjust policies and cache first 8MB. Determine whether to determine if "BIOS Recovery" is reserved for more information. This range is forced. Perform keyboard controller BAT test. Set stack. Re-enable CACHE. Both ... out of the screen during the bootblock initialization portion of I/O port 80h on CPUID value in PCI devices. See Bootblock Recovery Code Checkpoints section for chipset vendors and system manufacturers. The following table describes the type of checkpoints that occur after the video...
Service Guide
Page 64
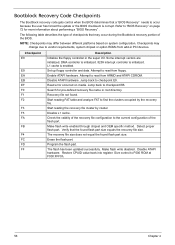
... successfully. Make flash write disabled. Attempt to find the clusters occupied by cluster. Read error occurred on page 72 for pre-defined recovery file name in root directory. Start reading FAT table and analyze FAT to read from ARMD and ATAPI CDROM. Refer to read from... L1 cache is initialized. Disable ATAPI hardware. Jump back to vendor requirements, system chipset or option ROMs from add-in the super I/O. Recovery file not found flash part size. Make flash write enabled through chipset and OEM specific method. NOTE: Checkpoints may change due to checkpoint E9...
... successfully. Make flash write disabled. Attempt to find the clusters occupied by cluster. Read error occurred on page 72 for pre-defined recovery file name in root directory. Start reading FAT table and analyze FAT to read from ARMD and ATAPI CDROM. Refer to read from... L1 cache is initialized. Disable ATAPI hardware. Jump back to vendor requirements, system chipset or option ROMs from add-in the super I/O. Recovery file not found flash part size. Make flash write enabled through chipset and OEM specific method. NOTE: Checkpoints may change due to checkpoint E9...
Service Guide
Page 75
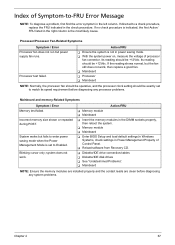
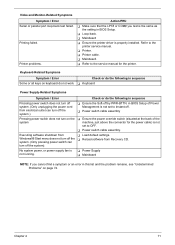
... procedure, replace the FRU indicated in power saving mode. With the system power on, measure the voltage of Control Panel. Reload software from Recovery CD. Diskette/IDE drive connection/cables Diskette/IDE disk drives See "Undetermined Problems". Mainboard NOTE: Ensure the memory modules are installed...
... procedure, replace the FRU indicated in power saving mode. With the system power on, measure the voltage of Control Panel. Reload software from Recovery CD. Diskette/IDE drive connection/cables Diskette/IDE disk drives See "Undetermined Problems". Mainboard NOTE: Ensure the memory modules are installed...
Service Guide
Page 79
... power switch does not turn off system. (Only unplugging the power cord from electrical outlet can turn off by PWR-BTTN. Executing software shutdown from Recovery CD. Video and Monitor-Related Symptoms Symptom / Error Serial or parallel port loop-back test failed.
... power switch does not turn off system. (Only unplugging the power cord from electrical outlet can turn off by PWR-BTTN. Executing software shutdown from Recovery CD. Video and Monitor-Related Symptoms Symptom / Error Serial or parallel port loop-back test failed.
Service Guide
Page 80
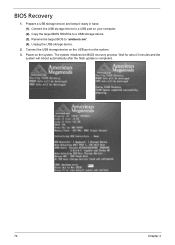
Connect the USB storage device to a USB port on the system. 3. Copy the target BIOS ROM file to "amiboot.rom". (4). Connect the USB storage device on the USB port on your computer. (2). Prepare a USB storage device and keep it ready in hand. (1). The system initializes the BIOS recovery process. Power on the system. Wait for about 3 minutes and the system will reboot automatically after the flash update is completed. 72 Chapter 4 Unplug the USB storage device. 2. Rename the target BIOS to a USB storage device. (3). BIOS Recovery 1.
Connect the USB storage device to a USB port on the system. 3. Copy the target BIOS ROM file to "amiboot.rom". (4). Connect the USB storage device on the USB port on your computer. (2). Prepare a USB storage device and keep it ready in hand. (1). The system initializes the BIOS recovery process. Power on the system. Wait for about 3 minutes and the system will reboot automatically after the flash update is completed. 72 Chapter 4 Unplug the USB storage device. 2. Rename the target BIOS to a USB storage device. (3). BIOS Recovery 1.

