Aspire X3810 - X5810 Service Guide
Page 7
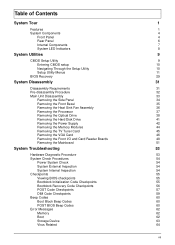
... 32 Main Unit Disassembly 33 Removing the Side Panel 34 Removing the Front Bezel 35 Removing the Heat Sink Fan Assembly 36 Removing the Processor 37 Removing the Optical Drive 38 Removing the Hard Disk Drive 41 Removing the Power Supply 42 Removing the Memory Modules 44 Removing the TV Tuner Card 45 Removing the VGA Card 46 Removing the Front I/O and Card Reader...
... 32 Main Unit Disassembly 33 Removing the Side Panel 34 Removing the Front Bezel 35 Removing the Heat Sink Fan Assembly 36 Removing the Processor 37 Removing the Optical Drive 38 Removing the Hard Disk Drive 41 Removing the Power Supply 42 Removing the Memory Modules 44 Removing the TV Tuner Card 45 Removing the VGA Card 46 Removing the Front I/O and Card Reader...

Aspire X3810 - X5810 Service Guide
Page 22
... Press Enter to access the Network Device Priority submenu and specify the boot sequence from available hard drives. Enabled Disabled Specifies the boot order from available removable drives. Press Enter to boot the computer by shortening Enabled or skipping certain standard booting process....displays during startup. Advanced BIOS Features Parameter Quick Boot Quiet Boot 1st/2nd/3rd/4th Boot Device Hard Disk Drive Priority Optical Disk Drive Priority Removable Device Priority Network Device Priority Bootup Num-Lock USB Beep Message Description Option Allows you to decrease...
... Press Enter to access the Network Device Priority submenu and specify the boot sequence from available hard drives. Enabled Disabled Specifies the boot order from available removable drives. Press Enter to boot the computer by shortening Enabled or skipping certain standard booting process....displays during startup. Advanced BIOS Features Parameter Quick Boot Quiet Boot 1st/2nd/3rd/4th Boot Device Hard Disk Drive Priority Optical Disk Drive Priority Removable Device Priority Network Device Priority Bootup Num-Lock USB Beep Message Description Option Allows you to decrease...
Aspire X3810 - X5810 Service Guide
Page 49
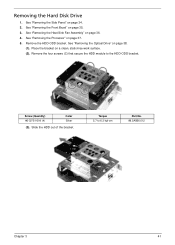
... on page 36. 4. See "Removing the Optical Drive" on page 35. 3. See "Removing the Front Bezel" on page 38. (1). Slide the HDD out of the bracket. See "Removing the Side Panel" on page 37. 5. Remove the HDD-ODD bracket. Remove the four screws (C) that secure the... HDD module to 6.3 kgf-cm Part No. 86.5A5B6.012 Chapter 3 41 See "Removing the Processor" on page 34. 2. Screw (Quantity) #6-32*3/16 NI (4) Color Silver (3). Removing the Hard Disk Drive...
... on page 36. 4. See "Removing the Optical Drive" on page 35. 3. See "Removing the Front Bezel" on page 38. (1). Slide the HDD out of the bracket. See "Removing the Side Panel" on page 37. 5. Remove the HDD-ODD bracket. Remove the four screws (C) that secure the... HDD module to 6.3 kgf-cm Part No. 86.5A5B6.012 Chapter 3 41 See "Removing the Processor" on page 34. 2. Screw (Quantity) #6-32*3/16 NI (4) Color Silver (3). Removing the Hard Disk Drive...
Aspire X3810 - X5810 Service Guide
Page 50
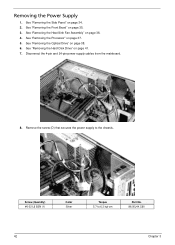
... power supply cables from the mainboard. 8. Removing the Power Supply 1. See "Removing the Heat Sink Fan Assembly" on page 34. 2. Screw (Quantity) #6-32 L6 BZN (1) Color Silver Torque 5.7 to the chassis. See "Removing the Side Panel" on page 36. 4. See "Removing the Hard Disk Drive" on page 35. 3. See "Removing the Front Bezel" on page 41. 7. See...
... power supply cables from the mainboard. 8. Removing the Power Supply 1. See "Removing the Heat Sink Fan Assembly" on page 34. 2. Screw (Quantity) #6-32 L6 BZN (1) Color Silver Torque 5.7 to the chassis. See "Removing the Side Panel" on page 36. 4. See "Removing the Hard Disk Drive" on page 35. 3. See "Removing the Front Bezel" on page 41. 7. See...
Aspire X3810 - X5810 Service Guide
Page 52
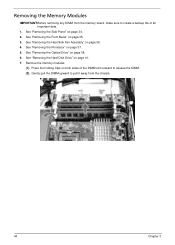
... page 41. 7. See "Removing the Hard Disk Drive" on page 35. 3. See "Removing the Optical Drive" on page 36. 4. Gently pull the DIMM upward to pull it away from the memory board, make sure to release the DIMM. (2). See "Removing the Heat Sink Fan Assembly" on page 38. 6. Remove the memory modules (1). See "Removing the Processor" on page...
... page 41. 7. See "Removing the Hard Disk Drive" on page 35. 3. See "Removing the Optical Drive" on page 36. 4. Gently pull the DIMM upward to pull it away from the memory board, make sure to release the DIMM. (2). See "Removing the Heat Sink Fan Assembly" on page 38. 6. Remove the memory modules (1). See "Removing the Processor" on page...
Aspire X3810 - X5810 Service Guide
Page 53
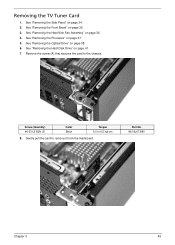
Removing the TV Tuner Card 1. See "Removing the Hard Disk Drive" on page 37. 5. Part No. 86.00J07.B60 Chapter 3 45 See "Removing the Processor" on page 41. 7. Remove the screw (A) that secures the card to 6.5 kgf-cm 8. Screw (Quantity) #6-32 L5 BZN (3) Color Black Torque 5.5 to the chassis. Gently pull the card to remove it from the mainboard. See "Removing the Optical Drive" on page 34. 2. See "Removing the Side Panel" on page 38. 6. See "Removing the Front Bezel" on page 36. 4. See "Removing the Heat Sink Fan Assembly" on page 35. 3.
Removing the TV Tuner Card 1. See "Removing the Hard Disk Drive" on page 37. 5. Part No. 86.00J07.B60 Chapter 3 45 See "Removing the Processor" on page 41. 7. Remove the screw (A) that secures the card to 6.5 kgf-cm 8. Screw (Quantity) #6-32 L5 BZN (3) Color Black Torque 5.5 to the chassis. Gently pull the card to remove it from the mainboard. See "Removing the Optical Drive" on page 34. 2. See "Removing the Side Panel" on page 38. 6. See "Removing the Front Bezel" on page 36. 4. See "Removing the Heat Sink Fan Assembly" on page 35. 3.

Aspire X3810 - X5810 Service Guide
Page 54
See "Removing the Side Panel" on page 37. 5. Gently pull the card to the chassis. See "Removing the Processor" on page 34. 2. See "Removing the Front Bezel" on page 41. 7. See "Removing the Hard Disk Drive" on page 35. 3. See "Removing the Optical Drive" on page 36. 4. Part No. 86.00J07.B60 46 Chapter 3 See "Removing the Heat Sink Fan Assembly" on page 38. 6. Removing the VGA Card 1. Remove the screw (A) that secures the card to remove it from the mainboard. Screw (Quantity) #6-32 L5 BZN (3) Color Black Torque 5.5 to 6.5 kgf-cm 8.
See "Removing the Side Panel" on page 37. 5. Gently pull the card to the chassis. See "Removing the Processor" on page 34. 2. See "Removing the Front Bezel" on page 41. 7. See "Removing the Hard Disk Drive" on page 35. 3. See "Removing the Optical Drive" on page 36. 4. Part No. 86.00J07.B60 46 Chapter 3 See "Removing the Heat Sink Fan Assembly" on page 38. 6. Removing the VGA Card 1. Remove the screw (A) that secures the card to remove it from the mainboard. Screw (Quantity) #6-32 L5 BZN (3) Color Black Torque 5.5 to 6.5 kgf-cm 8.
Aspire X3810 - X5810 Service Guide
Page 56
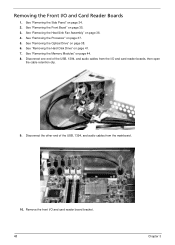
.... 48 Chapter 3 See "Removing the Memory Modules" on page 34. 2. See "Removing the Side Panel" on page 44. 8. Disconnect the other end of the USB, 1394, and audio cables from the mainboard. 10. See "Removing the Front Bezel" on page 38. 6. See "Removing the Optical Drive" on page 35. 3. See "Removing the Hard Disk Drive" on page 41. 7.
.... 48 Chapter 3 See "Removing the Memory Modules" on page 34. 2. See "Removing the Side Panel" on page 44. 8. Disconnect the other end of the USB, 1394, and audio cables from the mainboard. 10. See "Removing the Front Bezel" on page 38. 6. See "Removing the Optical Drive" on page 35. 3. See "Removing the Hard Disk Drive" on page 41. 7.
Aspire X3810 - X5810 Service Guide
Page 59
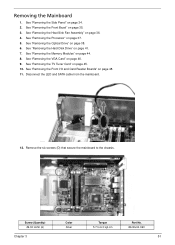
... (D) that secure the mainboard to 6.3 kgf-cm Part No. 86.00J44.C60 51 See "Removing the Heat Sink Fan Assembly" on page 37. 5. See "Removing the Processor" on page 36. 4. See "Removing the Hard Disk Drive" on page 48. 11. See "Removing the Front I/O and Card Reader Boards" on page 41. 7. Screw (Quantity) #6-32 L6 NI...
... (D) that secure the mainboard to 6.3 kgf-cm Part No. 86.00J44.C60 51 See "Removing the Heat Sink Fan Assembly" on page 37. 5. See "Removing the Processor" on page 36. 4. See "Removing the Hard Disk Drive" on page 48. 11. See "Removing the Front I/O and Card Reader Boards" on page 41. 7. Screw (Quantity) #6-32 L6 NI...


