
Acer Aspire V5-531 Notebook Service Guide
Page 35
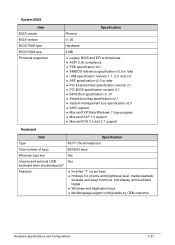
... base specification revision 2.1 PCI BIOS specification revision 2.1 BIOS Boot specification v1.01 Simple boot flag specification v2.1 System management bus specification v2.0 AHCI... support Microsoft XP/Vista/Windows 7 logo program Microsoft SLP 1.0 support Microsoft OA 2.0 and 2.1 support Keyboard Item Specification Type AS7F Chiclet keyboard Total number of keys 88/89/93 keys Windows logo key Yes Internal and external USB...
... base specification revision 2.1 PCI BIOS specification revision 2.1 BIOS Boot specification v1.01 Simple boot flag specification v2.1 System management bus specification v2.0 AHCI... support Microsoft XP/Vista/Windows 7 logo program Microsoft SLP 1.0 support Microsoft OA 2.0 and 2.1 support Keyboard Item Specification Type AS7F Chiclet keyboard Total number of keys 88/89/93 keys Windows logo key Yes Internal and external USB...
Acer Aspire V5-531 Notebook Service Guide
Page 69
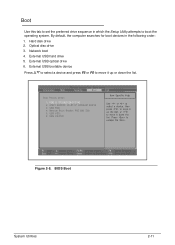
Hard disk drive 2. External USB hard drive 5. External USB optical drive 6. Figure 2-8. Optical disc drive 3. External USB bootable device Press to select a device and press F5 or F6 to move it up or down the list. Network boot 4. BIOS Boot System Utilities 2-11 By default, the computer searches for boot devices in which the Setup Utility attempts to boot the operating system. Boot 0 Use this tab to set the preferred drive sequence in the following order: 1.
Hard disk drive 2. External USB hard drive 5. External USB optical drive 6. Figure 2-8. Optical disc drive 3. External USB bootable device Press to select a device and press F5 or F6 to move it up or down the list. Network boot 4. BIOS Boot System Utilities 2-11 By default, the computer searches for boot devices in which the Setup Utility attempts to boot the operating system. Boot 0 Use this tab to set the preferred drive sequence in the following order: 1.

Acer Aspire V5-531 Notebook Service Guide
Page 71
... when Flash is used . Copy the "XXXXXXX.FD" file to any USB port. 5. System Utilities 2-13 Turn off the computer. 4. Insert the USB device containing the renamed BIOS file and the Crisis Recovery disk files to a bootable USB device containing the Crisis Recovery disk files. 3. NOTE: NOTE: Flash utility...61472;New features or options Restore a BIOS when it becomes corrupted. Use the Flash utility to finish loading BIOS Flash, do not boot system. Press and hold the Fn + Esc keys (this is the BIOS recovery hotkey), then press the power button. 6. Release the Fn ...
... when Flash is used . Copy the "XXXXXXX.FD" file to any USB port. 5. System Utilities 2-13 Turn off the computer. 4. Insert the USB device containing the renamed BIOS file and the Crisis Recovery disk files to a bootable USB device containing the Crisis Recovery disk files. 3. NOTE: NOTE: Flash utility...61472;New features or options Restore a BIOS when it becomes corrupted. Use the Flash utility to finish loading BIOS Flash, do not boot system. Press and hold the Fn + Esc keys (this is the BIOS recovery hotkey), then press the power button. 6. Release the Fn ...
Acer Aspire V5-531 Notebook Service Guide
Page 72
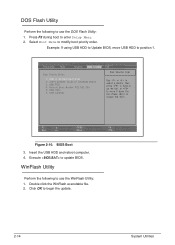
Insert the USB HDD and reboot computer. 4. Click OK to enter Setup Menu. 2. Double click the WinFlash executable file. 2. Press F2 during boot to begin the update. 2-14 System Utilities Figure 2-10. Example: If using USB HDD to Update BIOS, move USB HDD to modify boot priority order. Select Boot Menu to position 1. Execute to update BIOS. BIOS Boot 3. WinFlash Utility 0 Perform the following to use the WinFlash Utility: 1. DOS Flash Utility 0 Perform the following to use the DOS Flash Utility: 1.
Insert the USB HDD and reboot computer. 4. Click OK to enter Setup Menu. 2. Double click the WinFlash executable file. 2. Press F2 during boot to begin the update. 2-14 System Utilities Figure 2-10. Example: If using USB HDD to Update BIOS, move USB HDD to modify boot priority order. Select Boot Menu to position 1. Execute to update BIOS. BIOS Boot 3. WinFlash Utility 0 Perform the following to use the WinFlash Utility: 1. DOS Flash Utility 0 Perform the following to use the DOS Flash Utility: 1.
Acer Aspire V5-531 Notebook Service Guide
Page 76
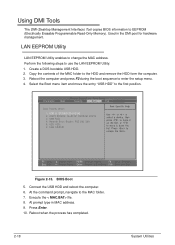
.... 2. At the command prompt, navigate to change the MAC address. Reboot when the process has completed. 2-18 System Utilities Select the Boot menu item and move the entry "USB HDD" to the HDD and remove the HDD form the computer. 3. Copy the contents of the MAC folder to the first position. At...
.... 2. At the command prompt, navigate to change the MAC address. Reboot when the process has completed. 2-18 System Utilities Select the Boot menu item and move the entry "USB HDD" to the HDD and remove the HDD form the computer. 3. Copy the contents of the MAC folder to the first position. At...
Acer Aspire V5-531 Notebook Service Guide
Page 196
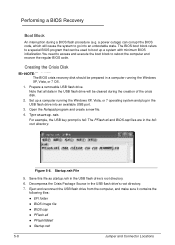
... (e.g. Type startup.nsh. Figure 5-6. Performing a BIOS Recovery 0 Boot Block 0 An interruption during the creation of the crisis disk. 2. For example, the USB key prompt is fs0. The BIOS boot block refers to go into an available USB port. 3. Set up a system with minimum BIOS initialization.You... need to access and execute the boot block to boot up a computer running the Windows XP, Vista...
... (e.g. Type startup.nsh. Figure 5-6. Performing a BIOS Recovery 0 Boot Block 0 An interruption during the creation of the crisis disk. 2. For example, the USB key prompt is fs0. The BIOS boot block refers to go into an available USB port. 3. Set up a system with minimum BIOS initialization.You... need to access and execute the boot block to boot up a computer running the Windows XP, Vista...
Acer Aspire V5-531 Notebook Service Guide
Page 197
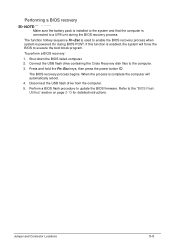
Press and hold the Fn+Esc keys, then press the power button . To perform a BIOS recovery: 1. Connect the USB flash drive containing the Crisis Recovery disk files to update the BIOS firmware. Jumper and Connector Locations 5-9 Shut down the BIOS failed-computer. 2. .... 3. The BIOS recovery process begins. When the process is powered On during the BIOS recovery process. Disconnect the USB flash drive from the computer. 5. Refer to execute the boot block program. The function hotkey sequence Fn+Esc is used to enable the BIOS recovery process when system is complete ...
Press and hold the Fn+Esc keys, then press the power button . To perform a BIOS recovery: 1. Connect the USB flash drive containing the Crisis Recovery disk files to update the BIOS firmware. Jumper and Connector Locations 5-9 Shut down the BIOS failed-computer. 2. .... 3. The BIOS recovery process begins. When the process is powered On during the BIOS recovery process. Disconnect the USB flash drive from the computer. 5. Refer to execute the boot block program. The function hotkey sequence Fn+Esc is used to enable the BIOS recovery process when system is complete ...


