Acer Aspire One D150, Aspire One D250 Netbook Series Start Guide
Page 13
...the Help and Support menu. Please refre to "Quick Guide" for certain models". Note: Viewing the file requires Adobe Reader. The printed Aspire One Series User Guide contains useful information applying to all models in the text with setting up your computer. It is not installed on your...on the screen to complete the installation. For instructions on how to use your Acer notebook, we have designed a set of your new computer. It covers basic topics such as system utilities, data recovery, expansion options and troubleshooting. Your guides To help you to be more on ...
...the Help and Support menu. Please refre to "Quick Guide" for certain models". Note: Viewing the file requires Adobe Reader. The printed Aspire One Series User Guide contains useful information applying to all models in the text with setting up your computer. It is not installed on your...on the screen to complete the installation. For instructions on how to use your Acer notebook, we have designed a set of your new computer. It covers basic topics such as system utilities, data recovery, expansion options and troubleshooting. Your guides To help you to be more on ...
Acer Aspire One D150, Aspire One D250 Netbook Series Start Guide
Page 18
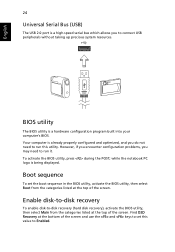
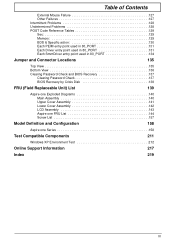
... options 23 Connectivity options 23 Built-in network feature 23 Universal Serial Bus (USB) 24 BIOS utility 24 Boot sequence 24 Enable disk-to-disk recovery 24 Password 25 Power management 25 Troubleshooting 26 Troubleshooting tips 26 Error messages 26 Regulations and safety notices 28 FCC notice 28 LCD pixel statement...
... options 23 Connectivity options 23 Built-in network feature 23 Universal Serial Bus (USB) 24 BIOS utility 24 Boot sequence 24 Enable disk-to-disk recovery 24 Password 25 Power management 25 Troubleshooting 26 Troubleshooting tips 26 Error messages 26 Regulations and safety notices 28 FCC notice 28 LCD pixel statement...
Acer Aspire One D150, Aspire One D250 Netbook Series Start Guide
Page 29
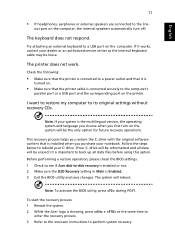
... helps you purchase your dealer or an authorized service center as the internal keyboard cable may be loose. To start the recovery process: 1 Restart the system. 2 While the Acer logo is Enabled. 3 Exit the BIOS utility and save changes. Before performing a restore operation, please check the BIOS ...settings. 1 Check to see if Acer disk-to-disk recovery is enabled or not. 2 Make sure the D2D Recovery setting in Main is showing, press + at the same time to enter the recovery process. 3 Refer to the onscreen instructions to a power outlet and ...
... helps you purchase your dealer or an authorized service center as the internal keyboard cable may be loose. To start the recovery process: 1 Restart the system. 2 While the Acer logo is Enabled. 3 Exit the BIOS utility and save changes. Before performing a restore operation, please check the BIOS ...settings. 1 Check to see if Acer disk-to-disk recovery is enabled or not. 2 Make sure the D2D Recovery setting in Main is showing, press + at the same time to enter the recovery process. 3 Refer to the onscreen instructions to a power outlet and ...
Acer Aspire One D150, Aspire One D250 Netbook Series Start Guide
Page 42
Your computer is already properly configured and optimized, and you do not need to run this value to Enabled. Find D2D Recovery at the bottom of the screen and use the and keys to set the boot sequence in the BIOS utility, activate the BIOS utility, ... hardware configuration program built into your computer's BIOS. To activate the BIOS utility, press during the POST; Enable disk-to-disk recovery To enable disk-to-disk recovery (hard disk recovery), activate the BIOS utility, then select Main from the categories listed at the top of the screen. English 24 Universal Serial Bus...
Your computer is already properly configured and optimized, and you do not need to run this value to Enabled. Find D2D Recovery at the bottom of the screen and use the and keys to set the boot sequence in the BIOS utility, activate the BIOS utility, ... hardware configuration program built into your computer's BIOS. To activate the BIOS utility, press during the POST; Enable disk-to-disk recovery To enable disk-to-disk recovery (hard disk recovery), activate the BIOS utility, then select Main from the categories listed at the top of the screen. English 24 Universal Serial Bus...
Aspire One 8.9-Inch Series (AOA) Quick Guide English
Page 8
... in Portable Document Format (PDF) and comes preloaded on how to use your Acer notebook, we have designed a set of your computer. Follow the instructions on AcerSystem User ... run the Adobe Reader setup program first. Acer expressly disclaims any liability for errors contained in these guides shall constitute a representation or warranty by Acer with setting up your new computer. For ...your notebook. English 8 First things first We would like to thank you for making an Acer notebook your choice for meeting your notebook. It is not installed on your computer, clicking on...
... in Portable Document Format (PDF) and comes preloaded on how to use your Acer notebook, we have designed a set of your computer. Follow the instructions on AcerSystem User ... run the Adobe Reader setup program first. Acer expressly disclaims any liability for errors contained in these guides shall constitute a representation or warranty by Acer with setting up your new computer. For ...your notebook. English 8 First things first We would like to thank you for making an Acer notebook your choice for meeting your notebook. It is not installed on your computer, clicking on...
Aspire One AOD150 Series Service Guide
Page 9
... 134 Jumper and Connector Locations 135 Top View 135 Bottom View 136 Clearing Password Check and BIOS Recovery 137 Clearing Password Check 137 BIOS Recovery by Crisis Disk 138 FRU (Field Replaceable Unit) List 139 Aspire one Exploded Diagrams 140 Main Assembly 140 Upper Cover Assembly 141 Lower Cover Assembly 142 LCD Assembly 143...
... 134 Jumper and Connector Locations 135 Top View 135 Bottom View 136 Clearing Password Check and BIOS Recovery 137 Clearing Password Check 137 BIOS Recovery by Crisis Disk 138 FRU (Field Replaceable Unit) List 139 Aspire one Exploded Diagrams 140 Main Assembly 140 Upper Cover Assembly 141 Lower Cover Assembly 142 LCD Assembly 143...

Aspire One AOD150 Series Service Guide
Page 31
... VGA Memory size=32 MB Allows startup to skip certain tests while booting, decreasing the time needed to factory defaults. Enables, disables D2D Recovery function. The hours are the default and suggested parameter settings. Enables, disables Boot Menu during POST. The function allows the user to create... Information Main Advanced Security Power Boot Exit Rev. 3.5 System Time: System Date: Total Memory: Video Memory: Quick Boot Network Boot F12 Boot Menu D2D Recovery SATA Mode [19:10:59] [01/09/2009] 1024 MB [8MB] [Enabled] [Enabled] [Disabled] [Enabled] [AHCI] Item Specific Help This...
... VGA Memory size=32 MB Allows startup to skip certain tests while booting, decreasing the time needed to factory defaults. Enables, disables D2D Recovery function. The hours are the default and suggested parameter settings. Enables, disables Boot Menu during POST. The function allows the user to create... Information Main Advanced Security Power Boot Exit Rev. 3.5 System Time: System Date: Total Memory: Video Memory: Quick Boot Network Boot F12 Boot Menu D2D Recovery SATA Mode [19:10:59] [01/09/2009] 1024 MB [8MB] [Enabled] [Enabled] [Disabled] [Enabled] [AHCI] Item Specific Help This...
Aspire One AOD150 Series Service Guide
Page 40
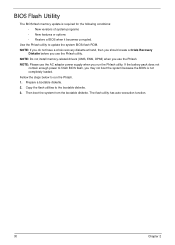
... utilities to run the Phlash utility. Then boot the system from the bootable diskette. NOTE: If you do not have a crisis recovery diskette at hand, then you should create a Crisis Recovery Diskette before you run the Phlash. 1. NOTE: Please use the AC adaptor power supply when you use the Phlash. Use the...
... utilities to run the Phlash utility. Then boot the system from the bootable diskette. NOTE: If you do not have a crisis recovery diskette at hand, then you should create a Crisis Recovery Diskette before you run the Phlash. 1. NOTE: Please use the AC adaptor power supply when you use the Phlash. Use the...
Aspire One AOD150 Series Service Guide
Page 135
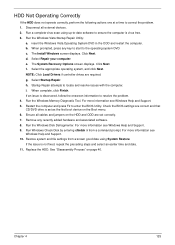
... a known good date using up-to-date software to locate and resolve issues with the computer. Replace the HDD. c. The System Recovery Options screen displays. i. The Install Windows screen displays. Click Next. Run the Windows Disk Defragmenter. Restart the computer and press F2 ... more information see Windows Help and Support. 5. HDD Not Operating Correctly If the HDD does not operate correctly, perform the following actions one at a time to enter the BIOS Utility. Startup Repair attempts to ensure the computer is set correctly. 7. Run the Windows Vista...
... a known good date using up-to-date software to locate and resolve issues with the computer. Replace the HDD. c. The System Recovery Options screen displays. i. The Install Windows screen displays. Click Next. Run the Windows Disk Defragmenter. Restart the computer and press F2 ... more information see Windows Help and Support. 5. HDD Not Operating Correctly If the HDD does not operate correctly, perform the following actions one at a time to enter the BIOS Utility. Startup Repair attempts to ensure the computer is set correctly. 7. Run the Windows Vista...
Aspire One AOD150 Series Service Guide
Page 147
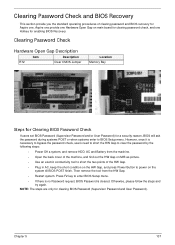
... out the HW Gap on M/B as picture. • Use an electric conductivity tool to short the two points of clearing password and BIOS recovery for Aspire one Hotkey for a security reason, BIOS will ask the password during systems POST or when systems enter to clear the password by the following steps:...or User Password) for enabling BIOS Recovery. Press F2 key to enter BIOS Setup menu. • If there is no Password request, BIOS Password is necessary to bypass the password check, users need to short the HW Gap to BIOS Setup menu. Aspire one provide one Hardware Open Gap on main board...
... out the HW Gap on M/B as picture. • Use an electric conductivity tool to short the two points of clearing password and BIOS recovery for Aspire one Hotkey for a security reason, BIOS will ask the password during systems POST or when systems enter to clear the password by the following steps:...or User Password) for enabling BIOS Recovery. Press F2 key to enter BIOS Setup menu. • If there is no Password request, BIOS Password is necessary to bypass the password check, users need to short the HW Gap to BIOS Setup menu. Aspire one provide one Hardware Open Gap on main board...

Aspire One AOD150 Series Service Guide
Page 148
... , prepare the Crisis USB key. Press Power button to a successful one once the previous BIOS flashing process failed. If this function is used to enter a special BIOS block, called Boot Block. Plug USB storage into USB port. 3. Steps for enable BIOS Recovery process when system is powered on during BIOS POST. The...
... , prepare the Crisis USB key. Press Power button to a successful one once the previous BIOS flashing process failed. If this function is used to enter a special BIOS block, called Boot Block. Plug USB storage into USB port. 3. Steps for enable BIOS Recovery process when system is powered on during BIOS POST. The...

