Service Guide
Page 144
... or dark spots display in the application. Roll back the video driver to correct the problem. 1. Remove and reinstall the video driver. 8. Abnormal Video Display If video displays abnormally, perform the following actions one at a time to correct the problem. 1. If the computer ...boots correctly, add the devices one by one year old, replace the CMOS battery. 2. Reboot the ...
... or dark spots display in the application. Roll back the video driver to correct the problem. 1. Remove and reinstall the video driver. 8. Abnormal Video Display If video displays abnormally, perform the following actions one at a time to correct the problem. 1. If the computer ...boots correctly, add the devices one by one year old, replace the CMOS battery. 2. Reboot the ...
Service Guide
Page 148
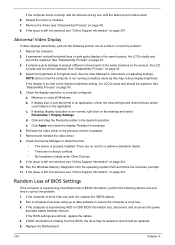
...4 b. Check the Device Manager to determine that all volume controls are experienced, perform the following actions one at a time to correct the problem. Remove and reinstall the audio driver. 5. Follow the onscreen prompts to start Speaker Setup. Do not replace non-defective FRUs: Start OK ... Problems If sound problems are set to 50 and not muted. 6. Internal Speaker Failure If the internal Speakers fail, perform the following actions one at a time to correct the problem. 1. Navigate to Start Control Panel Hardware and Sound Sound. Ensure that :...
...4 b. Check the Device Manager to determine that all volume controls are experienced, perform the following actions one at a time to correct the problem. Remove and reinstall the audio driver. 5. Follow the onscreen prompts to start Speaker Setup. Do not replace non-defective FRUs: Start OK ... Problems If sound problems are set to 50 and not muted. 6. Internal Speaker Failure If the internal Speakers fail, perform the following actions one at a time to correct the problem. 1. Navigate to Start Control Panel Hardware and Sound Sound. Ensure that :...

Service Guide
Page 150
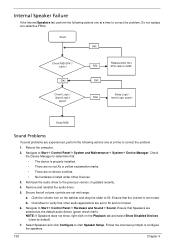
.... 2. If the issue is virus free. 3. d. HDD Not Operating Correctly If the HDD does not operate correctly, perform the following actions one at a time to enter the BIOS Utility. h. Startup Repair attempts to complete the test. 8. See "Disassembly Process" on the Boot menu...Repair your computer. e. The System Recovery Options screen displays. f. Select the appropriate operating system, and click Next. NOTE: Click Load Drivers if controller drives are correct and that CD/DVD drive is set correctly. 7. g. Select Startup Repair. When complete, click Finish. Run...
.... 2. If the issue is virus free. 3. d. HDD Not Operating Correctly If the HDD does not operate correctly, perform the following actions one at a time to enter the BIOS Utility. h. Startup Repair attempts to complete the test. 8. See "Disassembly Process" on the Boot menu...Repair your computer. e. The System Recovery Options screen displays. f. Select the appropriate operating system, and click Next. NOTE: Click Load Drivers if controller drives are correct and that CD/DVD drive is set correctly. 7. g. Select Startup Repair. When complete, click Finish. Run...
User Guide
Page 19
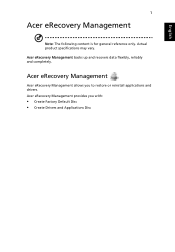
English 1 Acer eRecovery Management Note: The following content is for general reference only. Acer eRecovery Management Acer eRecovery Management allows you with: • Create Factory Default Disc • Create Drivers and Applications Disc Actual product specifications may vary. Acer eRecovery Management provides you to restore or reinstall applications and drivers. Acer eRecovery Management backs up and recovers data flexibly, reliably and completely.
English 1 Acer eRecovery Management Note: The following content is for general reference only. Acer eRecovery Management Acer eRecovery Management allows you with: • Create Factory Default Disc • Create Drivers and Applications Disc Actual product specifications may vary. Acer eRecovery Management provides you to restore or reinstall applications and drivers. Acer eRecovery Management backs up and recovers data flexibly, reliably and completely.

User Guide
Page 20
Note: External optical disc drive required. English 2 Launching Acer eRecovery Management 1 You may also launch Acer eRecovery Management by running the program from the Acer program group in the Start menu, or by double-clicking the icon if you have created a desktop shortcut. 2 You can choose to restore the system from a factory default image or reinstall applications and drivers. 3 Follow the instructions on screen to complete the process. Please see your retailer for more details.
Note: External optical disc drive required. English 2 Launching Acer eRecovery Management 1 You may also launch Acer eRecovery Management by running the program from the Acer program group in the Start menu, or by double-clicking the icon if you have created a desktop shortcut. 2 You can choose to restore the system from a factory default image or reinstall applications and drivers. 3 Follow the instructions on screen to complete the process. Please see your retailer for more details.
User Guide
Page 37
... for an extended period of time and cannot carry the computer with you: • AC adapter • Spare, fully-charged battery pack(s) • Additional printer driver files if you might also want to add an external keyboard, monitor or mouse. Airport security may want to purchase a second AC adapter for significant...
... for an extended period of time and cannot carry the computer with you: • AC adapter • Spare, fully-charged battery pack(s) • Additional printer driver files if you might also want to add an external keyboard, monitor or mouse. Airport security may want to purchase a second AC adapter for significant...
User Guide
Page 38
... the computer. Do not use converter kits sold for the country to which you are traveling • Spare, fully-charged battery packs • Additional printer driver files if you plan to use another printer • Proof of the country you are traveling in case you need to show it for taking...
... the computer. Do not use converter kits sold for the country to which you are traveling • Spare, fully-charged battery packs • Additional printer driver files if you plan to use another printer • Proof of the country you are traveling in case you need to show it for taking...

