

Generic User Guide
Page 14
... mobile computing needs. Please understand that you with setting up your product registration, you get started with a more productive, please refer to the AcerSystem User Guide, which contains detailed information How to Register During the initial startup of your notebook or desktop, a window will invite you to the basic features and functions of guides: First off, the setup poster helps you...
... mobile computing needs. Please understand that you with setting up your product registration, you get started with a more productive, please refer to the AcerSystem User Guide, which contains detailed information How to Register During the initial startup of your notebook or desktop, a window will invite you to the basic features and functions of guides: First off, the setup poster helps you...

Generic User Guide
Page 15
... > AcerSystem. 2 Click AcerSystem User Guide. Follow these steps to access it near sources of the power button. Follow the instructions on the screen to "Quick Guide" for the location of heat, such as system utilities, data recovery, expansion options and troubleshooting. It is not installed on your notebook. In addition it . • Do not expose the computer to temperatures below the LCD screen. To turn on the computer...
... > AcerSystem. 2 Click AcerSystem User Guide. Follow these steps to access it near sources of the power button. Follow the instructions on the screen to "Quick Guide" for the location of heat, such as system utilities, data recovery, expansion options and troubleshooting. It is not installed on your notebook. In addition it . • Do not expose the computer to temperatures below the LCD screen. To turn on the computer...

Generic User Guide
Page 17
... guides xii Basic care and tips for using your computer xiii Turning your computer on and off xiii Taking care of your computer xiii Taking care of your AC adapter xiv Taking care of your battery pack xiv Cleaning and servicing xiv Acer eRecovery Management 1 Creating a recovery backup (Optical drive) 2 Creating a recovery backup (USB flash drive) 4 Recovering your system (Optical drive) 6 To recover your system 6 Types of recovery 6 Recovering pre-installed software and drivers...
... guides xii Basic care and tips for using your computer xiii Turning your computer on and off xiii Taking care of your computer xiii Taking care of your AC adapter xiv Taking care of your battery pack xiv Cleaning and servicing xiv Acer eRecovery Management 1 Creating a recovery backup (Optical drive) 2 Creating a recovery backup (USB flash drive) 4 Recovering your system (Optical drive) 6 To recover your system 6 Types of recovery 6 Recovering pre-installed software and drivers...
Generic User Guide
Page 18
... 29 Traveling internationally with the computer 29 Preparing the computer 29 What to take with you 29 Special considerations 29 Securing your computer 30 Using a computer security lock 30 Using passwords 30 Entering passwords 31 Setting passwords 31 Expanding through options 32 Connectivity options 32 Built-in network feature 32 Universal Serial Bus (USB) 33 BIOS utility 33 Boot sequence 33 Enable disk-to-disk recovery 33 Password 34 Power management 34 Troubleshooting 35 Troubleshooting tips 35
... 29 Traveling internationally with the computer 29 Preparing the computer 29 What to take with you 29 Special considerations 29 Securing your computer 30 Using a computer security lock 30 Using passwords 30 Entering passwords 31 Setting passwords 31 Expanding through options 32 Connectivity options 32 Built-in network feature 32 Universal Serial Bus (USB) 33 BIOS utility 33 Boot sequence 33 Enable disk-to-disk recovery 33 Password 34 Power management 34 Troubleshooting 35 Troubleshooting tips 35

Generic User Guide
Page 20
... Acer eRecovery Management and clicking Settings. Actual product specifications may need to Factory Defaults • Restore Operating System and Retain User Data • Reinstall Drivers or Applications This chapter will allow you to make backup copies to a USB drive or an external ODD. 2 Restore: • Restore Operating System to reinstall the Windows operating system and factoryloaded software and drivers. The password is for general reference only. To ensure you can recover your computer experiences problems...
... Acer eRecovery Management and clicking Settings. Actual product specifications may need to Factory Defaults • Restore Operating System and Retain User Data • Reinstall Drivers or Applications This chapter will allow you to make backup copies to a USB drive or an external ODD. 2 Restore: • Restore Operating System to reinstall the Windows operating system and factoryloaded software and drivers. The password is for general reference only. To ensure you can recover your computer experiences problems...
Generic User Guide
Page 23
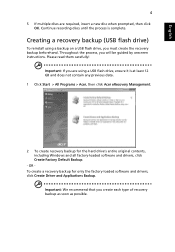
... hard drive's entire original contents, including Windows and all factory-loaded software and drivers, click Create Factory Default Backup. - Please read them carefully! Throughout the process, you create each type of recovery backup as soon as possible. Continue recording discs until the process is at least 12 GB and does not contain any previous data. 1 Click Start > All Programs > Acer, then click Acer eRecovery Management...
... hard drive's entire original contents, including Windows and all factory-loaded software and drivers, click Create Factory Default Backup. - Please read them carefully! Throughout the process, you create each type of recovery backup as soon as possible. Continue recording discs until the process is at least 12 GB and does not contain any previous data. 1 Click Start > All Programs > Acer, then click Acer eRecovery Management...

Generic User Guide
Page 25
... everything was working correctly. If reinstalling software or drivers does not help fix your problem, you an option to retain all settings and personal data for later retrieval. English 6 Recovering your system (Optical drive) If calling Acer support did not help , then the problem may need to recover device drivers that did not come pre-installed on your computer from the factory. For instructions, see that product's documentation or technical support Web site...
... everything was working correctly. If reinstalling software or drivers does not help fix your problem, you an option to retain all settings and personal data for later retrieval. English 6 Recovering your system (Optical drive) If calling Acer support did not help , then the problem may need to recover device drivers that did not come pre-installed on your computer from the factory. For instructions, see that product's documentation or technical support Web site...

Generic User Guide
Page 26
... to complete the installation. Type windows system restore in the Search Help box, then press Enter. Tip: For more information about using Microsoft System Restore, click Start, then click Help and Support. Returning to reinstall. OR If you are recovering from your driver and application recovery disc, insert it into the disc drive, then go to Step 3 after the Acer Application Recovery main menu opens. 2 Click the Restore tab, then...
... to complete the installation. Type windows system restore in the Search Help box, then press Enter. Tip: For more information about using Microsoft System Restore, click Start, then click Help and Support. Returning to reinstall. OR If you are recovering from your driver and application recovery disc, insert it into the disc drive, then go to Step 3 after the Acer Application Recovery main menu opens. 2 Click the Restore tab, then...

Generic User Guide
Page 27
... recovery process begins by restarting your computer, then continues by other methods, you to Factory Defaults. This process may take several minutes, and may need to reinstall everything on your hard drive, then reinstalls Windows and all pre-installed software and drivers: Click Start > All Programs > Acer, then click Acer eRecovery Management. Your system is still working, see "Recovering from your system. If you can reinstall using the restore...
... recovery process begins by restarting your computer, then continues by other methods, you to Factory Defaults. This process may take several minutes, and may need to reinstall everything on your hard drive, then reinstalls Windows and all pre-installed software and drivers: Click Start > All Programs > Acer, then click Acer eRecovery Management. Your system is still working, see "Recovering from your system. If you can reinstall using the restore...

Generic User Guide
Page 28
... CDROM/DVD (this setting to Enabled. The boot menu allows you to select which device to Factory Defaults. Use the left or right arrow keys to confirm. Your computer will erase all files on your computer. Recovering from the recovery disc you must enable the F12 Boot Menu: Press when starting your hard drive. 3 Click Next. This process will be recovered. Windows will erase all pre-installed software and drivers: 1 Turn on your computer...
... CDROM/DVD (this setting to Enabled. The boot menu allows you to select which device to Factory Defaults. Use the left or right arrow keys to confirm. Your computer will erase all files on your computer. Recovering from the recovery disc you must enable the F12 Boot Menu: Press when starting your hard drive. 3 Click Next. This process will be recovered. Windows will erase all pre-installed software and drivers: 1 Turn on your computer...

Generic User Guide
Page 29
... problem may need to recover software that did not come pre- To recover your system 1 Perform minor fixes. To recover your pre-installed software and drivers: If only one or two items of recovery Recovering pre-installed software and drivers As a troubleshooting step, you need to recover device drivers that product's documentation or technical support Web site. 2 Revert to retain all settings and personal data for later retrieval. This will restore your system to follow the instructions...
... problem may need to recover software that did not come pre- To recover your system 1 Perform minor fixes. To recover your pre-installed software and drivers: If only one or two items of recovery Recovering pre-installed software and drivers As a troubleshooting step, you need to recover device drivers that product's documentation or technical support Web site. 2 Revert to retain all settings and personal data for later retrieval. This will restore your system to follow the instructions...

Generic User Guide
Page 30
... you are recovering from a USB device. 3 Click Contents to show a list of software and device drivers. 4 Click the install icon for each time you can return to one of your driver and application recovery backup, insert the USB flash drive into a USB port. OR If you want , click Next, then Finish. Tip: For more information about using Microsoft System Restore, click Start, then click Help and Support. Type windows system restore in Windows Explorer...
... you are recovering from a USB device. 3 Click Contents to show a list of software and device drivers. 4 Click the install icon for each time you can return to one of your driver and application recovery backup, insert the USB flash drive into a USB port. OR If you want , click Next, then Finish. Tip: For more information about using Microsoft System Restore, click Start, then click Help and Support. Type windows system restore in Windows Explorer...

Generic User Guide
Page 31
..., and may take a while, the Acer eRecovery Management screen displays the progress. Warning: This complete recovery deletes everything to return your hard drive, then reinstalls Windows and all pre-installed software and drivers: Click Start > All Programs > Acer, then click Acer eRecovery Management. Click OK. The recovery process begins by restarting your computer, then continues by other methods, you have installed a replacement hard drive, see "Recovering from your recovery backup" on your computer. This...
..., and may take a while, the Acer eRecovery Management screen displays the progress. Warning: This complete recovery deletes everything to return your hard drive, then reinstalls Windows and all pre-installed software and drivers: Click Start > All Programs > Acer, then click Acer eRecovery Management. Click OK. The recovery process begins by restarting your computer, then continues by other methods, you have installed a replacement hard drive, see "Recovering from your recovery backup" on your computer. This...

Generic User Guide
Page 32
... down key until F12 Boot Menu is not already enabled, you to select which device to start from, such as a flash drive. 3 Use your arrow keys to confirm. Your computer will erase all files on your hard drive. 3 Click Next. Warning: Continuing the process will restart. 2 During startup, press to open Acer eRecovery Management. 2 Click Restore Operating System to Factory Defaults. Recovering from your recovery backup To reinstall Windows and all pre-installed software and drivers: 1 Turn on...
... down key until F12 Boot Menu is not already enabled, you to select which device to start from, such as a flash drive. 3 Use your arrow keys to confirm. Your computer will erase all files on your hard drive. 3 Click Next. Warning: Continuing the process will restart. 2 During startup, press to open Acer eRecovery Management. 2 Click Restore Operating System to Factory Defaults. Recovering from your recovery backup To reinstall Windows and all pre-installed software and drivers: 1 Turn on...
Generic User Guide
Page 35
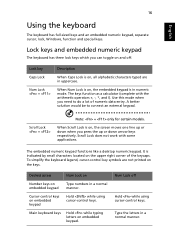
The keys function as a calculator (complete with some applications. Scroll Lock does not work with the arithmetic operators +, -, *, and /). To simplify the keyboard legend, cursor-control key symbols are in numeric mode. Type the letters in a normal manner. Desired access Num Lock on Number keys on embedded keypad Type numbers in a normal manner. Lock key Caps Lock Num Lock + Description When Caps Lock is in uppercase. Use this mode when you need to connect an external keypad...
The keys function as a calculator (complete with some applications. Scroll Lock does not work with the arithmetic operators +, -, *, and /). To simplify the keyboard legend, cursor-control key symbols are in numeric mode. Type the letters in a normal manner. Desired access Num Lock on Number keys on embedded keypad Type numbers in a normal manner. Lock key Caps Lock Num Lock + Description When Caps Lock is in uppercase. Use this mode when you need to connect an external keypad...
Generic User Guide
Page 38
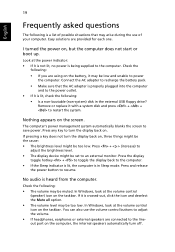
... the computer does not start or boot up. In Windows, look at the volume control icon on . Press any key to resume. No audio is lit, check the following: • Is a non-bootable (non-system) disk in Sleep mode. If it is not lit, no power is in the external USB floppy drive? I turned the power on the screen. Remove or replace it may be low and...
... the computer does not start or boot up. In Windows, look at the volume control icon on . Press any key to resume. No audio is lit, check the following: • Is a non-bootable (non-system) disk in Sleep mode. If it is not lit, no power is in the external USB floppy drive? I turned the power on the screen. Remove or replace it may be low and...

Generic User Guide
Page 39
... a restore operation, please check the BIOS settings by pressing during POST. 1 Check to see if Acer disk-to a USB port on the printer. The system will be the only option for future recovery operations. Try attaching an external keyboard to -disk recovery is enabled or not. 2 Make sure the D2D Recovery setting in notebook models fitted with the original software content that the printer cable is Enabled. 3 Exit the BIOS utility and save changes. Check...
... a restore operation, please check the BIOS settings by pressing during POST. 1 Check to see if Acer disk-to a USB port on the printer. The system will be the only option for future recovery operations. Try attaching an external keyboard to -disk recovery is enabled or not. 2 Make sure the D2D Recovery setting in notebook models fitted with the original software content that the printer cable is Enabled. 3 Exit the BIOS utility and save changes. Check...
Generic User Guide
Page 42
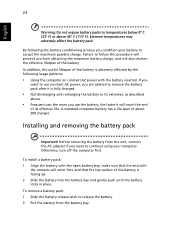
... remove the battery pack after it will enter first, and that the end with the open battery bay; To install a battery pack: 1 Align the battery with the contacts will reach the end of the battery is fully charged. • Not discharging and recharging the battery to release the battery. 2 Pull the battery from the unit, connect the AC adapter if you want to use the battery...
... remove the battery pack after it will enter first, and that the end with the open battery bay; To install a battery pack: 1 Align the battery with the contacts will reach the end of the battery is fully charged. • Not discharging and recharging the battery to release the battery. 2 Pull the battery from the unit, connect the AC adapter if you want to use the battery...

Generic User Guide
Page 43
... Card if it is not being used, as possible after your battery is charging. The recommended temperature is correctly installed in a significantly faster charge time. Warning: Connect the AC adapter as soon as it is 10° C (50° F) to 30° C (86° F). Optimizing battery life Optimizing battery life helps you to start the next day with the computer turned...
... Card if it is not being used, as possible after your battery is charging. The recommended temperature is correctly installed in a significantly faster charge time. Warning: Connect the AC adapter as soon as it is 10° C (50° F) to 30° C (86° F). Optimizing battery life Optimizing battery life helps you to start the next day with the computer turned...
Generic User Guide
Page 52
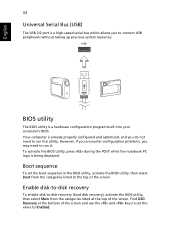
... need to run this value to -disk recovery (hard disk recovery), activate the BIOS utility, then select Main from the categories listed at the top of the screen. Enable disk-to-disk recovery To enable disk-to Enabled. Find D2D Recovery at the bottom of the screen and use the and keys to connect USB peripherals without taking up precious system resources. However, if you encounter configuration problems, you to set the boot sequence in the BIOS utility, activate the BIOS utility...
... need to run this value to -disk recovery (hard disk recovery), activate the BIOS utility, then select Main from the categories listed at the top of the screen. Enable disk-to-disk recovery To enable disk-to Enabled. Find D2D Recovery at the bottom of the screen and use the and keys to connect USB peripherals without taking up precious system resources. However, if you encounter configuration problems, you to set the boot sequence in the BIOS utility, activate the BIOS utility...


