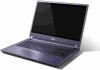
User Manual
Page 8
... frayed. Liquid was spilled into contact with the leaked fluids, rinse thoroughly with water and seek medical attention immediately. Do not pierce, open or disassemble the computer or battery. For safety reasons, and to prolong the lifetime of other risks. Refer all servicing to leak acid, become hot, explode or...
... frayed. Liquid was spilled into contact with the leaked fluids, rinse thoroughly with water and seek medical attention immediately. Do not pierce, open or disassemble the computer or battery. For safety reasons, and to prolong the lifetime of other risks. Refer all servicing to leak acid, become hot, explode or...
User Manual
Page 9
.... Please recycle when possible. Batteries may also explode if damaged. RADIO FREQUENCY INTERFERENCE Warning! Always try to qualified service personnel. Do not disassemble or dispose of them away from your body. Remember to follow any special regulations in force in any area, and always switch off all wireless... hot or cold battery may not work temporarily, even when the battery is prohibited or when it and its antenna are not limited to www.acer.com for this device. The battery can be reduced if the computer is left in hot or cold places, such as in a closed car...
.... Please recycle when possible. Batteries may also explode if damaged. RADIO FREQUENCY INTERFERENCE Warning! Always try to qualified service personnel. Do not disassemble or dispose of them away from your body. Remember to follow any special regulations in force in any area, and always switch off all wireless... hot or cold battery may not work temporarily, even when the battery is prohibited or when it and its antenna are not limited to www.acer.com for this device. The battery can be reduced if the computer is left in hot or cold places, such as in a closed car...

Acer Aspire M5-481T, PT, and TG Notebook Service Guide
Page 5
... 2-20 Removing BIOS Password 2-21 Miscellaneous Tools 2-23 Using DMI Tools 2-23 CHAPTER 3 Maintenance Procedures Introduction 3-3 General Information 3-3 Recommended Equipment 3-3 Screw Table 3-3 Maintenance Flowchart 3-4 Machine Disassembly 3-5 Getting Started 3-5 ODD Module Removal 3-6 Lower Cover Removal 3-8 Keyboard Backlight Removal 3-10 Keyboard Removal 3-11 Touch Pad Bracket Removal 3-12 Audio Board Removal 3-14 Audio...
... 2-20 Removing BIOS Password 2-21 Miscellaneous Tools 2-23 Using DMI Tools 2-23 CHAPTER 3 Maintenance Procedures Introduction 3-3 General Information 3-3 Recommended Equipment 3-3 Screw Table 3-3 Maintenance Flowchart 3-4 Machine Disassembly 3-5 Getting Started 3-5 ODD Module Removal 3-6 Lower Cover Removal 3-8 Keyboard Backlight Removal 3-10 Keyboard Removal 3-11 Touch Pad Bracket Removal 3-12 Audio Board Removal 3-14 Audio...
Acer Aspire M5-481T, PT, and TG Notebook Service Guide
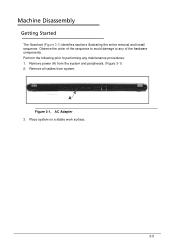
Page 87
Remove all cables from the system and peripherals. (Figure 3-1) 2. Remove power (A) from system. A Figure 3-1. Machine Disassembly 0 Getting Started 0 The flowchart (Figure 3-1) identifies sections illustrating the entire removal and install sequence. Place system on a stable work surface. 3-5 Perform the following prior to performing any of the sequence to avoid damage to any maintenance procedures: 1. Observe the order of the hardware components. AC Adapter 3.
Remove all cables from the system and peripherals. (Figure 3-1) 2. Remove power (A) from system. A Figure 3-1. Machine Disassembly 0 Getting Started 0 The flowchart (Figure 3-1) identifies sections illustrating the entire removal and install sequence. Place system on a stable work surface. 3-5 Perform the following prior to performing any of the sequence to avoid damage to any maintenance procedures: 1. Observe the order of the hardware components. AC Adapter 3.


