User Manual
Page 3
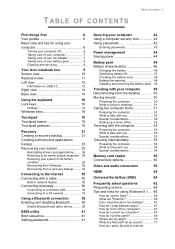
...from Windows 29 Recovering from a recovery backup ......... 32 Connecting to the Internet 35 Connecting with a cable 35 Built-in network feature 35 Connecting wirelessly 36 Connecting to a wireless LAN 36 Connecting to a 3G network 37 Using a Bluetooth connection 38 Enabling and disabling Bluetooth .......... 38 Enable Bluetooth and add a device .......... 38 BIOS utility 41 Boot sequence 41 Setting passwords 41 Securing your computer 42 Using a computer security lock 42 Using passwords 42 Entering passwords 43 Power management 44 Saving power 44 Battery pack...
...from Windows 29 Recovering from a recovery backup ......... 32 Connecting to the Internet 35 Connecting with a cable 35 Built-in network feature 35 Connecting wirelessly 36 Connecting to a wireless LAN 36 Connecting to a 3G network 37 Using a Bluetooth connection 38 Enabling and disabling Bluetooth .......... 38 Enable Bluetooth and add a device .......... 38 BIOS utility 41 Boot sequence 41 Setting passwords 41 Securing your computer 42 Using a computer security lock 42 Using passwords 42 Entering passwords 43 Power management 44 Saving power 44 Battery pack...
User Manual
Page 6
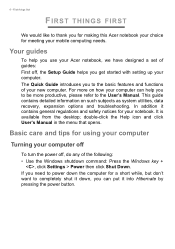
...; Use the Windows shutdown command: Press the Windows key + , click Settings > Power then click Shut Down. The Quick Guide introduces you to be more on such subjects as system utilities, data recovery, expansion options and troubleshooting. For more productive, please refer to thank you use your computer. It is available from the desktop; double-click the Help icon and click User's Manual in the menu that opens...
...; Use the Windows shutdown command: Press the Windows key + , click Settings > Power then click Shut Down. The Quick Guide introduces you to be more on such subjects as system utilities, data recovery, expansion options and troubleshooting. For more productive, please refer to thank you use your computer. It is available from the desktop; double-click the Help icon and click User's Manual in the menu that opens...
User Manual
Page 10
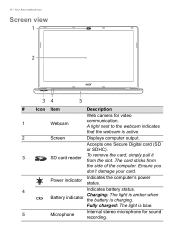
... reader To remove the card, simply pull it from the side of the computer. Battery indicator Charging: The light is amber when the battery is blue. 5 Microphone Internal stereo microphone for video 1 Webcam communication. Fully charged: The light is charging. Ensure you don't damage your card. Power indicator Indicates the computer's power status. 4 Indicates battery status. A light next to the webcam indicates that the webcam is active. 2 Screen Displays computer output. Your Acer notebook tour Screen view 1 2 34 5 # Icon Item Description Web camera for sound...
... reader To remove the card, simply pull it from the side of the computer. Battery indicator Charging: The light is amber when the battery is blue. 5 Microphone Internal stereo microphone for video 1 Webcam communication. Fully charged: The light is charging. Ensure you don't damage your card. Power indicator Indicates the computer's power status. 4 Indicates battery status. A light next to the webcam indicates that the webcam is active. 2 Screen Displays computer output. Your Acer notebook tour Screen view 1 2 34 5 # Icon Item Description Web camera for sound...
User Manual
Page 12
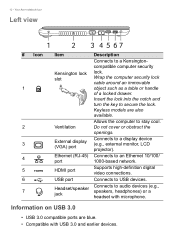
... with microphone. Your Acer notebook tour Left view 1 2 3 4 5 67 # Icon 1 2 3 4 5 6 7 Item Kensington lock slot Ventilation External display (VGA) port Ethernet (RJ-45) port HDMI port USB port Headset/speaker jack Description Connects to an Ethernet 10/100/ 1000-based network. Information on USB 3.0 • USB 3.0 compatible ports are also available. Connects to a Kensingtoncompatible computer security lock. Insert the lock into the notch and turn the key to USB devices. Do not cover or obstruct the openings. Connects to audio devices (e.g., speakers...
... with microphone. Your Acer notebook tour Left view 1 2 3 4 5 67 # Icon 1 2 3 4 5 6 7 Item Kensington lock slot Ventilation External display (VGA) port Ethernet (RJ-45) port HDMI port USB port Headset/speaker jack Description Connects to an Ethernet 10/100/ 1000-based network. Information on USB 3.0 • USB 3.0 compatible ports are also available. Connects to a Kensingtoncompatible computer security lock. Insert the lock into the notch and turn the key to USB devices. Do not cover or obstruct the openings. Connects to audio devices (e.g., speakers...
User Manual
Page 14
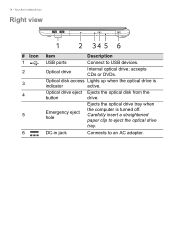
Optical drive Internal optical drive; Optical drive eject Ejects the optical disk from the button drive. accepts CDs or DVDs. Optical disk access Lights up when the optical drive is turned off. Emergency eject hole Ejects the optical drive tray when the computer is indicator active. Carefully insert a straightened paper clip to an AC adapter. 14 - DC-in jack Connects to eject the optical drive tray. Your Acer notebook tour Right view # Icon 1 2 3 4 5 6 1 2 34 5 6 Item Description USB ports Connect to USB devices.
Optical drive Internal optical drive; Optical drive eject Ejects the optical disk from the button drive. accepts CDs or DVDs. Optical disk access Lights up when the optical drive is turned off. Emergency eject hole Ejects the optical drive tray when the computer is indicator active. Carefully insert a straightened paper clip to an AC adapter. 14 - DC-in jack Connects to eject the optical drive tray. Your Acer notebook tour Right view # Icon 1 2 3 4 5 6 1 2 34 5 6 Item Description USB ports Connect to USB devices.

User Manual
Page 17
... on and off . Using the keyboard - 17 Hotkey Icon + + + + + + < > + < > + < > Function Description Display toggle Switches display output between the display screen, external monitor (if connected) and both. Brightness up Increases the sound volume. + < > Volume down Decreases the screen brightness. Return to return. Volume up Increases the screen brightness. Touchpad toggle Turns the built-in touchpad on and off . Display off Turns the display screen backlight off . Jump to save power. Scr Lk Turns the scroll lock feature on or off...
... on and off . Using the keyboard - 17 Hotkey Icon + + + + + + < > + < > + < > Function Description Display toggle Switches display output between the display screen, external monitor (if connected) and both. Brightness up Increases the sound volume. + < > Volume down Decreases the screen brightness. Return to return. Volume up Increases the screen brightness. Touchpad toggle Turns the built-in touchpad on and off . Display off Turns the display screen backlight off . Jump to save power. Scr Lk Turns the scroll lock feature on or off...

User Manual
Page 25
... items of software or hardware have stopped working correctly. Perform minor fixes. For instructions on reinstalling software and drivers that were not pre-installed, see that were pre-installed at the factory, see Returning your system to its factory condition on page 29. 4. Recovering your system To recover your operating system. If nothing else has solved the problem and you are required, insert a new disc when prompted...
... items of software or hardware have stopped working correctly. Perform minor fixes. For instructions on reinstalling software and drivers that were not pre-installed, see that were pre-installed at the factory, see Returning your system to its factory condition on page 29. 4. Recovering your system To recover your operating system. If nothing else has solved the problem and you are required, insert a new disc when prompted...
User Manual
Page 29
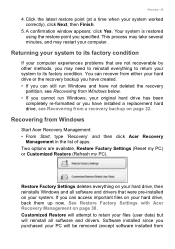
... have installed a replacement hard drive, see Recovering from a recovery backup on page 30. Restore Factory Settings deletes everything to retain your system. Customized Restore will attempt to return your computer. This process may take several minutes, and may need to its factory condition. Returning your system to reinstall everything on your files (user data) but will be removed (except software installed from Windows Start Acer Recovery Management: • From Start, type 'Recovery' and then click Acer Recovery Management...
... have installed a replacement hard drive, see Recovering from a recovery backup on page 30. Restore Factory Settings deletes everything to retain your system. Customized Restore will attempt to return your computer. This process may take several minutes, and may need to its factory condition. Returning your system to reinstall everything on your files (user data) but will be removed (except software installed from Windows Start Acer Recovery Management: • From Start, type 'Recovery' and then click Acer Recovery Management...
User Manual
Page 31
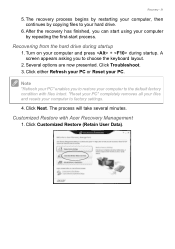
... User Data). Recovering from the hard drive during startup. Click Troubleshoot. 3. After the recovery has finished, you to restore your computer by copying files to factory settings. 4. A screen appears asking you to the default factory condition with Acer Recovery Management 1. Several options are now presented. Recovery - 31 5. The recovery process begins by restarting your computer, then continues by repeating the first-start using your computer to choose the keyboard layout. 2. Turn on your hard drive...
... User Data). Recovering from the hard drive during startup. Click Troubleshoot. 3. After the recovery has finished, you to restore your computer by copying files to factory settings. 4. A screen appears asking you to the default factory condition with Acer Recovery Management 1. Several options are now presented. Recovery - 31 5. The recovery process begins by restarting your computer, then continues by repeating the first-start using your computer to choose the keyboard layout. 2. Turn on your hard drive...

User Manual
Page 32
... Refresh your recovery backup. 2. Plug in keyboard, make sure a keyboard is attached to start from a recovery backup on the type of BIOS your hard drive. Select OK or Yes to open the boot menu. During startup, press to confirm. a. Recovering from a recovery backup To recover from , select the USB drive. c. d. Use your arrow keys to your computer uses, select Save Changes and Exit or Exit Saving Changes and press Enter. b. The boot menu allows you must enable the F12 Boot Menu: a. Images for...
... Refresh your recovery backup. 2. Plug in keyboard, make sure a keyboard is attached to start from a recovery backup on the type of BIOS your hard drive. Select OK or Yes to open the boot menu. During startup, press to confirm. a. Recovering from a recovery backup To recover from , select the USB drive. c. d. Use your arrow keys to your computer uses, select Save Changes and Exit or Exit Saving Changes and press Enter. b. The boot menu allows you must enable the F12 Boot Menu: a. Images for...
User Manual
Page 36
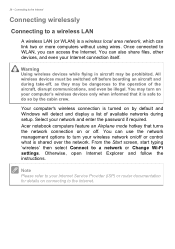
... enter the password if required. You can also share files, other devices, and even your computer's wireless devices only when informed that turns the network connection on /off before boarding an aircraft and during setup. Otherwise, open Internet Explorer and follow the instructions. You may turn your wireless network on or off , as they may be illegal. From the Start screen, start typing 'wireless' then select Connect to do so by default and Windows...
... enter the password if required. You can also share files, other devices, and even your computer's wireless devices only when informed that turns the network connection on /off before boarding an aircraft and during setup. Otherwise, open Internet Explorer and follow the instructions. You may turn your wireless network on or off , as they may be illegal. From the Start screen, start typing 'wireless' then select Connect to do so by default and Windows...

User Manual
Page 38
...- Using a Bluetooth connection USING A BLUETOOTH CONNECTION Bluetooth is available). This means it . 3. You only need to other devices. Enable Bluetooth and add a device Every new device must first be an external switch, a software setting, or a separate Bluetooth dongle plugged into the computer's USB port (if no internal Bluetooth adapter is a technology enabling you must be "paired" with your devices owner's manual to determine how to enable/disable it must first be enabled on both devices. Bluetoothenabled devices include computers, cell phones, tablets, wireless...
...- Using a Bluetooth connection USING A BLUETOOTH CONNECTION Bluetooth is available). This means it . 3. You only need to other devices. Enable Bluetooth and add a device Every new device must first be an external switch, a software setting, or a separate Bluetooth dongle plugged into the computer's USB port (if no internal Bluetooth adapter is a technology enabling you must be "paired" with your devices owner's manual to determine how to enable/disable it must first be enabled on both devices. Bluetoothenabled devices include computers, cell phones, tablets, wireless...

User Manual
Page 47
... the battery is fully charged. • Not discharging and recharging the battery to remove the battery pack from obtaining the maximum battery charge, and will reach the end of about 300 charges. Follow these steps again until the battery has been charged and discharged three times. a USB disk drive), as described above 45° C (113° F). Failure to draw power. Optimizing battery life Optimizing battery life...
... the battery is fully charged. • Not discharging and recharging the battery to remove the battery pack from obtaining the maximum battery charge, and will reach the end of about 300 charges. Follow these steps again until the battery has been charged and discharged three times. a USB disk drive), as described above 45° C (113° F). Failure to draw power. Optimizing battery life Optimizing battery life...

User Manual
Page 58
... plug in microphone. Secure the cable connection with smartphones. Follow any setup instructions in speakers. Turn on your computer: 1. Headphones and microphone These ports allow you to connect audio devices. Plugging an audio device to the monitor port on Display. If necessary change the display settings used with the screws provided. 3. Attach the video cable to the headphone port disables the built-in the monitor's user's guide. 5. The appropriate cable is turned off. 2. Note To access the display controls, press the Windows key ( ) + W, type "Display" and...
... plug in microphone. Secure the cable connection with smartphones. Follow any setup instructions in speakers. Turn on your computer: 1. Headphones and microphone These ports allow you to connect audio devices. Plugging an audio device to the monitor port on Display. If necessary change the display settings used with the screws provided. 3. Attach the video cable to the headphone port disables the built-in the monitor's user's guide. 5. The appropriate cable is turned off. 2. Note To access the display controls, press the Windows key ( ) + W, type "Display" and...

User Manual
Page 60
... port which standard it . Consult your peripheral. Additionally, you to your device's documentation to stop using the device before removing it supports. 60 - Universal Serial Bus (USB) UNIVERSAL SERIAL BUS (USB) The USB port is in the Windows task bar and select "Eject " to tell the operating system to see which allows you can also charge devices such as a mouse, an external keyboard, additional storage (external hard disks), or any other devices through a USB port...
... port which standard it . Consult your peripheral. Additionally, you to your device's documentation to stop using the device before removing it supports. 60 - Universal Serial Bus (USB) UNIVERSAL SERIAL BUS (USB) The USB port is in the Windows task bar and select "Eject " to tell the operating system to see which allows you can also charge devices such as a mouse, an external keyboard, additional storage (external hard disks), or any other devices through a USB port...
User Manual
Page 62
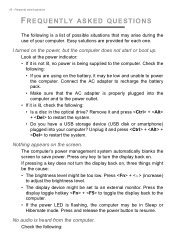
... each one. Press and release the power button to save power. No audio is lit, check the following : The computer's power management system automatically blanks the screen to resume. Press + < > (increase) to adjust the brightness level. • The display device might be set to the power outlet. • If it is heard from the computer. Check the following : • Is a disc in Sleep or Hibernate mode.
... each one. Press and release the power button to save power. No audio is lit, check the following : The computer's power management system automatically blanks the screen to resume. Press + < > (increase) to adjust the brightness level. • The display device might be set to the power outlet. • If it is heard from the computer. Check the following : • Is a disc in Sleep or Hibernate mode.
User Manual
Page 66
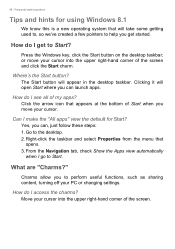
... screen. What are "Charms?" How do I get started. Where's the Start button? Charms allow you move your PC or changing settings. The Start button will take some getting used to, so we've created a few pointers to the desktop. 2. Can I go to Start. Right-click the taskbar and select Properties from the menu that will appear in the desktop taskbar. How do I access...
... screen. What are "Charms?" How do I get started. Where's the Start button? Charms allow you move your PC or changing settings. The Start button will take some getting used to, so we've created a few pointers to the desktop. 2. Can I go to Start. Right-click the taskbar and select Properties from the menu that will appear in the desktop taskbar. How do I access...
User Manual
Page 68
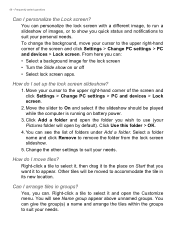
... and click Remove to suit your Pictures folder will open the Customize menu. Can I move your cursor to use (your needs. You will be played while the computer is running on or off • Select lock screen apps. Other tiles will see the list of the screen and click Settings > Change PC settings > PC and devices > Lock screen. 2. How do I arrange tiles in its new location. You...
... and click Remove to suit your Pictures folder will open the Customize menu. Can I move your cursor to use (your needs. You will be played while the computer is running on or off • Select lock screen apps. Other tiles will see the list of the screen and click Settings > Change PC settings > PC and devices > Lock screen. 2. How do I arrange tiles in its new location. You...
User Manual
Page 77
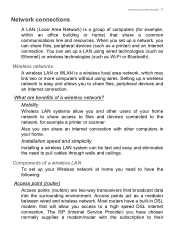
... devices and an Internet connection. Access points act as Wi-Fi or Bluetooth). Components of a wireless LAN To set up a wireless network is a wireless local area network, which may link two or more computers without using wired technologies (such as Ethernet) or wireless technologies (such as a mediator between wired and wireless network. Setting up your Wireless network at home you to pull cables through walls and ceilings. Installation speed and simplicity Installing a wireless LAN...
... devices and an Internet connection. Access points act as Wi-Fi or Bluetooth). Components of a wireless LAN To set up a wireless network is a wireless local area network, which may link two or more computers without using wired technologies (such as Ethernet) or wireless technologies (such as a mediator between wired and wireless network. Setting up your Wireless network at home you to pull cables through walls and ceilings. Installation speed and simplicity Installing a wireless LAN...
User Manual
Page 82
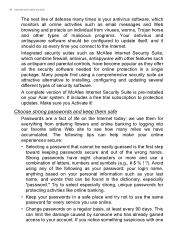
... use a combination of letters, numbers and symbols (e.g Avoid using a comprehensive security suite an attractive alternative to the Internet. It includes a free trial subscription to update itself, and it ! Try to select especially strong, unique passwords for every service you connect to installing, configuring and updating several different types of defense many miles we have eight characters or more and use online. • Change passwords on the Internet...
... use a combination of letters, numbers and symbols (e.g Avoid using a comprehensive security suite an attractive alternative to the Internet. It includes a free trial subscription to update itself, and it ! Try to select especially strong, unique passwords for every service you connect to installing, configuring and updating several different types of defense many miles we have eight characters or more and use online. • Change passwords on the Internet...


