User Manual
Page 3
... adapter 19 Battery pack 59 Taking care of your battery pack 19 Cleaning and servicing 19 Battery pack characteristics 59 Charging the battery 59 Your Acer notebook tour 21 Optimizing battery life 61 Screen view 22 Keyboard view 24 Left view 25 Information on USB 3.0 26 Checking the battery level 62 Battery...
... adapter 19 Battery pack 59 Taking care of your battery pack 19 Cleaning and servicing 19 Battery pack characteristics 59 Charging the battery 59 Your Acer notebook tour 21 Optimizing battery life 61 Screen view 22 Keyboard view 24 Left view 25 Information on USB 3.0 26 Checking the battery level 62 Battery...
User Manual
Page 17
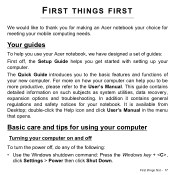
...such subjects as system utilities, data recovery, expansion options and troubleshooting. FIRST THINGS FIRST We would like to thank you for making an Acer notebook your choice for meeting your computer can help you use your computer. The Quick Guide introduces you to the User's Manual. In addition...new computer. First things first - 17 Your guides To help you get started with setting up your Acer notebook, we have designed a set of guides: First off , do any of your notebook. This guide contains detailed information on and off To turn the power off , the Setup Guide ...
...such subjects as system utilities, data recovery, expansion options and troubleshooting. FIRST THINGS FIRST We would like to thank you for making an Acer notebook your choice for meeting your computer can help you use your computer. The Quick Guide introduces you to the User's Manual. In addition...new computer. First things first - 17 Your guides To help you get started with setting up your Acer notebook, we have designed a set of guides: First off , do any of your notebook. This guide contains detailed information on and off To turn the power off , the Setup Guide ...
User Manual
Page 21
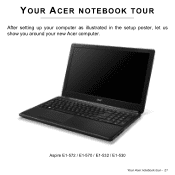
Aspire E1-572 / E1-570 / E1-532 / E1-530 Your Acer notebook tour - 21 YOUR ACER NOTEBOOK TOUR After setting up your computer as illustrated in the setup poster, let us show you around your new Acer computer.
Aspire E1-572 / E1-570 / E1-532 / E1-530 Your Acer notebook tour - 21 YOUR ACER NOTEBOOK TOUR After setting up your computer as illustrated in the setup poster, let us show you around your new Acer computer.
User Manual
Page 22
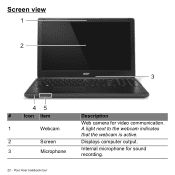
Screen view 1 2 3 45 # Icon Item 1 Webcam 2 Screen 3 Microphone 22 - A light next to the webcam indicates that the webcam is active. Displays computer output. Internal microphone for video communication. Your Acer notebook tour Description Web camera for sound recording.
Screen view 1 2 3 45 # Icon Item 1 Webcam 2 Screen 3 Microphone 22 - A light next to the webcam indicates that the webcam is active. Displays computer output. Internal microphone for video communication. Your Acer notebook tour Description Web camera for sound recording.
User Manual
Page 23
# Icon Item Description Accepts one Secure Digital (SD or 4 SD card reader SDHC) card. Charging: The light is amber when the Battery indicator battery is charging. 5 Fully charged: The light is active. HDD indicator Indicates when the hard disk drive is blue when plugged in. Your Acer notebook tour - 23 Communication Indicates the computer's wireless indicator connectivity device status. Indicates the computer's battery status. Note: Push to remove/install the card. Power indicator Indicates the computer's power status.
# Icon Item Description Accepts one Secure Digital (SD or 4 SD card reader SDHC) card. Charging: The light is amber when the Battery indicator battery is charging. 5 Fully charged: The light is active. HDD indicator Indicates when the hard disk drive is blue when plugged in. Your Acer notebook tour - 23 Communication Indicates the computer's wireless indicator connectivity device status. Indicates the computer's battery status. Note: Push to remove/install the card. Power indicator Indicates the computer's power status.
User Manual
Page 24
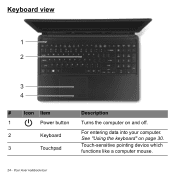
Keyboard view 1 2 3 4 # Icon Item Description 1 Power button Turns the computer on page 30. 3 Touchpad Touch-sensitive pointing device which functions like a computer mouse. 24 - Your Acer notebook tour See "Using the keyboard" on and off. 2 Keyboard For entering data into your computer.
Keyboard view 1 2 3 4 # Icon Item Description 1 Power button Turns the computer on page 30. 3 Touchpad Touch-sensitive pointing device which functions like a computer mouse. 24 - Your Acer notebook tour See "Using the keyboard" on and off. 2 Keyboard For entering data into your computer.
User Manual
Page 25
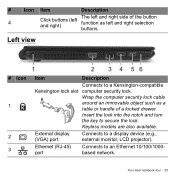
... or handle of a locked drawer. Insert the lock into the notch and turn the key to a Kensington-compatible Kensington lock slot computer security lock. Your Acer notebook tour - 25 # Icon Item Description 4 Click buttons (left and right) The left and right selection buttons. Keyless models are also available. Ethernet (RJ-45) port...
... or handle of a locked drawer. Insert the lock into the notch and turn the key to a Kensington-compatible Kensington lock slot computer security lock. Your Acer notebook tour - 25 # Icon Item Description 4 Click buttons (left and right) The left and right selection buttons. Keyless models are also available. Ethernet (RJ-45) port...
User Manual
Page 26
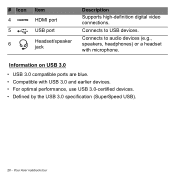
Connects to audio devices (e.g., speakers, headphones) or a headset with USB 3.0 and earlier devices. • For optimal performance, use USB 3.0-certified devices. • Defined by the USB 3.0 specification (SuperSpeed USB). 26 - Your Acer notebook tour Information on USB 3.0 • USB 3.0 compatible ports are blue. • Compatible with microphone. Connects to USB devices. # Icon 4 5 6 Item HDMI port USB port Headset/speaker jack Description Supports high-definition digital video connections.
Connects to audio devices (e.g., speakers, headphones) or a headset with USB 3.0 and earlier devices. • For optimal performance, use USB 3.0-certified devices. • Defined by the USB 3.0 specification (SuperSpeed USB). 26 - Your Acer notebook tour Information on USB 3.0 • USB 3.0 compatible ports are blue. • Compatible with microphone. Connects to USB devices. # Icon 4 5 6 Item HDMI port USB port Headset/speaker jack Description Supports high-definition digital video connections.
User Manual
Page 27
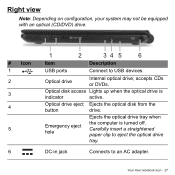
Optical drive eject Ejects the optical disk from the button drive. Optical disk access Lights up when the optical drive is turned off. Your Acer notebook tour - 27 accepts CDs or DVDs. Emergency eject hole Ejects the optical drive tray when the computer is indicator active. Carefully insert a straightened paper clip ...
Optical drive eject Ejects the optical disk from the button drive. Optical disk access Lights up when the optical drive is turned off. Your Acer notebook tour - 27 accepts CDs or DVDs. Emergency eject hole Ejects the optical drive tray when the computer is indicator active. Carefully insert a straightened paper clip ...
User Manual
Page 28
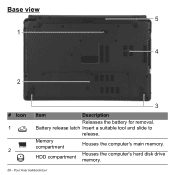
Base view 5 1 4 2 # Icon 1 2 3 Item Description Releases the battery for removal. Your Acer notebook tour Battery release latch Insert a suitable tool and slide to release. HDD compartment Houses the computer's hard disk drive memory. 28 - Memory compartment Houses the computer's main memory.
Base view 5 1 4 2 # Icon 1 2 3 Item Description Releases the battery for removal. Your Acer notebook tour Battery release latch Insert a suitable tool and slide to release. HDD compartment Houses the computer's hard disk drive memory. 28 - Memory compartment Houses the computer's main memory.

User Manual
Page 29
Your Acer notebook tour - 29 # Icon Item Description 3 Speakers Deliver stereo audio output. 4 Ventilation and cooling fan Allows the computer to stay cool. Note: For models with an AMD processor and a single memory module: If you replace the memory module, the new module must go into the same slot occupied by the module that was removed. Do not cover or obstruct the openings. 5 Battery bay Houses the computer's battery pack.
Your Acer notebook tour - 29 # Icon Item Description 3 Speakers Deliver stereo audio output. 4 Ventilation and cooling fan Allows the computer to stay cool. Note: For models with an AMD processor and a single memory module: If you replace the memory module, the new module must go into the same slot occupied by the module that was removed. Do not cover or obstruct the openings. 5 Battery bay Houses the computer's battery pack.


