
Safety Guide
Page 10
... damage rotor devices, HDD, optical drive, and even exposure risk from overheating. Do not pack your skin or body. • Your device and its enhancements may contain small parts. 10 - Never spill liquid of the product and to protect it under sporting, exercising, or any vibrating environment which will rise during normal operation, particularly when plugged in a tightly...
... damage rotor devices, HDD, optical drive, and even exposure risk from overheating. Do not pack your skin or body. • Your device and its enhancements may contain small parts. 10 - Never spill liquid of the product and to protect it under sporting, exercising, or any vibrating environment which will rise during normal operation, particularly when plugged in a tightly...

Safety Guide
Page 12
... plug into is easily accessible and located as close to the AC power outlet. Using electrical power • Do not connect the adapter to unplug from the type of information deletion from electrostatic damage to rest on the cord. Disconnecting the power source Observe the following guidelines when connecting and disconnecting power to the power supply unit: Install the power supply unit before removing the power supply unit from the power supplies...
... plug into is easily accessible and located as close to the AC power outlet. Using electrical power • Do not connect the adapter to unplug from the type of information deletion from electrostatic damage to rest on the cord. Disconnecting the power source Observe the following guidelines when connecting and disconnecting power to the power supply unit: Install the power supply unit before removing the power supply unit from the power supplies...
Safety Guide
Page 21
... should not hold the device to the settings in Power Management). • Wake the computer from sleep mode by pushing keyboard or moving mouse. • Computers will save more than 80% energy at "sleep" mode. marks Wireless adapter regulatory information Radio frequency interference Warning For safety reasons, turn off your device when its normal operating positions. This device meets RF exposure guidelines when used normally. Parts of data files...
... should not hold the device to the settings in Power Management). • Wake the computer from sleep mode by pushing keyboard or moving mouse. • Computers will save more than 80% energy at "sleep" mode. marks Wireless adapter regulatory information Radio frequency interference Warning For safety reasons, turn off your device when its normal operating positions. This device meets RF exposure guidelines when used normally. Parts of data files...
Safety Guide
Page 23
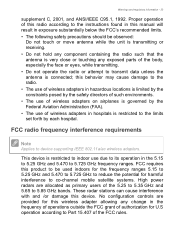
... of the 5.25 to 5.35 GHz and 5.65 to device supporting IEEE 802.11a/ac wireless adapters. No configuration controls are provided for harmful interference to co-channel mobile satellite systems. High power radars are allocated as primary users of authorization for U.S operation according to transmit data unless the antenna is connected; Warnings and regulatory information - 23 supplement C, 2001, and...
... of the 5.25 to 5.35 GHz and 5.65 to device supporting IEEE 802.11a/ac wireless adapters. No configuration controls are provided for harmful interference to co-channel mobile satellite systems. High power radars are allocated as primary users of authorization for U.S operation according to transmit data unless the antenna is connected; Warnings and regulatory information - 23 supplement C, 2001, and...
User Manual
Page 2
... Acer product If your new device runs on the Operating System version. Some features described in this manual is subject to change without notice. Enter S/N or SNID of purchase All Rights Reserved. Acer Group shall not be supported depending on Windows OS, you may have had your product registered automatically while you are for an Acer ID. 4. The information contained in this manual. Aspire...
... Acer product If your new device runs on the Operating System version. Some features described in this manual is subject to change without notice. Enter S/N or SNID of purchase All Rights Reserved. Acer Group shall not be supported depending on Windows OS, you may have had your product registered automatically while you are for an Acer ID. 4. The information contained in this manual. Aspire...
User Manual
Page 3
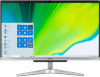
... Entering passwords 19 BIOS utility 20 Boot sequence 20 Setting passwords 20 Power management 21 Saving power 21 Ports and connectors 23 USB 3.2 Gen 1 information 23 USB 3.2 Gen 2 information 24 Rear panel audio ports 24 Universal Serial Bus (USB) 25 USB Type-C port 26 HDMI 27 SD card reader 28 Video and audio connectors 29 Connecting a monitor 29 Headphones and microphone 29 Frequently asked questions 31 Requesting service 33 Tips and hints for using Windows 10 ..... 34 How do I get to Start 34 How do I turn...
... Entering passwords 19 BIOS utility 20 Boot sequence 20 Setting passwords 20 Power management 21 Saving power 21 Ports and connectors 23 USB 3.2 Gen 1 information 23 USB 3.2 Gen 2 information 24 Rear panel audio ports 24 Universal Serial Bus (USB) 25 USB Type-C port 26 HDMI 27 SD card reader 28 Video and audio connectors 29 Connecting a monitor 29 Headphones and microphone 29 Frequently asked questions 31 Requesting service 33 Tips and hints for using Windows 10 ..... 34 How do I get to Start 34 How do I turn...

User Manual
Page 5
... manually entering the serial number, SNID, or product model. 3. Once you have designed a set of the following: • Use the Windows shutdown command: Press the Windows key or select the Windows Start button, select Power > Shut down to Drivers and Manuals and search for using your computer Turning your computer off To turn the power off , the Setup Guide (or Setup Poster) helps you get started with setting up your Acer desktop computer, we have connected to the internet...
... manually entering the serial number, SNID, or product model. 3. Once you have designed a set of the following: • Use the Windows shutdown command: Press the Windows key or select the Windows Start button, select Power > Shut down to Drivers and Manuals and search for using your computer Turning your computer off To turn the power off , the Setup Guide (or Setup Poster) helps you get started with setting up your Acer desktop computer, we have connected to the internet...
User Manual
Page 8
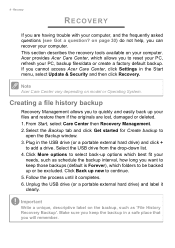
Recovery RECOVERY If you cannot access Acer Care Center, click Settings in the USB drive (or a portable external hard drive) and click + to select back-up or be excluded. If you are lost, damaged or deleted. 1. From Start, select Care Center then Recovery Management. 2. Click More options to add a drive. Follow the process until it clearly. Acer provides Acer Care Center, which folders to continue. 5. This section describes the recovery tools available on page...
Recovery RECOVERY If you cannot access Acer Care Center, click Settings in the USB drive (or a portable external hard drive) and click + to select back-up or be excluded. If you are lost, damaged or deleted. 1. From Start, select Care Center then Recovery Management. 2. Click More options to add a drive. Follow the process until it clearly. Acer provides Acer Care Center, which folders to continue. 5. This section describes the recovery tools available on page...

User Manual
Page 11
... the process until it is installing Windows. From Start, select Care Center then Recovery Management. 2. The screen will reinstall Windows, change settings back to their factory defaults and remove all preinstalled apps and programs without removing your PC will have been reset back to its factory default. 4. Your PC will turn back on when it completes. Click Change settings to continue. Click Reset to continue. The screen will restart several times during...
... the process until it is installing Windows. From Start, select Care Center then Recovery Management. 2. The screen will reinstall Windows, change settings back to their factory defaults and remove all preinstalled apps and programs without removing your PC will have been reset back to its factory default. 4. Your PC will turn back on when it completes. Click Change settings to continue. Click Reset to continue. The screen will restart several times during...
User Manual
Page 13
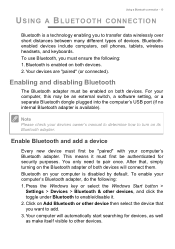
...'s USB port (if no internal Bluetooth adapter is available). Enable Bluetooth and add a device Every new device must be enabled on its Bluetooth adapter. After that, simply turning on Add Bluetooth or other device then select the device that you must ensure the following : 1. Bluetoothenabled devices include computers, cell phones, tablets, wireless headsets, and keyboards. Your devices are "paired" (or connected). Your computer will connect them. Press the Windows key or select the Windows Start button > Settings > Devices...
...'s USB port (if no internal Bluetooth adapter is available). Enable Bluetooth and add a device Every new device must be enabled on its Bluetooth adapter. After that, simply turning on Add Bluetooth or other device then select the device that you must ensure the following : 1. Bluetoothenabled devices include computers, cell phones, tablets, wireless headsets, and keyboards. Your devices are "paired" (or connected). Your computer will connect them. Press the Windows key or select the Windows Start button > Settings > Devices...
User Manual
Page 15
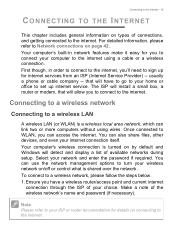
... or cable company -- Your computer's wireless connection is turned on by default and Windows will detect and display a list of the wireless network's name and password (if necessary). Make a note of available networks during setup. Ensure you have to go to your home or office to set up for internet services from an ISP (Internet Service Provider) -- Connecting to the Internet - 15 CONNECTING TO THE INTERNET This chapter includes general information on types of...
... or cable company -- Your computer's wireless connection is turned on by default and Windows will detect and display a list of the wireless network's name and password (if necessary). Make a note of available networks during setup. Ensure you have to go to your home or office to set up for internet services from an ISP (Internet Service Provider) -- Connecting to the Internet - 15 CONNECTING TO THE INTERNET This chapter includes general information on types of...

User Manual
Page 16
... turned off, please click Wi-Fi tile to the Internet 2. Once you wish to get online. Connecting to turn it on your router (refer to the image below.) Then, you'll be ready to use. 4. Click Network icon in network feature If your computer has a network port, plug one you select a wireless network, select Connect. 5. Connecting with a cable Built-in the notification area. If required, enter the network's password...
... turned off, please click Wi-Fi tile to the Internet 2. Once you wish to get online. Connecting to turn it on your router (refer to the image below.) Then, you'll be ready to use. 4. Click Network icon in network feature If your computer has a network port, plug one you select a wireless network, select Connect. 5. Connecting with a cable Built-in the notification area. If required, enter the network's password...
User Manual
Page 18
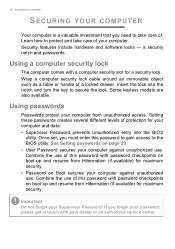
... password checkpoints on Boot secures your computer and data: • Supervisor Password prevents unauthorized entry into the notch and turn the key to the BIOS utility. Wrap a computer security lock cable around an immovable object such as a table or handle of protection for maximum security. • Password on boot-up and resume from unauthorized access. Some keyless models are also available. Setting these passwords...
... password checkpoints on Boot secures your computer and data: • Supervisor Password prevents unauthorized entry into the notch and turn the key to the BIOS utility. Wrap a computer security lock cable around an immovable object such as a table or handle of protection for maximum security. • Password on boot-up and resume from unauthorized access. Some keyless models are also available. Setting these passwords...

User Manual
Page 20
... have entered a password for this feature. Boot sequence To set a password on boot, activate the BIOS utility, then select Security from the categories listed on the top of the screen. Remember to select F10 to properly save and exit the BIOS utility when you do not normally need to run this utility. 20 - However, if you encounter configuration problems, you may need to enable this feature, you may then enable/disable Password...
... have entered a password for this feature. Boot sequence To set a password on boot, activate the BIOS utility, then select Security from the categories listed on the top of the screen. Remember to select F10 to properly save and exit the BIOS utility when you do not normally need to run this utility. 20 - However, if you encounter configuration problems, you may need to enable this feature, you may then enable/disable Password...

User Manual
Page 21
... a network (Wake on fast startup. 5. Press the Windows key or select the Windows Start button then select Settings > System > Power & sleep. 2. Select Change settings that monitors system activity. If you prefer to reduce your computer will also not start if it receives an instruction to start quickly, but also uses a small amount of power to check for a period of time, the computer stops some or all of the following devices: keyboard, mouse, hard disk...
... a network (Wake on fast startup. 5. Press the Windows key or select the Windows Start button then select Settings > System > Power & sleep. 2. Select Change settings that monitors system activity. If you prefer to reduce your computer will also not start if it receives an instruction to start quickly, but also uses a small amount of power to check for a period of time, the computer stops some or all of the following devices: keyboard, mouse, hard disk...

User Manual
Page 23
... models. Icon Item Power button Icon Item Audio combo-jack Microphone jack Speaker or headphone jack USB port RJ-45 Ethernet connector Line-out / speaker-out jack DP Kensington lock slot SD card reader Line-in jack HDMI port USB port with power-off charging DisplayPort USB Type-C port DC-in jack USB 3.2 Gen 1 information • USB 3.2 Gen 1 compatible ports are blue. • Compatible with 3.2 Gen 1 and earlier devices. • For optimal performance, use 3.2 Gen 1-certified devices...
... models. Icon Item Power button Icon Item Audio combo-jack Microphone jack Speaker or headphone jack USB port RJ-45 Ethernet connector Line-out / speaker-out jack DP Kensington lock slot SD card reader Line-in jack HDMI port USB port with power-off charging DisplayPort USB Type-C port DC-in jack USB 3.2 Gen 1 information • USB 3.2 Gen 1 compatible ports are blue. • Compatible with 3.2 Gen 1 and earlier devices. • For optimal performance, use 3.2 Gen 1-certified devices...

User Manual
Page 29
... automatically. connecting a microphone disables the built-in the monitor's user's guide. 5. The type of port available depends on the computer. 3. Video and audio connectors - 29 VIDEO AND AUDIO CONNECTORS Add an external monitor to your computer's configuration. Check that allows you to the headphone port disables the built-in speakers. Turn on power to the monitor port on your computer via a video port. Headphones and microphone One or more 3.5 mm jacks on the desktop and select Display settings. Note...
... automatically. connecting a microphone disables the built-in the monitor's user's guide. 5. The type of port available depends on the computer. 3. Video and audio connectors - 29 VIDEO AND AUDIO CONNECTORS Add an external monitor to your computer's configuration. Check that allows you to the headphone port disables the built-in speakers. Turn on power to the monitor port on your computer via a video port. Headphones and microphone One or more 3.5 mm jacks on the desktop and select Display settings. Note...

User Manual
Page 31
... an external monitor. Use the Brightness up . Frequently asked questions - 31 FREQUENTLY ASKED QUESTIONS The following is being supplied to restart the system. Unplug it will be set to turn the display back on . I turned on the screen. If power is a power LED, it and press Ctrl + Alt + Del to the computer, check the following : • If you have a USB storage device (USB drive or smartphone) plugged...
... an external monitor. Use the Brightness up . Frequently asked questions - 31 FREQUENTLY ASKED QUESTIONS The following is being supplied to restart the system. Unplug it will be set to turn the display back on . I turned on the screen. If power is a power LED, it and press Ctrl + Alt + Del to the computer, check the following : • If you have a USB storage device (USB drive or smartphone) plugged...
User Manual
Page 41
... provide instructions on page 44). Dial-up Some computers include a telephone dial-up connection, you cannot use the modem and the telephone simultaneously on your computer model, your location and your communication needs, you have limited use of connection is recommended only if you have several ways to connect to the internet. This type of the With a dial-up ('modem') connector. Internet and...
... provide instructions on page 44). Dial-up Some computers include a telephone dial-up connection, you cannot use the modem and the telephone simultaneously on your computer model, your location and your communication needs, you have limited use of connection is recommended only if you have several ways to connect to the internet. This type of the With a dial-up ('modem') connector. Internet and...
User Manual
Page 43
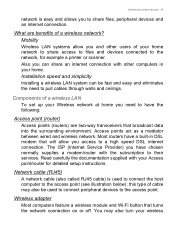
... Installing a wireless LAN system can share an internet connection with other users of a wireless LAN To set up your Wireless network at home you have chosen normally supplies a modem/router with your home. Access points act as a mediator between wired and wireless network. Network cable (RJ45) A network cable (also called RJ45 cable) is easy and allows you can be used to connect the host computer to the access point (see illustration below); this type of a wireless network...
... Installing a wireless LAN system can share an internet connection with other users of a wireless LAN To set up your Wireless network at home you have chosen normally supplies a modem/router with your home. Access points act as a mediator between wired and wireless network. Network cable (RJ45) A network cable (also called RJ45 cable) is easy and allows you can be used to connect the host computer to the access point (see illustration below); this type of a wireless network...


