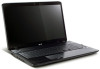
Acer Aspire 8935G Notebook Series Start Guide
Page 3
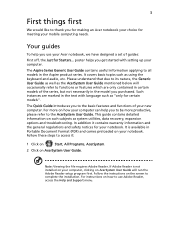
...you get started with language such as system utilities, data recovery, expansion options and troubleshooting. This guide contains detailed information ... these steps to access it contains warranty information and the general regulations and safety notices for your Acer notebook, we have designed a set of your computer. Note: Viewing the file requires Adobe Reader... 2 Click on AcerSystem User Guide will occasionally refer to functions or features which are marked in the Aspire product series. Your guides To help you to be more productive, please refer to the AcerSystem User ...
...you get started with language such as system utilities, data recovery, expansion options and troubleshooting. This guide contains detailed information ... these steps to access it contains warranty information and the general regulations and safety notices for your Acer notebook, we have designed a set of your computer. Note: Viewing the file requires Adobe Reader... 2 Click on AcerSystem User Guide will occasionally refer to functions or features which are marked in the Aspire product series. Your guides To help you to be more productive, please refer to the AcerSystem User ...
Acer Aspire 8935G Series Service Guide
Page 9
... Codes 207 Jumper and Connector Locations 211 Top View 211 Bottom View 212 Clearing Password Check and BIOS Recovery 213 Clearing Password Check 213 BIOS Recovery by Crisis Disk 214 FRU (Field Replaceable Unit) List 215 Acer SM80 Exploded Diagrams 216 Main Chassis 216 LCD Assembly 217 LCD Assembly (Non-Bezel 218 IX
... Codes 207 Jumper and Connector Locations 211 Top View 211 Bottom View 212 Clearing Password Check and BIOS Recovery 213 Clearing Password Check 213 BIOS Recovery by Crisis Disk 214 FRU (Field Replaceable Unit) List 215 Acer SM80 Exploded Diagrams 216 Main Chassis 216 LCD Assembly 217 LCD Assembly (Non-Bezel 218 IX

Acer Aspire 8935G Series Service Guide
Page 47
... or disables the switchable graphics mode. Information Main System Time: System Date: Total Memory: Video Memory: Quiet Boot: Network Boot: F12 Boot Menu: D2D Recovery: SATA Mode: Phoenix SecureCore(tm) Setup Utility Security Boot Exit [19:10:59] [01/09/2009] 4030 MB 512 MB [Enabled] [Enabled] [Disabled... memory available. Enables, disables the system boot from 0 to set the system time and date as well as enable and disable boot option and recovery. Valid range is from LAN (remote server). Format/Option Format: HH:MM:SS (hour:minute:second) Format MM/DD/YYYY (month/day/year...
... or disables the switchable graphics mode. Information Main System Time: System Date: Total Memory: Video Memory: Quiet Boot: Network Boot: F12 Boot Menu: D2D Recovery: SATA Mode: Phoenix SecureCore(tm) Setup Utility Security Boot Exit [19:10:59] [01/09/2009] 4030 MB 512 MB [Enabled] [Enabled] [Disabled... memory available. Enables, disables the system boot from 0 to set the system time and date as well as enable and disable boot option and recovery. Valid range is from LAN (remote server). Format/Option Format: HH:MM:SS (hour:minute:second) Format MM/DD/YYYY (month/day/year...

Acer Aspire 8935G Series Service Guide
Page 53
... use the Phlash utility. Then boot the system from the bootable diskette. Chapter 2 43 NOTE: If you do not have a crisis recovery diskette at hand, then you should create a Crisis Recovery Diskette before you use the AC adaptor power supply when you run the Phlash. 1. Prepare a bootable diskette. 2. Copy the flash utilities...
... use the Phlash utility. Then boot the system from the bootable diskette. Chapter 2 43 NOTE: If you do not have a crisis recovery diskette at hand, then you should create a Crisis Recovery Diskette before you use the AC adaptor power supply when you run the Phlash. 1. Prepare a bootable diskette. 2. Copy the flash utilities...
Acer Aspire 8935G Series Service Guide
Page 214
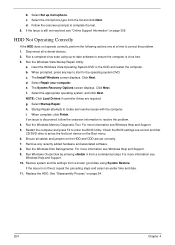
... problem. 4. HDD Not Operating Correctly If the HDD does not operate correctly, perform the following actions one at a time to complete the test. 8. The System Recovery Options screen displays. h. If an issue is discovered, follow the onscreen information to ensure the computer is still not resolved, see Windows Help and Support...
... problem. 4. HDD Not Operating Correctly If the HDD does not operate correctly, perform the following actions one at a time to complete the test. 8. The System Recovery Options screen displays. h. If an issue is discovered, follow the onscreen information to ensure the computer is still not resolved, see Windows Help and Support...
Acer Aspire 8935G Series Service Guide
Page 218
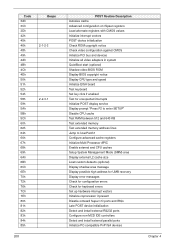
... Setup System Management Mode (SMM) area Display external L2 cache size Load custom defaults (optional) Display shadow-area message Display possible high address for UMB recovery Display error messages Check for configuration errors Check for keyboard errors Set up hardware interrupt vectors Initialize coprocessor if present Disable onboard Super I/O ports and...
... Setup System Management Mode (SMM) area Display external L2 cache size Load custom defaults (optional) Display shadow-area message Display possible high address for UMB recovery Display error messages Check for configuration errors Check for keyboard errors Set up hardware interrupt vectors Initialize coprocessor if present Disable onboard Super I/O ports and...
Acer Aspire 8935G Series Service Guide
Page 220
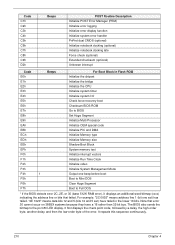
... in Flash ROM E0h Initialize the chipset E1h Initialize the bridge E2h Initialize the CPU E3h Initialize system timer E4h Initialize system I/O E5h Check force recovery boot E6h Checksum BIOS ROM E7h Go to BIOS E8h Set Huge Segment E9h Initialize Multi Processor EAh Initialize OEM special code EBh Initialize PIC...
... in Flash ROM E0h Initialize the chipset E1h Initialize the bridge E2h Initialize the CPU E3h Initialize system timer E4h Initialize system I/O E5h Check force recovery boot E6h Checksum BIOS ROM E7h Go to BIOS E8h Set Huge Segment E9h Initialize Multi Processor EAh Initialize OEM special code EBh Initialize PIC...
Acer Aspire 8935G Series Service Guide
Page 223
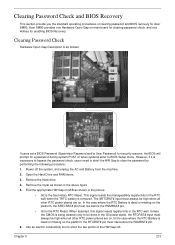
...battery is necessary to bypass the password check, users need to short the HW Gap to short the two points of clearing password and BIOS recovery for Acer SM80. This signal resets the manageablility register bits in the picture. • G2 is dead or missing on M/B as shown in the... in the above figure 5. Use an electric conductivity tool to clear the password by performing the following procedure: 1. Clearing Password Check and BIOS Recovery This section provide you the standard operating procedures of the HW Gap G3. Chapter 5 213 Find the appropriate HW Gap on the platform, the...
...battery is necessary to bypass the password check, users need to short the HW Gap to short the two points of clearing password and BIOS recovery for Acer SM80. This signal resets the manageablility register bits in the picture. • G2 is dead or missing on M/B as shown in the... in the above figure 5. Use an electric conductivity tool to clear the password by performing the following procedure: 1. Clearing Password Check and BIOS Recovery This section provide you the standard operating procedures of the HW Gap G3. Chapter 5 213 Find the appropriate HW Gap on the platform, the...

Acer Aspire 8935G Series Service Guide
Page 224
...screen to enter BIOS Setup menu. Press F2 key to create the disk. 4. Users can enable this machine by Crisis Disk BIOS Recovery Boot Block: BIOS Recovery Boot Block is no Password request, the BIOS Password has been successfully cleared. If this function is powered on the system till ... a USB Crisis Disk. If there is a special block of BIOS. Press Fn + ESC button then plug in the USB disk. 2. Restart system. BIOS Recovery by regular BIOS flashing process. 214 Chapter 5 To use the Crisis USB key, do the following: 1. Follow the steps below: 1. Click Start to format...
...screen to enter BIOS Setup menu. Press F2 key to create the disk. 4. Users can enable this machine by Crisis Disk BIOS Recovery Boot Block: BIOS Recovery Boot Block is no Password request, the BIOS Password has been successfully cleared. If this function is powered on the system till ... a USB Crisis Disk. If there is a special block of BIOS. Press Fn + ESC button then plug in the USB disk. 2. Restart system. BIOS Recovery by regular BIOS flashing process. 214 Chapter 5 To use the Crisis USB key, do the following: 1. Follow the steps below: 1. Click Start to format...


