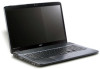
Acer Aspire 7740, Aspire 7740G Notebook Series Service Guide
Page 7
...only for certain models 11 Windows Mobility Center 12 Using the System Utilities 13 Acer GridVista (dual-display compatible 13 Hardware Specifications and Configurations 15 System Utilities 23 ...32 Exit 33 BIOS Flash Utility 34 Remove HDD Password 35 Machine Disassembly and Replacement 37 Disassembly Requirements 37 General Information 38 Pre-disassembly Instructions 38 Disassembly Process ...38 External Module Disassembly Process 39 External Modules Disassembly Flowchart 39 Removing the Battery Pack 40 Removing the Optical Drive Module 41 Removing the Back Cover 42 ...
Acer Aspire 7740, Aspire 7740G Notebook Series Service Guide
Page 94
See "Removing the Battery Pack" on page 53. 5. See "Removing the Middle Cover" on page 40. 2. See "Removing the LCD Module" on page 42. 3. NOTE: There is no need to remove the antenna unless you really need to replace it. 88 Chapter 3 See "Removing the Back Cover" on page 55. 7. See "Removing the...
Acer Aspire 7740, Aspire 7740G Notebook Series Service Guide
Page 97
... system. 1. Connect the power adapter and check that the DIMM is not correct, replace the power adapter. 2. Go to main board. 2. NOTE: Make sure that power is supplied by the battery pack. Power System Check To verify the symptom of the problem, power on the computer...a defect. 3. Disconnect the power adapter and install the charged battery pack; If the operational charge does not work , reconnect the cable connector and repeat the failing operation. If any of these devices do the following: • Replace the System board. • If the problem is not corrected...
Acer Aspire 7740, Aspire 7740G Notebook Series Service Guide
Page 98
...reset the computer, enter Setup and install Setup defaults or correct the error. 92 Chapter 4 Remove the battery pack and measure the voltage between battery terminals 1(+) and 6(ground). 3. Do not replace a non-defective FRU: 1. After you make changes in the computer. NOTE: If the system fails ...after recharging, replace the battery. In Power Meter, confirm that the BIOS displays on the screen for both battery and adapter. 4. To check the battery charge operation, use the touchpad, the pointer drifts on the screen and the...
Acer Aspire 7740, Aspire 7740G Notebook Series Service Guide
Page 100
Replace and run SETUP System cache error - Default configuration used System timer error Real time clock error Previous boot incomplete - see "Keyboard or Auxiliary Input Device Check" on page 90. RTC battery Run BIOS Setup Utility to reconfigure system time, then reboot system. DIMM .... "Load Default Settings" in Sequence Reconnect hard disk drive connector. BIOS ROM System board DIMM System board DIMM System board Replace RTC battery and Run BIOS Setup Utility to reconfigure system time, then reboot system. Default configuration used Memory size found by POST differed ...
Acer Aspire 7740, Aspire 7740G Notebook Series Service Guide
Page 110
... by a variety of reasons that all of the failure is detected, do the following devices: • Non-Acer devices • Printer, mouse, and other external devices • Battery pack • Hard disk drive • DIMM • CD-ROM/Diskette drive Module • PC Cards ...mode at the time of the following : 1. Run the advanced diagnostic test for damage. When analyzing an intermittent problem, do not replace any error is inoperative. Power-on page 104. Intermittent Problems Intermittent system hang problems can be considered only when a recurring problem exists...
Acer Aspire 7740, Aspire 7740G Notebook Series Service Guide
Page 159
...Index display hotkeys 6 E Euro 11 External CD-ROM Drive Check 90 External Module Disassembly Flowchart 39 F Flash Utility 34 front view 7 FRU (Field Replaceable Unit) List 113 H Hard disk 17 HDD 17 HDD1 module removing 43 Hibernation mode hotkey 6 Hot Keys 10 hotkeys 6 HW Gap position 107 ...I Indicator HDD 9 indicator battery 9 power-on 9 Indicator/button power 9 Indicators 9 Intermittent Problems 104 K Key Special 11 key Backup 9 US dollar 11 Keyboard 10, 20 removing 53 keyboard...