Aspire 7739, 7739G, 7739Z Notebook Service Guide
Page 3
... webcam Wireless and networking 0 WLAN: Acer InviLink™ Nplify™ 802.11b/g/n Wi-Fi CERTIFIED™ Supporting Acer signalUp™ wireless technology LAN: Atheros/ AR8151 PCI-E Fast Ethernet, Wake-on-LAN ready Privacy Control 0 BIOS user, supervisor, HDD passwords Kensington lock slot Dimensions and Weight 0 Dimensions 0 414.75 (W) x 275(D) x 27.1/34.3(H) mm (16.3 x 10.8 x 1.07/1.35 inches) Weight 0 2.7 kg (5.95 lbs.) with 6-cell battery pack Power Adapter and Battery 0 ACPI 3.0 CPU power management...
... webcam Wireless and networking 0 WLAN: Acer InviLink™ Nplify™ 802.11b/g/n Wi-Fi CERTIFIED™ Supporting Acer signalUp™ wireless technology LAN: Atheros/ AR8151 PCI-E Fast Ethernet, Wake-on-LAN ready Privacy Control 0 BIOS user, supervisor, HDD passwords Kensington lock slot Dimensions and Weight 0 Dimensions 0 414.75 (W) x 275(D) x 27.1/34.3(H) mm (16.3 x 10.8 x 1.07/1.35 inches) Weight 0 2.7 kg (5.95 lbs.) with 6-cell battery pack Power Adapter and Battery 0 ACPI 3.0 CPU power management...

Aspire 7739, 7739G, 7739Z Notebook Service Guide
Page 5
... W AC adapter Software Productivity Acer Backup Manager (V3.0.0) Acer ePower Management Acer eRecovery Management Adobe® Reader® v9.1 Adobe® Flash® Player 10.1 Bing™ Bar eSobi™ (Acer v2.0.4) Microsoft® Office 2010 preloaded (purchase a product key to activate) Microsoft® Office Starter 2010 Norton™ Online Backup Security MyWinLocker® (except China, Hong Kong) McAfee® Internet Security Suite Trial Multimedia Acer Acade...
... W AC adapter Software Productivity Acer Backup Manager (V3.0.0) Acer ePower Management Acer eRecovery Management Adobe® Reader® v9.1 Adobe® Flash® Player 10.1 Bing™ Bar eSobi™ (Acer v2.0.4) Microsoft® Office 2010 preloaded (purchase a product key to activate) Microsoft® Office Starter 2010 Norton™ Online Backup Security MyWinLocker® (except China, Hong Kong) McAfee® Internet Security Suite Trial Multimedia Acer Acade...

Aspire 7739, 7739G, 7739Z Notebook Service Guide
Page 8
... right mouse buttons. Charge: The light shows amber when the battery is charging. 2. Full Charged: Blue Under Charging: Orange Battery low: Breeze mode Orange(1 sec on/3 sec off) Battery situation: Blinking mode Orange(1 sec on /1 sec off) Hibernation/Power off ) Using battery or not connected to AC power:N/A. Power on: Blue Standby: Breeze mode Blue(1sec on/3 sec off) Entering Hibernation: Blinking mode Blue(1 sec on /1 sec off : N/A INdicates the computer's battery status. 1. Web camera for video...
... right mouse buttons. Charge: The light shows amber when the battery is charging. 2. Full Charged: Blue Under Charging: Orange Battery low: Breeze mode Orange(1 sec on/3 sec off) Battery situation: Blinking mode Orange(1 sec on /1 sec off) Hibernation/Power off ) Using battery or not connected to AC power:N/A. Power on: Blue Standby: Breeze mode Blue(1sec on/3 sec off) Entering Hibernation: Blinking mode Blue(1 sec on /1 sec off : N/A INdicates the computer's battery status. 1. Web camera for video...

Aspire 7739, 7739G, 7739Z Notebook Service Guide
Page 9
... the lock. external monitor, LCD projector). Supports high-definition digital video connections. Some keyless models are also available. Only one card can operate at any given time. Insert the lock into the notch and turn the key to remove/install the card. Connects to USB 2.0 devices (e.g., USB mouse, USB camera). Hardware Specifications and Configurations 1-13 Left View 0 Figure 1-2. Connects to an Ethernet 10/100/1000-based network. Left View Table 1-2. Left View No Icon Item 1 Kensington lock slot 2 External display (VGA) port 3 Ethernet...
... the lock. external monitor, LCD projector). Supports high-definition digital video connections. Some keyless models are also available. Only one card can operate at any given time. Insert the lock into the notch and turn the key to remove/install the card. Connects to USB 2.0 devices (e.g., USB mouse, USB camera). Hardware Specifications and Configurations 1-13 Left View 0 Figure 1-2. Connects to an Ethernet 10/100/1000-based network. Left View Table 1-2. Left View No Icon Item 1 Kensington lock slot 2 External display (VGA) port 3 Ethernet...

Aspire 7739, 7739G, 7739Z Notebook Service Guide
Page 16
Functions supported by Windows XP, Windows Vista, and Windows 7: < >: Open or close the Start menu < > + : Open the Run dialog box < > + : Minimizes all windows + < > + M: Undo minimize all windows < > + : Show the help window < > + : Open Windows Explorer < > + : Search for a file or folder < > + : Show the desktop + < > + : Search for computers (search in network) < > + : Lock computer (if connected to a network domain), or switch users (if not connected to a network domain) + < > + : Moves focus from Start menu, to the Quick Launch toolbar, to the system...
Functions supported by Windows XP, Windows Vista, and Windows 7: < >: Open or close the Start menu < > + : Open the Run dialog box < > + : Minimizes all windows + < > + M: Undo minimize all windows < > + : Show the help window < > + : Open Windows Explorer < > + : Search for a file or folder < > + : Show the desktop + < > + : Search for computers (search in network) < > + : Lock computer (if connected to a network domain), or switch users (if not connected to a network domain) + < > + : Moves focus from Start menu, to the Quick Launch toolbar, to the system...

Aspire 7739, 7739G, 7739Z Notebook Service Guide
Page 17
Hotkeys 0 The computer uses hotkeys or key combinations to access most computer controls. Hotkeys Hotkey + + Icon Function Description Communication Toggles WiFi, 3G and Bluetooth On and Off Device On/Off using a pop-up Decreases the screen brightness. Turns Off the LCD back light Touchpad toggle Speaker toggle Turns the touchpad On and Off. Brightness Down Volume up window. Hardware Specifications and Configurations 1-21 Keyboard Hotkeys Table 1-9. Increases the volume + Volume down Decreases the volume + Play/Pause Play or pause a selected media ...
Hotkeys 0 The computer uses hotkeys or key combinations to access most computer controls. Hotkeys Hotkey + + Icon Function Description Communication Toggles WiFi, 3G and Bluetooth On and Off Device On/Off using a pop-up Decreases the screen brightness. Turns Off the LCD back light Touchpad toggle Speaker toggle Turns the touchpad On and Off. Brightness Down Volume up window. Hardware Specifications and Configurations 1-21 Keyboard Hotkeys Table 1-9. Increases the volume + Volume down Decreases the volume + Play/Pause Play or pause a selected media ...

Aspire 7739, 7739G, 7739Z Notebook Service Guide
Page 24
...-key Acer FineTip keyboard with independent standard numeric keypad, international language support 103-/104-/107-keys Yes Plug USB keyboard to Acer BIOS specification. 0 Table 1-20. LAN Interface Item Specification LAN Chipset Atheros AR8158 PCI-E Fast Ethernet Controller LAN connector type RJ45 LAN connector location RJ45 at the left side Features Supports 10/100Mbps Fast Ethernet Keyboard 0 Table 1-21. Features Item LAN Interface Specification INSYDE code base Flash ROM 4 MB Support Acer UI Support multi-boot Suspend to RAM (S3)/Disk (S4) Support...
...-key Acer FineTip keyboard with independent standard numeric keypad, international language support 103-/104-/107-keys Yes Plug USB keyboard to Acer BIOS specification. 0 Table 1-20. LAN Interface Item Specification LAN Chipset Atheros AR8158 PCI-E Fast Ethernet Controller LAN connector type RJ45 LAN connector location RJ45 at the left side Features Supports 10/100Mbps Fast Ethernet Keyboard 0 Table 1-21. Features Item LAN Interface Specification INSYDE code base Flash ROM 4 MB Support Acer UI Support multi-boot Suspend to RAM (S3)/Disk (S4) Support...
Aspire 7739, 7739G, 7739Z Notebook Service Guide
Page 33
... state System DMA Specification 0 Table 1-41. Item Suspend to RAM (S3) Save to power off - Battery in low power state Discharging Amber and blinking - System saves all system states and data onto the disc prior to Disk (S4) Card Reader Specification CPU set power down, VGA Suspend, PCMCIA Suspend, Audio, Power Down, Hard Disk Power Down, CD-ROM Power Down, Super I/O Low Power mode. System LED Indicator 0 Table 1-40. Battery abnormal stop charge or battery in critical low...
... state System DMA Specification 0 Table 1-41. Item Suspend to RAM (S3) Save to power off - Battery in low power state Discharging Amber and blinking - System saves all system states and data onto the disc prior to Disk (S4) Card Reader Specification CPU set power down, VGA Suspend, PCMCIA Suspend, Audio, Power Down, Hard Disk Power Down, CD-ROM Power Down, Super I/O Low Power mode. System LED Indicator 0 Table 1-40. Battery abnormal stop charge or battery in critical low...
Aspire 7739, 7739G, 7739Z Notebook Service Guide
Page 37
... this utility. Navigation keys appear at the bottom of the screen. To activate the BIOS Utility, press F2 during POST to enabled. To change boot device without entering the BIOS SETUP, Press F12 during POST when prompted at the bottom of screen. Navigating the BIOS Utility 0 Five menu options are: Information Main Security Boot Exit To navigate through the following: Menu - Parameter help carefully when making changes to run Setup. If configuration problems occur, users may need...
... this utility. Navigation keys appear at the bottom of the screen. To activate the BIOS Utility, press F2 during POST to enabled. To change boot device without entering the BIOS SETUP, Press F12 during POST when prompted at the bottom of screen. Navigating the BIOS Utility 0 Five menu options are: Information Main Security Boot Exit To navigate through the following: Menu - Parameter help carefully when making changes to run Setup. If configuration problems occur, users may need...

Aspire 7739, 7739G, 7739Z Notebook Service Guide
Page 43
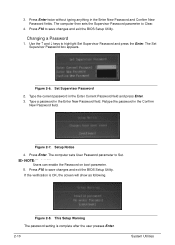
... Enter. Set Supervisor Password 2. Press Enter. Press F10 to enter a password, three attempts are allowed before the system halts. Figure 2-4. System Utilities 2-9 Type a new password in the Enter New Password field. BIOS Security (Continued) Parameter Description Option NOTE: When prompted to save changes and exit the BIOS Setup Utility. Characters do not appear on boot parameter. 4. NOTE: NOTE: Users can opt to enable the Password on the screen. 3. Table 2-3. The Set Supervisor Password box appears: Figure 2-5. Set...
... Enter. Set Supervisor Password 2. Press Enter. Press F10 to enter a password, three attempts are allowed before the system halts. Figure 2-4. System Utilities 2-9 Type a new password in the Enter New Password field. BIOS Security (Continued) Parameter Description Option NOTE: When prompted to save changes and exit the BIOS Setup Utility. Characters do not appear on boot parameter. 4. NOTE: NOTE: Users can opt to enable the Password on the screen. 3. Table 2-3. The Set Supervisor Password box appears: Figure 2-5. Set...
Aspire 7739, 7739G, 7739Z Notebook Service Guide
Page 44
... computer sets User Password parameter to save changes and exit the BIOS Setup Utility. Retype the password in the Enter New Password field. If the verification is complete after the user presses Enter. 2-10 System Utilities Type a password in the Confirm New Password field. Press Enter. NOTE: NOTE: Users can enable the Password on boot parameter. 5. Press F10 to save changes and exit the BIOS Setup Utility. 3. Press F10 to Set. Changing a Password 0 1. Figure 2-8. This Setup Warning The password setting is OK, the screen...
... computer sets User Password parameter to save changes and exit the BIOS Setup Utility. Retype the password in the Enter New Password field. If the verification is complete after the user presses Enter. 2-10 System Utilities Type a password in the Confirm New Password field. Press Enter. NOTE: NOTE: Users can enable the Password on boot parameter. 5. Press F10 to save changes and exit the BIOS Setup Utility. 3. Press F10 to Set. Changing a Password 0 1. Figure 2-8. This Setup Warning The password setting is OK, the screen...
Aspire 7739, 7739G, 7739Z Notebook Service Guide
Page 129
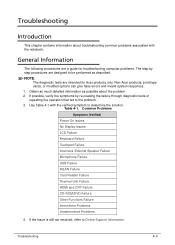
... much detailed information as described. Use Table 4-1 with the notebook. Table 4-1. Common Problems Symptoms (Verified) Power On Issues No Display Issues LCD Failure Keyboard Failure Touchpad Failure Internal & External Speaker Failure Microphone Failure USB Failure WLAN Failure Card Reader Failure Thermal Unit Failure HDMI and CRT Failure CD-ROM/DVD Failure Other Functions Failure Intermittent Problems Undetermined Problems 4. Troubleshooting Introduction 0 This chapter contains information about the problem. 2. NOTE: NOTE: The diagnostic tests...
... much detailed information as described. Use Table 4-1 with the notebook. Table 4-1. Common Problems Symptoms (Verified) Power On Issues No Display Issues LCD Failure Keyboard Failure Touchpad Failure Internal & External Speaker Failure Microphone Failure USB Failure WLAN Failure Card Reader Failure Thermal Unit Failure HDMI and CRT Failure CD-ROM/DVD Failure Other Functions Failure Intermittent Problems Undetermined Problems 4. Troubleshooting Introduction 0 This chapter contains information about the problem. 2. NOTE: NOTE: The diagnostic tests...

Aspire 7739, 7739G, 7739Z Notebook Service Guide
Page 130
... into a known serviceable electrical outlet. 4. after removing all surge protectors between the computer and the outlet. 3. Remove any recently installed software. 7. Power On Issues 0 If the system does not power on . Remove all extension cables between the computer and the electrical outlet. If the Issue is properly connected to Online Support Information. 4-4 Troubleshooting Do not replace a non-defective FRU: Start Check AC/Battery Power on Check...
... into a known serviceable electrical outlet. 4. after removing all surge protectors between the computer and the outlet. 3. Remove any recently installed software. 7. Power On Issues 0 If the system does not power on . Remove all extension cables between the computer and the electrical outlet. If the Issue is properly connected to Online Support Information. 4-4 Troubleshooting Do not replace a non-defective FRU: Start Check AC/Battery Power on Check...

Aspire 7739, 7739G, 7739Z Notebook Service Guide
Page 131
Do not replace a non-defective FRU: START NG LCD Moduel OK? DDRRAM Module CPU Thermal Replace MB Module well NG Fasten Screw screwed? Switching between internal and external by removing the power cable and battery. Hold the power button for specific model procedures. 2. Replace LCD Panel/LCD Cable Power On? Make sure that internal display is selected. Figure 4-2. Reference Product pages for 10 seconds. 4. Ext.DDRRAM Module well connected? No Display Issues 0 If the Display does not work, perform the following, one at...
Do not replace a non-defective FRU: START NG LCD Moduel OK? DDRRAM Module CPU Thermal Replace MB Module well NG Fasten Screw screwed? Switching between internal and external by removing the power cable and battery. Hold the power button for specific model procedures. 2. Replace LCD Panel/LCD Cable Power On? Make sure that internal display is selected. Figure 4-2. Reference Product pages for 10 seconds. 4. Ext.DDRRAM Module well connected? No Display Issues 0 If the Display does not work, perform the following, one at...

Aspire 7739, 7739G, 7739Z Notebook Service Guide
Page 132
... properly installed. Remove any memory cards and CD/DVD discs. 8. Check the display resolution is listed under Other Devices 7. If desktop display resolution is faulty and should be replaced. Disconnect power and all Windows. Click and drag the Resolution slider to the User Manual for instructions on adjusting the settings. Refer to the desired resolution. Roll back the video driver to its highest level. Run the Windows Memory Diagnostic from the operating system DVD...
... properly installed. Remove any memory cards and CD/DVD discs. 8. Check the display resolution is listed under Other Devices 7. If desktop display resolution is faulty and should be replaced. Disconnect power and all Windows. Click and drag the Resolution slider to the User Manual for instructions on adjusting the settings. Refer to the desired resolution. Roll back the video driver to its highest level. Run the Windows Memory Diagnostic from the operating system DVD...
Aspire 7739, 7739G, 7739Z Notebook Service Guide
Page 136
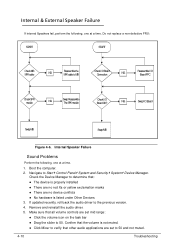
... I/O Board Connection NG Reassemble I/O Board FPC Check SPK module NG Swap Reassemble The SPK module Check I /O Board Swap MB Swap MB Figure 4-6. Do not replace a non-defective FRU: START START Check MB SPK cable NG Reassemble the SPK cable to verify that the volume is listed under Other Devices 3. If updated recently, roll back the audio driver to Startu Control Panelu System and Securityu Systemu Device Manager. Remove and reinstall the audio driver. 5.
... I/O Board Connection NG Reassemble I/O Board FPC Check SPK module NG Swap Reassemble The SPK module Check I /O Board Swap MB Swap MB Figure 4-6. Do not replace a non-defective FRU: START START Check MB SPK cable NG Reassemble the SPK cable to verify that the volume is listed under Other Devices 3. If updated recently, roll back the audio driver to Startu Control Panelu System and Securityu Systemu Device Manager. Remove and reinstall the audio driver. 5.

Aspire 7739, 7739G, 7739Z Notebook Service Guide
Page 137
... good date using System Restore. 10. NOTE: NOTE: If Speakers do not function correctly, the mother board may be defective or damaged. 13. Select Speakers and click Configure to Startu Control Panelu Hardware and Soundu Sound. Remove any recently installed hardware or software. 9. Connect a set of earphones or external speakers. Confirm that Speakers are selected as the default audio device (green check mark). Reinstall the Operating System. 12. Troubleshooting 4-11...
... good date using System Restore. 10. NOTE: NOTE: If Speakers do not function correctly, the mother board may be defective or damaged. 13. Select Speakers and click Configure to Startu Control Panelu Hardware and Soundu Sound. Remove any recently installed hardware or software. 9. Connect a set of earphones or external speakers. Confirm that Speakers are selected as the default audio device (green check mark). Reinstall the Operating System. 12. Troubleshooting 4-11...

Aspire 7739, 7739G, 7739Z Notebook Service Guide
Page 145
... recur, connect the removed devices one is found , replace the FRU. 3. Check if external modules are functioning correctly. 2. When analyzing an intermittent problem, perform the following devices: Non-Acer devices Printer, mouse, and other external devices Battery pack Hard disk drive DIMM CD-ROM/Diskette drive Module PC Cards 4. Do not replace a non-defective FRU: System board LCD assembly Troubleshooting 4-19 Run the advanced diagnostic test for damage. Check if drives are functioning correctly. 3. Undetermined Problems 0 The diagnostic problems does...
... recur, connect the removed devices one is found , replace the FRU. 3. Check if external modules are functioning correctly. 2. When analyzing an intermittent problem, perform the following devices: Non-Acer devices Printer, mouse, and other external devices Battery pack Hard disk drive DIMM CD-ROM/Diskette drive Module PC Cards 4. Do not replace a non-defective FRU: System board LCD assembly Troubleshooting 4-19 Run the advanced diagnostic test for damage. Check if drives are functioning correctly. 3. Undetermined Problems 0 The diagnostic problems does...

Aspire 7739, 7739G, 7739Z Notebook Service Guide
Page 149
... Install Hotkey service BDS 12 ASF Initialization BDS 13 PCI enumeration BDS 14 PCI resource assign complete BDS 15 PCI enumeration complete BDS 16 Keyboard Controller, keyboard and mouse initialization Troubleshooting 4-23 Table 4-6. DXE Phase POST Code Table (Continued) Functionality Name (Include\ PostCode.h) Phase Post Code Description DXE_PCRTC_INIT DXE 52 RTC Initialization DXE_SATA_INIT* DXE 53 SATA Controller earlyInitialization DXE_SMM_CONTROLER_INIT* DXE 54 Setup SMM Control service...
... Install Hotkey service BDS 12 ASF Initialization BDS 13 PCI enumeration BDS 14 PCI resource assign complete BDS 15 PCI enumeration complete BDS 16 Keyboard Controller, keyboard and mouse initialization Troubleshooting 4-23 Table 4-6. DXE Phase POST Code Table (Continued) Functionality Name (Include\ PostCode.h) Phase Post Code Description DXE_PCRTC_INIT DXE 52 RTC Initialization DXE_SATA_INIT* DXE 53 SATA Controller earlyInitialization DXE_SMM_CONTROLER_INIT* DXE 54 Setup SMM Control service...

Aspire 7739, 7739G, 7739Z Notebook Service Guide
Page 158
...: 1. Remove HDD, AC and Battery. 3. Steps for Clearing BIOS Password Check 0 If users set BIOS Passwords (Supervisor Password and/or User Password) for enabling BIOS Recovery. If it is only for : Clearing Passwords BIOS Recovery. Remove power from the system. 2. Disconnect the RTC Battery (Figure 5-3 ). 5-6 Jumper and Connector Locations This Machine has one Hardware Open Gap on the main board for clearing password check and one Hotkey for a security reason, BIOS will ask the password during systems POST or when system enters the BIOS Setup menu.
...: 1. Remove HDD, AC and Battery. 3. Steps for Clearing BIOS Password Check 0 If users set BIOS Passwords (Supervisor Password and/or User Password) for enabling BIOS Recovery. If it is only for : Clearing Passwords BIOS Recovery. Remove power from the system. 2. Disconnect the RTC Battery (Figure 5-3 ). 5-6 Jumper and Connector Locations This Machine has one Hardware Open Gap on the main board for clearing password check and one Hotkey for a security reason, BIOS will ask the password during systems POST or when system enters the BIOS Setup menu.


