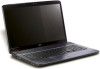
Acer Aspire 7540 Service Guide
Page 7
... Hot Keys 15 Special Key (only for certain models 15 Windows Mobility Center 16 Using the System Utilities 17 Acer Bio-Protection (only for certain models 17 Acer GridVista (dual-display compatible 18 Hardware Specifications and Configurations 19 System Utilities 27 BIOS Setup Utility 27 Navigating the ... Modules Disassembly Flowchart 43 Removing the SD Dummy Card 44 Removing the Battery Pack 45 Removing the Back Cover 46 Removing the Hard Disk Drive Module 48 Removing the Wireless LAN Card 50 Removing the DIMM Module 51 Removing the Heatsink Module 52 Removing the CPU 54 ...
... Hot Keys 15 Special Key (only for certain models 15 Windows Mobility Center 16 Using the System Utilities 17 Acer Bio-Protection (only for certain models 17 Acer GridVista (dual-display compatible 18 Hardware Specifications and Configurations 19 System Utilities 27 BIOS Setup Utility 27 Navigating the ... Modules Disassembly Flowchart 43 Removing the SD Dummy Card 44 Removing the Battery Pack 45 Removing the Back Cover 46 Removing the Hard Disk Drive Module 48 Removing the Wireless LAN Card 50 Removing the DIMM Module 51 Removing the Heatsink Module 52 Removing the CPU 54 ...
Acer Aspire 7540 Service Guide
Page 10
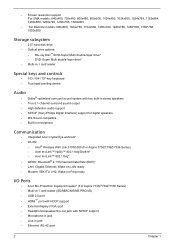
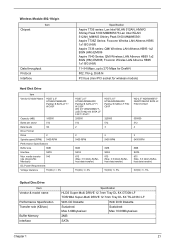
... 1280x720, 1280x768, 1280*800, 1360*768, 1600x900 Storage subsystem • 2.5" hard disk drive • Optical drive options: • Blu-ray Disc™/DVD-Super Multi double-layer drive* • DVD-Super Multi double-layer drive* • Multi-in-1 card reader Special keys and controls • 103-/104...; WPAN: Bluetooth® 2.1+Enhanced Data Rate (EDR)* • LAN: Gigabit Ethernet; Wake-on -Ring ready I/O Ports • Acer Bio-Protection fingerprint reader* (For Aspire 7736/7736Z/7336 Series) • Multi-in-1 card reader (SD/MMC/MS/MS PRO/xD) • USB 2.0 port • HDMI™...
... 1280x720, 1280x768, 1280*800, 1360*768, 1600x900 Storage subsystem • 2.5" hard disk drive • Optical drive options: • Blu-ray Disc™/DVD-Super Multi double-layer drive* • DVD-Super Multi double-layer drive* • Multi-in-1 card reader Special keys and controls • 103-/104...; WPAN: Bluetooth® 2.1+Enhanced Data Rate (EDR)* • LAN: Gigabit Ethernet; Wake-on -Ring ready I/O Ports • Acer Bio-Protection fingerprint reader* (For Aspire 7736/7736Z/7336 Series) • Multi-in-1 card reader (SD/MMC/MS/MS PRO/xD) • USB 2.0 port • HDMI™...
Acer Aspire 7540 Service Guide
Page 15
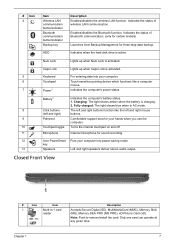
Indicates the status of Bluetooth communication. (only for certain models) Launches Acer Backup Management for sound recording. 12 Acer PowerSmart Puts your computer. 6 Touchpad Touch-sensitive pointing device which functions like the left and right mouse (left and right buttons ... 10 Touchpad toggle Turns the internal touchpad on and off. 11 Microphone Internal microphone for three-step data backup. HDD Indicates when the hard disk drive is charging. 2. Caps Lock Lights up when Num Lock is activated. 5 Keyboard For entering data into your computer into power-saving...
Indicates the status of Bluetooth communication. (only for certain models) Launches Acer Backup Management for sound recording. 12 Acer PowerSmart Puts your computer. 6 Touchpad Touch-sensitive pointing device which functions like the left and right mouse (left and right buttons ... 10 Touchpad toggle Turns the internal touchpad on and off. 11 Microphone Internal microphone for three-step data backup. HDD Indicates when the hard disk drive is charging. 2. Caps Lock Lights up when Num Lock is activated. 5 Keyboard For entering data into your computer into power-saving...
Acer Aspire 7540 Service Guide
Page 29
...up to 270 Mbps for Draft-N 802.11b+g, Draft-N PCI bus (mini PCI socket for wireless module) Hard Disk Drive Item Vendor & Model Name HGST 2.5" HTS545016B9A300 Panther B SATA LF F/ W:C60F Capacity (MB) 160000 Bytes per sector 512 Data heads...Drive Format Disks 2 Spindle speed (RPM) 5400 RPM Performance Specifications Buffer size 8MB Interface SATA Max. Wireless Module 802.11b/g/n Item Chipset Data throughput Protocol Interface Specification Aspire 7736 series: Lan Intel WLAN 512AN_HMWG Shirley Peak 5100 MM#895373;Lan Intel WLAN 512AN_MMWG Shirley Peak 5100 MM#895361 Aspire 7736Z...
...up to 270 Mbps for Draft-N 802.11b+g, Draft-N PCI bus (mini PCI socket for wireless module) Hard Disk Drive Item Vendor & Model Name HGST 2.5" HTS545016B9A300 Panther B SATA LF F/ W:C60F Capacity (MB) 160000 Bytes per sector 512 Data heads...Drive Format Disks 2 Spindle speed (RPM) 5400 RPM Performance Specifications Buffer size 8MB Interface SATA Max. Wireless Module 802.11b/g/n Item Chipset Data throughput Protocol Interface Specification Aspire 7736 series: Lan Intel WLAN 512AN_HMWG Shirley Peak 5100 MM#895373;Lan Intel WLAN 512AN_MMWG Shirley Peak 5100 MM#895361 Aspire 7736Z...
Acer Aspire 7540 Service Guide
Page 40
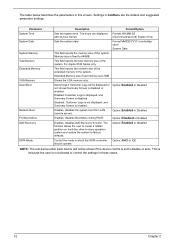
Sets the system date. For Aspire 8530 Series only. Format/Option Format: HH:MM:SS (hour:minute:second) System Time Format MM/DD/YYYY (month/day/ year) System Date Option: Enabled ... Boot Network Boot F12 Boot Menu D2D Recovery SATA Mode Description Sets the system time. The function allows the user to create a hidden partition on hard disc drive to store operation system and restore the system to control the settings in this screen. Enables, disables the system boot from LAN (remote server...
Sets the system date. For Aspire 8530 Series only. Format/Option Format: HH:MM:SS (hour:minute:second) System Time Format MM/DD/YYYY (month/day/ year) System Date Option: Enabled ... Boot Network Boot F12 Boot Menu D2D Recovery SATA Mode Description Sets the system time. The function allows the user to create a hidden partition on hard disc drive to store operation system and restore the system to control the settings in this screen. Enables, disables the system boot from LAN (remote server...
Acer Aspire 7540 Service Guide
Page 45
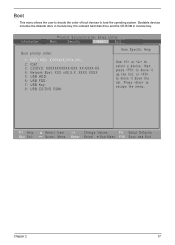
... ROM: Item Specific Help Use < > or < > to select a device, then press to move it down the list. Bootable devices includes the diskette drive in module bay, the onboard hard disk drive and the CD-ROM in module bay. Boot This menu allows the user to decide the order of boot devices to load...
... ROM: Item Specific Help Use < > or < > to select a device, then press to move it down the list. Bootable devices includes the diskette drive in module bay, the onboard hard disk drive and the CD-ROM in module bay. Boot This menu allows the user to decide the order of boot devices to load...

Acer Aspire 7540 Service Guide
Page 51
... TURN OFF POWER AND PERIPHERALS UNPLUG POWER CABLES SD DUMMY CARD Cx1 ODD MODULE OPTICAL DISK DRIVE Hx1 OPTICAL LOCKER BRACKET REMOVE BATTERY PACK Cx4 BACK COVER Ax1 HDD MODULE DIMM MODULES Fx2 HARD DISK BRACKET HARD DISK DRIVE Screwx6 THERMAL MODULE Bx1 WLAN BOARD CPU Screw List Item A B C F G H Screw M2.5 x L4 M2 x L4...
... TURN OFF POWER AND PERIPHERALS UNPLUG POWER CABLES SD DUMMY CARD Cx1 ODD MODULE OPTICAL DISK DRIVE Hx1 OPTICAL LOCKER BRACKET REMOVE BATTERY PACK Cx4 BACK COVER Ax1 HDD MODULE DIMM MODULES Fx2 HARD DISK BRACKET HARD DISK DRIVE Screwx6 THERMAL MODULE Bx1 WLAN BOARD CPU Screw List Item A B C F G H Screw M2.5 x L4 M2 x L4...
Acer Aspire 7540 Service Guide
Page 56
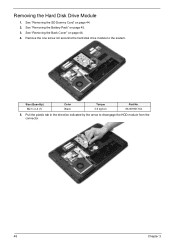
See "Removing the Battery Pack" on page 46. 4. Remove the one screw (A) securing the hard disk drive module to disengage the HDD module from the connector. 48 Chapter 3 Pull the plastic tab in the direction indicated by the arrow to the system. See "Removing the Back Cover" on page 45. 3. Size (Quantity) M2.5 x L4 (1) Color Black Torque 3.0 kgf-cm Part No. 86.00H59.734 5. See "Removing the SD Dummy Card" on page 44. 2. Removing the Hard Disk Drive Module 1.
See "Removing the Battery Pack" on page 46. 4. Remove the one screw (A) securing the hard disk drive module to disengage the HDD module from the connector. 48 Chapter 3 Pull the plastic tab in the direction indicated by the arrow to the system. See "Removing the Back Cover" on page 45. 3. Size (Quantity) M2.5 x L4 (1) Color Black Torque 3.0 kgf-cm Part No. 86.00H59.734 5. See "Removing the SD Dummy Card" on page 44. 2. Removing the Hard Disk Drive Module 1.
Acer Aspire 7540 Service Guide
Page 58
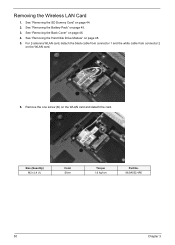
See "Removing the SD Dummy Card" on the WLAN card. 6. For 2-antenna WLAN card, detach the black cable from connector 1 and the white cable from connector 2 on page 44. 2. See "Removing the Back Cover" on page 45. 3. See "Removing the Battery Pack" on page 46. 4. See "Removing the Hard Disk Drive Module" on the WLAN card and detach the card. Remove the one screw (B) on page 48. 5. Size (Quantity) M2 x L4 (1) Color Silver Torque 1.6 kgf-cm Part No. 86.9A552.4R0 50 Chapter 3 Removing the Wireless LAN Card 1.
See "Removing the SD Dummy Card" on the WLAN card. 6. For 2-antenna WLAN card, detach the black cable from connector 1 and the white cable from connector 2 on page 44. 2. See "Removing the Back Cover" on page 45. 3. See "Removing the Battery Pack" on page 46. 4. See "Removing the Hard Disk Drive Module" on the WLAN card and detach the card. Remove the one screw (B) on page 48. 5. Size (Quantity) M2 x L4 (1) Color Silver Torque 1.6 kgf-cm Part No. 86.9A552.4R0 50 Chapter 3 Removing the Wireless LAN Card 1.
Acer Aspire 7540 Service Guide
Page 59
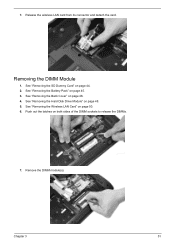
See "Removing the SD Dummy Card" on page 45. 3. See "Removing the Battery Pack" on page 44. 2. Chapter 3 51 7. Push out the latches on page 50. 6. Remove the DIMM module(s). See "Removing the Wireless LAN Card" on both sides of the DIMM sockets to release the DIMMs. 7. Release the wireless LAN card from its connector and detach the card. See "Removing the Back Cover" on page 48. 5. See "Removing the Hard Disk Drive Module" on page 46. 4. Removing the DIMM Module 1.
See "Removing the SD Dummy Card" on page 45. 3. See "Removing the Battery Pack" on page 44. 2. Chapter 3 51 7. Push out the latches on page 50. 6. Remove the DIMM module(s). See "Removing the Wireless LAN Card" on both sides of the DIMM sockets to release the DIMMs. 7. Release the wireless LAN card from its connector and detach the card. See "Removing the Back Cover" on page 48. 5. See "Removing the Hard Disk Drive Module" on page 46. 4. Removing the DIMM Module 1.
Acer Aspire 7540 Service Guide
Page 60
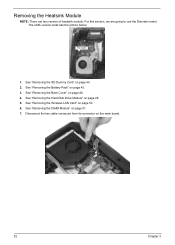
... Dummy Card" on page 46. 4. See "Removing the Back Cover" on page 44. 2. See "Removing the DIMM Module" on page 48. 5. See "Removing the Hard Disk Drive Module" on page 51. 7. See "Removing the Wireless LAN Card" on page 50. 6. For this section, we are two version of heatsink module. Removing the...
... Dummy Card" on page 46. 4. See "Removing the Back Cover" on page 44. 2. See "Removing the DIMM Module" on page 48. 5. See "Removing the Hard Disk Drive Module" on page 51. 7. See "Removing the Wireless LAN Card" on page 50. 6. For this section, we are two version of heatsink module. Removing the...

Acer Aspire 7540 Service Guide
Page 62
... the CPU are the same for all the models. 1. See "Removing the Hard Disk Drive Module" on page 51. 7. See "Removing the DIMM Module" on page 48. 5. Removing the CPU NOTE: Aspire 7736/7736Z/7336 Series uses the Intel® processor, while Aspire 7540 Series uses the AMD® processor. See "Removing the SD Dummy...
... the CPU are the same for all the models. 1. See "Removing the Hard Disk Drive Module" on page 51. 7. See "Removing the DIMM Module" on page 48. 5. Removing the CPU NOTE: Aspire 7736/7736Z/7336 Series uses the Intel® processor, while Aspire 7540 Series uses the AMD® processor. See "Removing the SD Dummy...
Acer Aspire 7540 Service Guide
Page 63
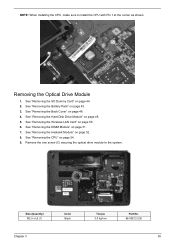
NOTE: When installing the CPU, make sure to the system. Remove the one screw (C) securing the optical drive module to install the CPU with Pin 1 at the corner as shown. See "Removing the Wireless LAN Card" on page 54. 9. See "Removing the CPU" ... the DIMM Module" on page 44. 2. See "Removing the Battery Pack" on page 52. 8. See "Removing the Heatsink Module" on page 45. 3. See "Removing the Hard Disk Drive Module" on page 46. 4. See "Removing the Back Cover" on page 48. 5. Size (Quantity) M2.5 x L6 (1) Chapter 3 Color Black Torque 3.0 kgf-cm Part No...
NOTE: When installing the CPU, make sure to the system. Remove the one screw (C) securing the optical drive module to install the CPU with Pin 1 at the corner as shown. See "Removing the Wireless LAN Card" on page 54. 9. See "Removing the CPU" ... the DIMM Module" on page 44. 2. See "Removing the Battery Pack" on page 52. 8. See "Removing the Heatsink Module" on page 45. 3. See "Removing the Hard Disk Drive Module" on page 46. 4. See "Removing the Back Cover" on page 48. 5. Size (Quantity) M2.5 x L6 (1) Chapter 3 Color Black Torque 3.0 kgf-cm Part No...
Acer Aspire 7540 Service Guide
Page 66
....536 Size (Quantity) M2.5 x L4 (5) 58 Color Black Torque 3.0 kgf-cm Part No. 86.00H59.734 Chapter 3 See "Removing the Optical Drive Module" on page 51. 7. See "Removing the Hard Disk Drive Module" on page 52. 8. See "Removing the Heatsink Module" on page 48. 5. Remove the twelve (C) from the lower case. See "Removing...
....536 Size (Quantity) M2.5 x L4 (5) 58 Color Black Torque 3.0 kgf-cm Part No. 86.00H59.734 Chapter 3 See "Removing the Optical Drive Module" on page 51. 7. See "Removing the Hard Disk Drive Module" on page 52. 8. See "Removing the Heatsink Module" on page 48. 5. Remove the twelve (C) from the lower case. See "Removing...
Acer Aspire 7540 Service Guide
Page 68
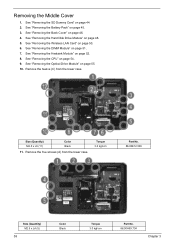
See "Removing the Optical Drive Module" on page 51. 7. See "Removing the DIMM Module" on page 55. 10. See "Removing the CPU" on page 58. 11. See "Removing the Middle ... the Back Cover" on the touchpad area. 60 Chapter 3 Release the keyboard from the latches. 12. Turn it over on page 46. 4. See "Removing the Hard Disk Drive Module" on page 52. 8. See "Removing the Heatsink Module" on page 48. 5. See "Removing the SD Dummy Card" on page 44. 2.
See "Removing the Optical Drive Module" on page 51. 7. See "Removing the DIMM Module" on page 55. 10. See "Removing the CPU" on page 58. 11. See "Removing the Middle ... the Back Cover" on the touchpad area. 60 Chapter 3 Release the keyboard from the latches. 12. Turn it over on page 46. 4. See "Removing the Hard Disk Drive Module" on page 52. 8. See "Removing the Heatsink Module" on page 48. 5. See "Removing the SD Dummy Card" on page 44. 2.

Acer Aspire 7540 Service Guide
Page 69
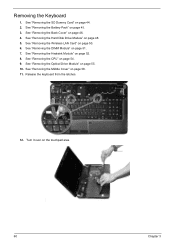
... page 45. 3. See "Removing the Keyboard" on page 51. 7. See "Removing the DIMM Module" on page 60. 12. See "Removing the Optical Drive Module" on page 44. 2. Release the wireless antenna cables from the latches and carefully pull out the wireless antenna cables from its connector on page... 58. 11. Chapter 3 61 See "Removing the SD Dummy Card" on page 55. 10. See "Removing the Hard Disk Drive Module" on page 50. 6. Release the latch (a) and disconnect the keyboard cable (b) from the hole.. Removing the LCD Module 1. See "Removing the...
... page 45. 3. See "Removing the Keyboard" on page 51. 7. See "Removing the DIMM Module" on page 60. 12. See "Removing the Optical Drive Module" on page 44. 2. Release the wireless antenna cables from the latches and carefully pull out the wireless antenna cables from its connector on page... 58. 11. Chapter 3 61 See "Removing the SD Dummy Card" on page 55. 10. See "Removing the Hard Disk Drive Module" on page 50. 6. Release the latch (a) and disconnect the keyboard cable (b) from the hole.. Removing the LCD Module 1. See "Removing the...
Acer Aspire 7540 Service Guide
Page 71
... page 54. 9. Chapter 3 63 See "Removing the CPU" on page 52. 8. See "Removing the SD Dummy Card" on page 48. 5. See "Removing the Hard Disk Drive Module" on page 44. 2. See "Removing the Keyboard" on page 50. 6. See "Removing the Wireless LAN Card" on page 60. 12. See "Removing the ...Optical Drive Module" on page 58. 11. See "Removing the Middle Cover" on page 55. 10. See "Removing the LCD Module" on page 51. 7. Separating the ...
... page 54. 9. Chapter 3 63 See "Removing the CPU" on page 52. 8. See "Removing the SD Dummy Card" on page 48. 5. See "Removing the Hard Disk Drive Module" on page 44. 2. See "Removing the Keyboard" on page 50. 6. See "Removing the Wireless LAN Card" on page 60. 12. See "Removing the ...Optical Drive Module" on page 58. 11. See "Removing the Middle Cover" on page 55. 10. See "Removing the LCD Module" on page 51. 7. Separating the ...

Acer Aspire 7540 Service Guide
Page 74
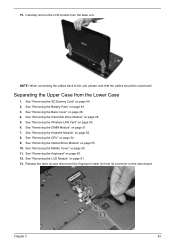
...page 58. 11. See "Removing the Middle Cover" on page 52. 8. See "Removing the Keyboard" on page 55. 10. See "Removing the Optical Drive Module" on page 60. 12. See "Separating the Upper Case from the Lower Case" on page 44. 2. Release the latch (a) and disconnect the fingerprint.../ button cable (b) from the lower case. See "Removing the SD Dummy Card" on page 63. 14. See "Removing the Hard Disk Drive Module" on page 50. 6. See "Removing the Wireless LAN Card" on page 48. 5. See "Removing the LCD Module" on page 54. 9. Gently...
...page 58. 11. See "Removing the Middle Cover" on page 52. 8. See "Removing the Keyboard" on page 55. 10. See "Removing the Optical Drive Module" on page 60. 12. See "Separating the Upper Case from the Lower Case" on page 44. 2. Release the latch (a) and disconnect the fingerprint.../ button cable (b) from the lower case. See "Removing the SD Dummy Card" on page 63. 14. See "Removing the Hard Disk Drive Module" on page 50. 6. See "Removing the Wireless LAN Card" on page 48. 5. See "Removing the LCD Module" on page 54. 9. Gently...
Acer Aspire 7540 Service Guide
Page 77
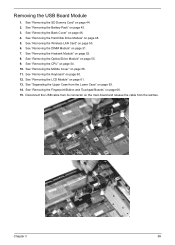
Removing the USB Board Module 1. See "Removing the Middle Cover" on page 48. 5. See "Removing the Hard Disk Drive Module" on page 58. 11. See "Removing the DIMM Module" on page 52. 8. See "Removing the Heatsink Module" on page 51. 7. See "Removing the LCD ...Module" on page 55. 9. See "Separating the Upper Case from the latches. See "Removing the Optical Drive Module" on page 61. 13. See "Removing the CPU" on page 46. 4. Disconnect the USB cable from its connector on the main board and release...
Removing the USB Board Module 1. See "Removing the Middle Cover" on page 48. 5. See "Removing the Hard Disk Drive Module" on page 58. 11. See "Removing the DIMM Module" on page 52. 8. See "Removing the Heatsink Module" on page 51. 7. See "Removing the LCD ...Module" on page 55. 9. See "Separating the Upper Case from the latches. See "Removing the Optical Drive Module" on page 61. 13. See "Removing the CPU" on page 46. 4. Disconnect the USB cable from its connector on the main board and release...
Acer Aspire 7540 Service Guide
Page 105
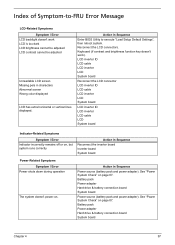
... runs correctly Action in characters Abnormal screen Wrong color displayed LCD has extra horizontal or vertical lines displayed. Battery pack Power adapter Hard drive & battery connection board System board Power source (battery pack and power adapter). See "Power System Check" on . Action in... LCD-Related Symptoms Symptom / Error LCD backlight doesn't work ). See "Power System Check" on page 87. Battery pack Power adapter Hard drive & battery connection board System board Chapter 4 97 Action in Sequence Power source (battery pack and power adapter). Reconnect the LCD connectors...
... runs correctly Action in characters Abnormal screen Wrong color displayed LCD has extra horizontal or vertical lines displayed. Battery pack Power adapter Hard drive & battery connection board System board Power source (battery pack and power adapter). See "Power System Check" on . Action in... LCD-Related Symptoms Symptom / Error LCD backlight doesn't work ). See "Power System Check" on page 87. Battery pack Power adapter Hard drive & battery connection board System board Chapter 4 97 Action in Sequence Power source (battery pack and power adapter). Reconnect the LCD connectors...


