Aspire 7730/7730G/7730Z/7730ZG Service Guide
Page 41
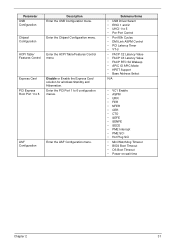
...; Power-on wait time Chapter 2 31 ASF Configuration Enter the ASF Configuration menu. Submenu Items • USB Driver Select • EHCI 1 and 2 • UHCI 1 to 6 Disable or Enable the Express Card solution for windows Standby and Hibernation. Parameter USB Configuration Description Enter the USB Configuration menu. Chipset Configuration Enter the Chipset Configuration...
...; Power-on wait time Chapter 2 31 ASF Configuration Enter the ASF Configuration menu. Submenu Items • USB Driver Select • EHCI 1 and 2 • UHCI 1 to 6 Disable or Enable the Express Card solution for windows Standby and Hibernation. Parameter USB Configuration Description Enter the USB Configuration menu. Chipset Configuration Enter the Chipset Configuration...

Aspire 7730/7730G/7730Z/7730ZG Service Guide
Page 140
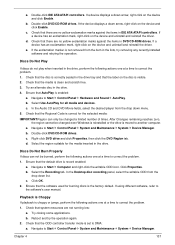
... and should be replaced. If the Issue is virus free. 3. See "Disassembly Process" on adjusting settings. c. Roll back the video driver to correct the problem. 1. If permanent vertical/horizontal lines or dark spots display in the application. If the BIOS settings are no device... in the same location, the LCD is properly installed. See "Disassembly Process" on page 44. 4. Readjust if necessary. 6. Run the Windows Memory Diagnostic from the BIOS, the drive may reduce display brightness. Replace the Motherboard. 6. e. Check the Device Manager to ensure the computer...
... and should be replaced. If the Issue is virus free. 3. See "Disassembly Process" on adjusting settings. c. Roll back the video driver to correct the problem. 1. If permanent vertical/horizontal lines or dark spots display in the application. If the BIOS settings are no device... in the same location, the LCD is properly installed. See "Disassembly Process" on page 44. 4. Readjust if necessary. 6. Run the Windows Memory Diagnostic from the BIOS, the drive may reduce display brightness. Replace the Motherboard. 6. e. Check the Device Manager to ensure the computer...

Aspire 7730/7730G/7730Z/7730ZG Service Guide
Page 145
... the following actions one at a time to enter the BIOS Utility. The Install Windows screen displays. f. h. Run the Windows Disk Defragmenter. Chapter 4 135 insert the Windows Vista Operating System DVD in the ODD and restart the computer. NOTE: Click Load Drivers if controller drives are correct and that CD/DVD drive is not fixed...
... the following actions one at a time to enter the BIOS Utility. The Install Windows screen displays. f. h. Run the Windows Disk Defragmenter. Chapter 4 135 insert the Windows Vista Operating System DVD in the ODD and restart the computer. NOTE: Click Load Drivers if controller drives are correct and that CD/DVD drive is not fixed...
Aspire 7730/7730G/7730Z/7730ZG Service Guide
Page 147
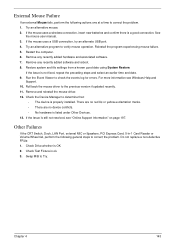
... applications. Double-click DVD/CD-ROM drives. If a device has an exclamation mark, right-click on the device and uninstall and reinstall the driver. Navigate to Start´ Computer and right-click the writable ODD icon. b. d. Ensure that the ODD controller transfer mode is clean and scratch... right-click on the device and click Enable. Select Use AutoPlay for the selected media: IMPORTANT:Region can not be changed even Windows is reinstalled or the drive is correct for all media and devices. Check that there are no yellow exclamation marks against the items...
... applications. Double-click DVD/CD-ROM drives. If a device has an exclamation mark, right-click on the device and uninstall and reinstall the driver. Navigate to Start´ Computer and right-click the writable ODD icon. b. d. Ensure that the ODD controller transfer mode is clean and scratch... right-click on the device and click Enable. Select Use AutoPlay for the selected media: IMPORTANT:Region can not be changed even Windows is reinstalled or the drive is correct for all media and devices. Check that there are no yellow exclamation marks against the items...
Aspire 7730/7730G/7730Z/7730ZG Service Guide
Page 153
Restart the computer. 6. If the issue is OK. 2. Roll back the mouse driver to Try. Remove and reinstall the mouse driver. 12. Check Drive whether is not fixed, repeat the preceding steps and select an earlier time and date. 9. Swap M/B to the previous version if ... a USB connection, try an alternate USB port. 4. If the mouse uses a wireless connection, insert new batteries and confirm there is still not resolved, see Windows Help and Support. 10. Restore system and file settings from a known good date using System Restore. Check Test Fixture is listed under Other Devices. 13...
Restart the computer. 6. If the issue is OK. 2. Roll back the mouse driver to Try. Remove and reinstall the mouse driver. 12. Check Drive whether is not fixed, repeat the preceding steps and select an earlier time and date. 9. Swap M/B to the previous version if ... a USB connection, try an alternate USB port. 4. If the mouse uses a wireless connection, insert new batteries and confirm there is still not resolved, see Windows Help and Support. 10. Restore system and file settings from a known good date using System Restore. Check Test Fixture is listed under Other Devices. 13...


