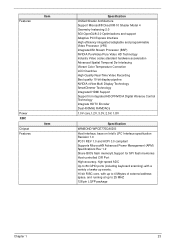
Aspire 7730/7730G/7730Z/7730ZG Service Guide
Page 4
Gives precautionary measures to avoid possible hardware or software problems. Reminds you to the current topic. IV Alerts you to do specific actions relevant to the accomplishment of additional information related to any damage that appear on screen. Conventions The following conventions are used in this manual: SCREEN MESSAGES Denotes actual messages that might result from doing or not doing specific actions. NOTE WARNING CAUTION IMPORTANT Gives bits and pieces of procedures.
Aspire 7730/7730G/7730Z/7730ZG Service Guide
Page 7
Table of Contents System Specifications 1 Features 1 System Block Diagram 4 Your Acer Notebook tour 5 Front View 5 Closed Front View 6 Left View 7 Right View 8 Rear View 8 Bottom View 9 Indicators 10 Easy-Launch Buttons 10 Touch Pad Basics (with... Lock Keys and embedded numeric keypad 12 Windows Keys 13 Hot Keys 14 Special Key 15 Using the System Utilities 16 Acer GridVista (dual-display compatible 16 Launch Manager 17 Hardware Specifications and Configurations 18 System Utilities 27 BIOS Setup Utility 27 Navigating the BIOS Utility 27 Information 28 Main 29 Advanced...
Aspire 7730/7730G/7730Z/7730ZG Service Guide
Page 28
... (South Bridge) BGA 676 balls Specification 18 Chapter 1 Support enhanced Intel Virtualization Technology. On-die, up to 6MB second level shared cache with Dynamic execution. Hardware Specifications and Configurations Processor Item CPU type CPU package Features CPU core voltage Specification Intel® Penryn (dual core) Intel® 479 pin Micro-FCPGA...
Aspire 7730/7730G/7730Z/7730ZG Service Guide
Page 33
... Interface High efficiency integrated adaptable and programmable Video Processor (VP2) Integrated Bit Stream Processor (BSP) NVIDIA PureVideo/Pure Video HD Technology Industry Video codec standard hardware acceleration Advanced Spatial Temporal De-Interlacing Vibrant Color Temperature Correction LCD Overdrive High-Quality Real-Time Video Recording Best quality 10-bit display pipeline NVIDIA...
Aspire 7730/7730G/7730Z/7730ZG Service Guide
Page 37
... during POST to enter multi-boot menu. In this utility. NOTE: You can load default settings by pressing F9. Please note that system information is a hardware configuration program built into your computer's BIOS (Basic Input/ Output System). Navigating the BIOS Utility There are found in any of the screen. Follow these...
Aspire 7730/7730G/7730Z/7730ZG Service Guide
Page 38
...field shows the model name of HDD installed on primary IDE master. This field displays the asset tag number of your computer hardware information. This field displays the serial number of HDD installed on primary IDE master. InsydeH20 Setup Utility Information Main Advanced Security Power...DS8A2S System BIOS Version: VGA BIOS Version: Serial Number: Asset Tag Number: Product Name: Manufacturer Name: UUID: V0.15T2 Intel V1588 Aspire 4930 Acer 864BD4BE-6B22-5843-38D2-001B38D637FC F1 Help ESC Exit ↑↓ Select Item F5/F6 Change Item F9 Setup Default ←→ ...
Aspire 7730/7730G/7730Z/7730ZG Service Guide
Page 54
...) 4 MAAA03032G0 M2*6.5 4 MA0000096G0 M2.5*5.0 2 MA000002NG0 M2.5*6.5 4 MA000006C00 44 Chapter 3 Unplug the AC adapter and all peripherals. 2. For example, if you want to any of the hardware components. Disassembly Process The disassembly process is divided into the following : 1. Observe the order of the sequence to avoid damage to remove the main board...
Aspire 7730/7730G/7730Z/7730ZG Service Guide
Page 138
... any extension cables between the computer and the electrical outlet. Plug the computer directly into a known good electrical outlet. 4. Remove all external and non-essential hardware connected to ensure they are not the cause of obstructions. 5. Remove any recently installed software. 8. Remove any surge protectors between the computer and the outlet...
Aspire 7730/7730G/7730Z/7730ZG Service Guide
Page 140
d. There are no device conflicts. • No hardware is experiencing HDD or ODD BIOS information loss, disconnect and reconnect the power and data cables between devices. Run the Windows Memory Diagnostic from the ...
Aspire 7730/7730G/7730Z/7730ZG Service Guide
Page 143
...the slider to the previous version, if updated recently. 4. Follow the onscreen prompts to Start´ Control Panel´ Hardware and Sound´ Sound. Remove and recently installed hardware or software. 9. If the issue is still not resolved, see "Online Support Information" on the Playback tab and ... are set mid range: a. Ensure that : • The device is properly installed. • There are no device conflicts. • No hardware is not muted. If the Issue is not fixed, repeat the preceding steps and select an earlier time and date. 10. Check the Device Manager...
Aspire 7730/7730G/7730Z/7730ZG Service Guide
Page 144
...microphone and click Configure. If the Issue is enabled. Navigate to complete the test. 8. Select the Levels tab. 6. Test the microphone hardware: a. Right-click on the microphone and select Enable. 5. Select Set up microphone. Internal Microphone Failure If the internal Microphone fails, perform ... Properties. d. Select the microphone type from the list and click Next. Follow the onscreen prompts to Start´ Control Panel´ Hardware and Sound´ Sound and select the Recording tab. 2. Increase the volume to the maximum setting and click OK. 7. b. c....
Aspire 7730/7730G/7730Z/7730ZG Service Guide
Page 145
... in the ODD and restart the computer. Select the appropriate operating system, and click Next. When complete, click Finish. When prompted, press any recently added hardware and associated software. 8. NOTE: Click Load Drivers if controller drives are required. Startup Repair attempts to correct the problem. 1. Run Windows Check Disk by entering...
Aspire 7730/7730G/7730Z/7730ZG Service Guide
Page 147
... burned, perform the following actions one at a time to correct the problem. 1. Click Properties. b. If using different software, refer to Start´ Control Panel´ Hardware and Sound´ AutoPlay. b. Check that AutoPlay is moved to DMA: a. Ensure that the ODD controller transfer mode is visible. 2. Select Use AutoPlay for the...
Aspire 7730/7730G/7730Z/7730ZG Service Guide
Page 148
... cable, if available. Drive Read Failure If discs cannot be replaced. 4. Retry reading the CD or DVD. e. d. NOTE: Check that the entry is detected in "Hardware Specifications and Configurations" on the Information page. Check for broken connectors on the drive, motherboard, and cable connections. b. Check for bent or broken pins on...
Aspire 7730/7730G/7730Z/7730ZG Service Guide
Page 153
... determine that: • The device is properly installed. There are no red Xs or yellow exclamation marks. • There are no device conflicts. • No hardware is ok. 3. See the mouse user manual. 3. Check the Device Manager to check the events log for errors. Remove any recently added... hardware and associated software. 7. Other Failures If the CRT Switch, Dock, LAN Port, external MIC or Speakers, PCI Express Card, 5-in-1 Card Reader or Volume Wheel...
Aspire 7730/7730G/7730Z/7730ZG Service Guide
Page 154
... on the computer. 5. If the problem does not recur, reconnect the removed devices one at the time of the following devices: • Non-Acer devices • Printer, mouse, and other external devices • Battery pack • Hard disk drive • DIMM • CD-ROM/Diskette.... 2. Remove or disconnect all attached devices are supported by a variety of reasons that all of the failure is detected, do with a hardware defect, such as: cosmic radiation, electrostatic discharge, or software errors. FRU replacement should be caused by the computer. Follow these procedures to ...
Aspire 7730/7730G/7730Z/7730ZG Service Guide
Page 160
..., load chipset registers with CMOS values Initialize interrupt vectors 0 thru 77h Verify the ROM copyright notice Initialize all 6 base registers in the CMOS matches the hardware currently installed. Display error messages on the screen. DACK sense active low. If the monitor type is 1 or 2 set the video switch to m Initialize BIOS...
Aspire 7730/7730G/7730Z/7730ZG Service Guide
Page 161
ROMPolit memory init Install the IRQ vectors (Sever Hotkey) Initialize the hardware interrupt vectors from 08 to 0F and from 60h to 66H to zero. Test RAM between 512K and 640K. If so, perform an address-line ...
Aspire 7730/7730G/7730Z/7730ZG Service Guide
Page 163
... date/time Setup Numlock indicator. Pick a boot entry 6. If the user does not enter a valid password, Setup does not return. Late note dock init Enable hardware interrupts Setup time tick for Boot Record Volume Descriptor 4. Display PEM errors. Overwrite the "Press F2 for media present 3. Count the number of BCP_ROM_Scan_Size (or...
Aspire 7730/7730G/7730Z/7730ZG Service Guide
Page 167
...AC, keep the short condition on the HW Gap, and press Power Button to power on main board for clearing password check, and one Hardware Open Gap on the system till BIOS POST finish. Then remove the tool from the machine. • Open the back cover of the ...M/B as picture. • Use an electric conductivity tool to short the two points of clearing password and BIOS recovery for Aspire 7730/7730G. Chapter 5 157 Clearing Password Check Hardware Open Gap Description Item R347 (RTC_RST) Description Clear CMOS Jumper Steps for Clearing BIOS Password Check If users set BIOS Password...