

Aspire 7560, 7560G Service Guide
Page 5
... 1 Hardware Specifications Features 1-5 Operating System 1-5 Platform 1-5 System Memory 1-5 Display 1-5 Graphics 1-6 Audio Subsystem 1-7 Storage Subsystem 1-7 Optical Media Drive 1-7 Communication 1-7 Privacy Control 1-8 Dimensions and Weight 1-8 Power Adapter and Battery 1-8 Special Keys and Controls 1-8 I/O Ports 1-9 Environment 1-9 Optional Items 1-9 Warranty 1-9 Software 1-10 Notebook Tour 1-11 Top View 1-11 Closed Front View 1-13 Rear View 1-14 Left View 1-15 Right View 1-17 Base View 1-18 Touchpad Basics 1-20 Using the Keyboard 1-21 Windows Keys 1-22 Hotkeys...
... 1 Hardware Specifications Features 1-5 Operating System 1-5 Platform 1-5 System Memory 1-5 Display 1-5 Graphics 1-6 Audio Subsystem 1-7 Storage Subsystem 1-7 Optical Media Drive 1-7 Communication 1-7 Privacy Control 1-8 Dimensions and Weight 1-8 Power Adapter and Battery 1-8 Special Keys and Controls 1-8 I/O Ports 1-9 Environment 1-9 Optional Items 1-9 Warranty 1-9 Software 1-10 Notebook Tour 1-11 Top View 1-11 Closed Front View 1-13 Rear View 1-14 Left View 1-15 Right View 1-17 Base View 1-18 Touchpad Basics 1-20 Using the Keyboard 1-21 Windows Keys 1-22 Hotkeys...
Aspire 7560, 7560G Service Guide
Page 6
... Display Supported Resolution (LCD 1-37 Graphics Controller 1-37 Display Supported Resolution (GPU 1-37 Bluetooth Interface 1-38 Bluetooth Module 1-38 Camera 1-38 Mini Card 1-38 Audio Codec and Amplifier 1-39 Audio Interface 1-39 Wireless Module 802.11b/g/n 1-40 Battery 1-40 VRAM 1-40 USB Port 1-40 HDMI Port 1-41 AC Adapter 1-41 System Power Management 1-41 Card Reader 1-42 System LED Indicator 1-42 System DMA Specification 1-43 System Interrupt Specification 1-44 System IO Address Map 1-45 System I/O Address Specifications 1-46 CHAPTER 2 System Utilities BIOS Setup...
... Display Supported Resolution (LCD 1-37 Graphics Controller 1-37 Display Supported Resolution (GPU 1-37 Bluetooth Interface 1-38 Bluetooth Module 1-38 Camera 1-38 Mini Card 1-38 Audio Codec and Amplifier 1-39 Audio Interface 1-39 Wireless Module 802.11b/g/n 1-40 Battery 1-40 VRAM 1-40 USB Port 1-40 HDMI Port 1-41 AC Adapter 1-41 System Power Management 1-41 Card Reader 1-42 System LED Indicator 1-42 System DMA Specification 1-43 System Interrupt Specification 1-44 System IO Address Map 1-45 System I/O Address Specifications 1-46 CHAPTER 2 System Utilities BIOS Setup...
Aspire 7560, 7560G Service Guide
Page 7
... HDD Module Carrier Installation . . . . 3-19 WLAN Module Removal 3-20 WLAN Module Installation 3-21 DIMM Module Removal 3-22 DIMM Module Installation 3-23 Keyboard Removal 3-24 Keyboard Installation 3-26 Upper Cover Removal 3-27 Upper Cover Installation 3-30 Touchpad FFC Removal 3-32 Touchpad FFC Installation 3-33 Power Board Removal 3-34 Power Board Installation 3-35 RJ45 Module Removal 3-36 RJ45 Module Installation 3-37 USB Module Removal 3-38 USB Module Installation 3-39 Bluetooth Module Removal 3-40 Bluetooth Module Installation 3-41 RTC Battery Removal 3-42 RTC Battery...
... HDD Module Carrier Installation . . . . 3-19 WLAN Module Removal 3-20 WLAN Module Installation 3-21 DIMM Module Removal 3-22 DIMM Module Installation 3-23 Keyboard Removal 3-24 Keyboard Installation 3-26 Upper Cover Removal 3-27 Upper Cover Installation 3-30 Touchpad FFC Removal 3-32 Touchpad FFC Installation 3-33 Power Board Removal 3-34 Power Board Installation 3-35 RJ45 Module Removal 3-36 RJ45 Module Installation 3-37 USB Module Removal 3-38 USB Module Installation 3-39 Bluetooth Module Removal 3-40 Bluetooth Module Installation 3-41 RTC Battery Removal 3-42 RTC Battery...
Aspire 7560, 7560G Service Guide
Page 17
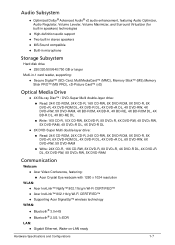
...;MS-Sound compatible Built-in microphone Storage Subsystem 0 Hard disk drive 250/320/500/640/750 GB or larger Multi-in-1 card reader, supporting: Secure Digital™ (SD) Card, MultiMediaCard™ (MMC), Memory Stick™ (MS),Memory Stick PRO™ (MS PRO), xD-Picture Card™ (xD) Optical Media Drive 0 4X Blu-ray Disc™ / DVD-Super Multi double...
...;MS-Sound compatible Built-in microphone Storage Subsystem 0 Hard disk drive 250/320/500/640/750 GB or larger Multi-in-1 card reader, supporting: Secure Digital™ (SD) Card, MultiMediaCard™ (MMC), Memory Stick™ (MS),Memory Stick PRO™ (MS PRO), xD-Picture Card™ (xD) Optical Media Drive 0 4X Blu-ray Disc™ / DVD-Super Multi double...
Aspire 7560, 7560G Service Guide
Page 23
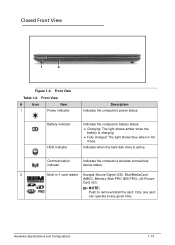
...'s wireless connectivity device status. 2 Multi-in AC mode. Only one card can operate at any given time. Front View Table 1-2. Hardware Specifications and Configurations 1-13 Indicates when the hard disk drive is charging. Fully charged: The light shows blue when in -1 card reader Accepts Secure Digital (SD), MultiMediaCard (MMC), Memory Stick PRO (MS PRO), xD-Picture Card (xD). Front View # Icon Item 1 Power indicator Description Indicates the computer's power status. NOTE: Push to remove/install the card. Battery indicator HDD indicator Indicates the...
...'s wireless connectivity device status. 2 Multi-in AC mode. Only one card can operate at any given time. Front View Table 1-2. Hardware Specifications and Configurations 1-13 Indicates when the hard disk drive is charging. Fully charged: The light shows blue when in -1 card reader Accepts Secure Digital (SD), MultiMediaCard (MMC), Memory Stick PRO (MS PRO), xD-Picture Card (xD). Front View # Icon Item 1 Power indicator Description Indicates the computer's power status. NOTE: Push to remove/install the card. Battery indicator HDD indicator Indicates the...
Aspire 7560, 7560G Service Guide
Page 25
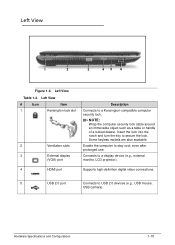
... and Configurations 1-15 Left View Table 1-4. Left View # Icon Item 1 Kensington lock slot 2 Ventilation slots 3 External display (VGA) port Description Connects to stay cool, even after prolonged use. Insert the lock into the notch and turn the key to USB 2.0 devices (e.g., USB mouse, USB camera). NOTE: Wrap the computer security lock cable around an immovable object such as a table or handle of a locked drawer. Connects to a display device (e.g., external monitor, LCD projector). 4 HDMI port Supports high-definition digital video connections. 5 USB 2.0 port Connects...
... and Configurations 1-15 Left View Table 1-4. Left View # Icon Item 1 Kensington lock slot 2 Ventilation slots 3 External display (VGA) port Description Connects to stay cool, even after prolonged use. Insert the lock into the notch and turn the key to USB 2.0 devices (e.g., USB mouse, USB camera). NOTE: Wrap the computer security lock cable around an immovable object such as a table or handle of a locked drawer. Connects to a display device (e.g., external monitor, LCD projector). 4 HDMI port Supports high-definition digital video connections. 5 USB 2.0 port Connects...
Aspire 7560, 7560G Service Guide
Page 32
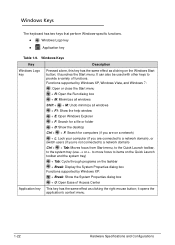
... provide a variety of Access Center Application key This key has the same effect as clicking the right mouse button; Windows Keys 0 The keyboard has two keys that perform Windows-specific functions. Windows Logo key Application key Table 1-9. it opens the application's context menu. 1-22 Hardware Specifications and Configurations it launches the Start menu. Windows Keys Key Description Windows Logo key Pressed alone, this key has the same effect as clicking on a network) + L: Lock your computer (if...
... provide a variety of Access Center Application key This key has the same effect as clicking the right mouse button; Windows Keys 0 The keyboard has two keys that perform Windows-specific functions. Windows Logo key Application key Table 1-9. it opens the application's context menu. 1-22 Hardware Specifications and Configurations it launches the Start menu. Windows Keys Key Description Windows Logo key Pressed alone, this key has the same effect as clicking on a network) + L: Lock your computer (if...

Aspire 7560, 7560G Service Guide
Page 33
... to save power. Hotkeys 0 Hotkeys or key combinations can be used to access most of your computer; Table 1-10. Enables/disables the computer's communication devices. (Communication devices may vary by configuration.) Switches display output between the display screen, external monitor (if connected) and both. Fn + F7 Play/Pause Plays or pauses media files Hardware Specifications and Configurations 1-23 Keyboard Hotkeys Hotkey Fn + F1 Icon Function ? Press any key to create backup copies of the computer's controls like screen brightness and volume output. Fn...
... to save power. Hotkeys 0 Hotkeys or key combinations can be used to access most of your computer; Table 1-10. Enables/disables the computer's communication devices. (Communication devices may vary by configuration.) Switches display output between the display screen, external monitor (if connected) and both. Fn + F7 Play/Pause Plays or pauses media files Hardware Specifications and Configurations 1-23 Keyboard Hotkeys Hotkey Fn + F1 Icon Function ? Press any key to create backup copies of the computer's controls like screen brightness and volume output. Fn...

Aspire 7560, 7560G Service Guide
Page 48
... type Supported protocol Bluetooth Module Controller Features Item Camera Item Vendor and Model Type Mini Card Item Number supported Features 3G Card (N/A) Features Item 1-38 Specifications Atheros BU12/ Broadcom BCM2070 TX 1.2Mbits/sec RX 1.2Mbits/sec 3.0+HS USB 2.0 SM06B-XSRK-ETB/SM08B-SURS-TF (Add BT supported protocol here such as A2DP) Specifications Broadcom BCM2070 / Atheros BU12 Mini USB module with built-in antenna Bluetooth 3.0 Specification...
... type Supported protocol Bluetooth Module Controller Features Item Camera Item Vendor and Model Type Mini Card Item Number supported Features 3G Card (N/A) Features Item 1-38 Specifications Atheros BU12/ Broadcom BCM2070 TX 1.2Mbits/sec RX 1.2Mbits/sec 3.0+HS USB 2.0 SM06B-XSRK-ETB/SM08B-SURS-TF (Add BT supported protocol here such as A2DP) Specifications Broadcom BCM2070 / Atheros BU12 Mini USB module with built-in antenna Bluetooth 3.0 Specification...
Aspire 7560, 7560G Service Guide
Page 61
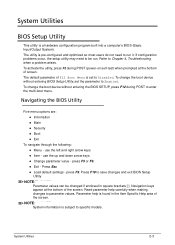
... following: Menu - use the up and down arrow keys Change parameter value - Navigation keys appear at the bottom of the screen. System Utilities BIOS Setup Utility 0 This utility is subject to specific models. use the left and right arrow keys Item - Parameter help carefully when making changes to Chapter 4, Troubleshooting when a problem arises. To change the boot device without entering BIOS Setup Utility, set to save changes and exit BIOS Setup Utility NOTE: NOTE: Parameter...
... following: Menu - use the up and down arrow keys Change parameter value - Navigation keys appear at the bottom of the screen. System Utilities BIOS Setup Utility 0 This utility is subject to specific models. use the left and right arrow keys Item - Parameter help carefully when making changes to Chapter 4, Troubleshooting when a problem arises. To change the boot device without entering BIOS Setup Utility, set to save changes and exit BIOS Setup Utility NOTE: NOTE: Parameter...
Aspire 7560, 7560G Service Guide
Page 69
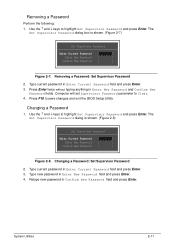
...Press Enter twice without typing anything in Enter New Password field and press Enter. 4. Use the and keys to save changes and exit the BIOS Setup Utility. Type new password in Enter New Password and Confirm New Password fields. Type current password in Confirm New Password field and press Enter. The Set Supervisor Password dialog is shown. (Figure 2-7) Set Supervisor Password Enter Current Password [ ] Enter New Password [ ] Confirm New Password [ ] Figure 2-7. Retype new password in Enter Current Password field and press Enter. 3. Press...
...Press Enter twice without typing anything in Enter New Password field and press Enter. 4. Use the and keys to save changes and exit the BIOS Setup Utility. Type new password in Enter New Password and Confirm New Password fields. Type current password in Confirm New Password field and press Enter. The Set Supervisor Password dialog is shown. (Figure 2-7) Set Supervisor Password Enter Current Password [ ] Enter New Password [ ] Confirm New Password [ ] Figure 2-7. Retype new password in Enter Current Password field and press Enter. 3. Press...
Aspire 7560, 7560G Service Guide
Page 84
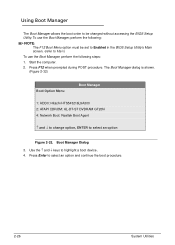
... F12 Boot Menu option must be changed without accessing the BIOS Setup Utility. Start the computer. 2. Press F12 when prompted during POST procedure. Using Boot Manager 0 The Boot Manager allows the boot order to be set to Enabled in the BIOS Setup Utility's Main screen. (refer to Main) To use the Boot Manager, perform the following steps: 1. The Boot Manager dialog is shown. (Figure 2-32) Boot Option Menu Boot Manager 1: HDD0: Hitachi HTS543216L9A300 2: ATAPI CDROM: HL-DT-ST DVDRAM GT20N 4: Network Boot: Realtek Boot Agent...
... F12 Boot Menu option must be changed without accessing the BIOS Setup Utility. Start the computer. 2. Press F12 when prompted during POST procedure. Using Boot Manager 0 The Boot Manager allows the boot order to be set to Enabled in the BIOS Setup Utility's Main screen. (refer to Main) To use the Boot Manager, perform the following steps: 1. The Boot Manager dialog is shown. (Figure 2-32) Boot Option Menu Boot Manager 1: HDD0: Hitachi HTS543216L9A300 2: ATAPI CDROM: HL-DT-ST DVDRAM GT20N 4: Network Boot: Realtek Boot Agent...
Aspire 7560, 7560G Service Guide
Page 165
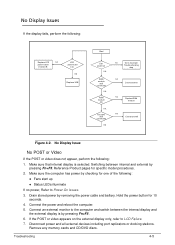
.... Disconnect power and all external devices including port replicators or docking stations. Troubleshooting 4-5 Switching between the internal display and the external display is selected. Connect the power and reboot the computer. 5. Connect an external monitor to the computer and switch between internal and external by removing the power cable and battery. Remove any memory cards and CD/DVD discs. Hold the power button for specific model procedures. 2. If the POST or video appears on OK RAM module well connected OK RAM module OK OK lcd cable well connected OK NG...
.... Disconnect power and all external devices including port replicators or docking stations. Troubleshooting 4-5 Switching between the internal display and the external display is selected. Connect the power and reboot the computer. 5. Connect an external monitor to the computer and switch between internal and external by removing the power cable and battery. Remove any memory cards and CD/DVD discs. Hold the power button for specific model procedures. 2. If the POST or video appears on OK RAM module well connected OK RAM module OK OK lcd cable well connected OK NG...
Aspire 7560, 7560G Service Guide
Page 166
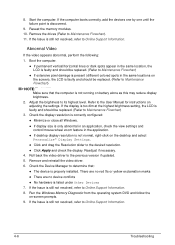
.... Adjust the brightness to Maintenance Flowchart). 11. Readjust if necessary. 4. Remove and reinstall the video driver. 6. Check the Device Manager to determine that the computer is not running on battery alone as this may reduce display brightness. 2. Refer to Online Support Information. 4-6 Troubleshooting There are no red Xs or yellow exclamation marks There are no device conflicts No hardware is properly installed...
.... Adjust the brightness to Maintenance Flowchart). 11. Readjust if necessary. 4. Remove and reinstall the video driver. 6. Check the Device Manager to determine that the computer is not running on battery alone as this may reduce display brightness. 2. Refer to Online Support Information. 4-6 Troubleshooting There are no red Xs or yellow exclamation marks There are no device conflicts No hardware is properly installed...

Aspire 7560, 7560G Service Guide
Page 179
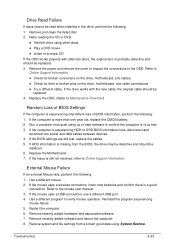
... Drivers if controller drives are set as the first boot device on -screen information to enter the BIOS Utility. NOTE: NOTE: Startup Repair attempts to mainboard. 2. Check the BIOS settings are correct and that CD/DVD drive is operating correctly, perform the following : 1. Confirm all external devices. 2. Troubleshooting 4-19 Disconnect all cables and jumpers on the HDD and ODD are required. When prompted, press any recently added hardware and associated software. 5. d. When the System Recovery Options screen...
... Drivers if controller drives are set as the first boot device on -screen information to enter the BIOS Utility. NOTE: NOTE: Startup Repair attempts to mainboard. 2. Check the BIOS settings are correct and that CD/DVD drive is operating correctly, perform the following : 1. Confirm all external devices. 2. Troubleshooting 4-19 Disconnect all cables and jumpers on the HDD and ODD are required. When prompted, press any recently added hardware and associated software. 5. d. When the System Recovery Options screen...
Aspire 7560, 7560G Service Guide
Page 182
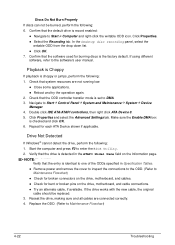
... to Start Computer and right-click the writable ODD icon. Check that the ODD controller transfer mode is the factory default. Check that system resources are connected correctly. 4. Repeat for bent or broken pins on the drive, motherboard, and cable connections. Try an alternate cable, if available. Verify that the software used for burning discs is set to enter the BIOS Utility. 2. Reseat the drive, making sure...
... to Start Computer and right-click the writable ODD icon. Check that the ODD controller transfer mode is the factory default. Check that system resources are connected correctly. 4. Repeat for bent or broken pins on the drive, motherboard, and cable connections. Try an alternate cable, if available. Verify that the software used for burning discs is set to enter the BIOS Utility. 2. Reseat the drive, making sure...
Aspire 7560, 7560G Service Guide
Page 183
... the drive using System Restore. If the computer is more than one year old, replace the CMOS battery. 2. Refer to a music CD If the ODD works properly with the new cable, the original cable should be replaced. 4. Remove recently added software and reboot the computer. 8. Restore system and file settings from the BIOS, the drive may be defective and should be replaced. 3. Remove the power and remove the cover to inspect the connections to Maintenance...
... the drive using System Restore. If the computer is more than one year old, replace the CMOS battery. 2. Refer to a music CD If the ODD works properly with the new cable, the original cable should be replaced. 4. Remove recently added software and reboot the computer. 8. Restore system and file settings from the BIOS, the drive may be defective and should be replaced. 3. Remove the power and remove the cover to inspect the connections to Maintenance...
Aspire 7560, 7560G Service Guide
Page 185
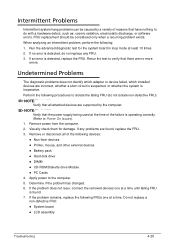
... all attached devices are no error is inoperative. If the problem remains, replace the following devices: Non-Acer devices Printer, mouse, and other external devices Battery pack Hard disk drive DIMM CD-ROM/Diskette drive Module PC Cards 4. Determine if the problem has changed. 6. Do not replace a non-defective FRU: System board LCD assembly Troubleshooting 4-25...
... all attached devices are no error is inoperative. If the problem remains, replace the following devices: Non-Acer devices Printer, mouse, and other external devices Battery pack Hard disk drive DIMM CD-ROM/Diskette drive Module PC Cards 4. Determine if the problem has changed. 6. Do not replace a non-defective FRU: System board LCD assembly Troubleshooting 4-25...

Aspire 7560, 7560G Service Guide
Page 189
....h) BDS_ENTER_BDS BDS_INSTALL_HOTKEY BDS_ASF_INIT* BDS_PCI_ENUMERATION_START Phase Post Code Description BDS 10 Enter BDS entry BDS 11 Install Hotkey service BDS 12 ASF Initialization BDS 13 PCI enumeration Troubleshooting 4-29 DXE Phase POST Code Table (Continued) Functionality Name (Include\PostCode.h) Phase Post Code Description DXE_MP_CPU_INIT DXE 4F Multi-processor MiddleInitialization DXE_SMBUS_INIT DXE 50 SMBUS Driver Initialization DXE_SMART_TIMER_INIT DXE 51 8259 Initialization DXE_PCRTC_INIT...
....h) BDS_ENTER_BDS BDS_INSTALL_HOTKEY BDS_ASF_INIT* BDS_PCI_ENUMERATION_START Phase Post Code Description BDS 10 Enter BDS entry BDS 11 Install Hotkey service BDS 12 ASF Initialization BDS 13 PCI enumeration Troubleshooting 4-29 DXE Phase POST Code Table (Continued) Functionality Name (Include\PostCode.h) Phase Post Code Description DXE_MP_CPU_INIT DXE 4F Multi-processor MiddleInitialization DXE_SMBUS_INIT DXE 50 SMBUS Driver Initialization DXE_SMART_TIMER_INIT DXE 51 8259 Initialization DXE_PCRTC_INIT...

Aspire 7560, 7560G Service Guide
Page 199
.../or User Password) is cleared. 6. Locate the RTC reset point and short it (A). (Figure 5-3) A Figure 5-3. If no password prompt is shown, BIOS password is set, the BIOS will prompt for the password at system POST or upon entering the BIOS setup menu. Clear the password check with the SOP (standard operating procedure) for clearing the BIOS password and recovering the BIOS for clearing BIOS Password (Supervisor Password and User Password). CMOS Jumper Table 5-3. If password prompt is only for the Acer Aspire 7560/7560G. Clearing Password...
.../or User Password) is cleared. 6. Locate the RTC reset point and short it (A). (Figure 5-3) A Figure 5-3. If no password prompt is shown, BIOS password is set, the BIOS will prompt for the password at system POST or upon entering the BIOS setup menu. Clear the password check with the SOP (standard operating procedure) for clearing the BIOS password and recovering the BIOS for clearing BIOS Password (Supervisor Password and User Password). CMOS Jumper Table 5-3. If password prompt is only for the Acer Aspire 7560/7560G. Clearing Password...


