Aspire 7230/7530/7530G Quick Guide
Page 5
... preloaded on AcerSystem User Guide. In addition it : 1 Click on Start, All Programs, AcerSystem. 2 Click on your notebook. The printed Aspire Series Generic User Guide contains useful information applying to all models in the text with setting up your computer. Follow the instructions on the screen...features and functions of your new computer. Please understand that due to its nature, the Generic User Guide as well as Acer's Empowering Technology, using the keyboard, audio, etc. Such instances are only contained in certain models of the series, but not necessarily in the model ...
... preloaded on AcerSystem User Guide. In addition it : 1 Click on Start, All Programs, AcerSystem. 2 Click on your notebook. The printed Aspire Series Generic User Guide contains useful information applying to all models in the text with setting up your computer. Follow the instructions on the screen...features and functions of your new computer. Please understand that due to its nature, the Generic User Guide as well as Acer's Empowering Technology, using the keyboard, audio, etc. Such instances are only contained in certain models of the series, but not necessarily in the model ...
Aspire 7230/7530/7530G Quick Guide
Page 7
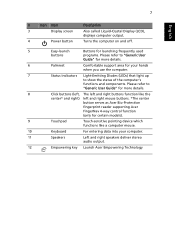
... details. 6 Palmrest Comfortable support area for certain models). 9 Touchpad Touch-sensitive pointing device which functions like a computer mouse. 10 Keyboard For entering data into your hands when you use the computer. 7 Status indicators Light-Emitting Diodes (LEDs) that light up to ... buttons function like the center* and right) left and right mouse buttons. *The center button serves as Acer Bio-Protection fingerprint reader supporting Acer FingerNav 4-way control function (only for your computer. 11 Speakers Left and right speakers deliver stereo audio output...
... details. 6 Palmrest Comfortable support area for certain models). 9 Touchpad Touch-sensitive pointing device which functions like a computer mouse. 10 Keyboard For entering data into your hands when you use the computer. 7 Status indicators Light-Emitting Diodes (LEDs) that light up to ... buttons function like the center* and right) left and right mouse buttons. *The center button serves as Acer Bio-Protection fingerprint reader supporting Acer FingerNav 4-way control function (only for your computer. 11 Speakers Left and right speakers deliver stereo audio output...
Aspire 7230/7530/7530G Quick Guide
Page 13
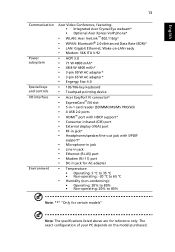
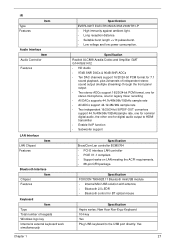
English 13 Communication Power subsystem Special keys and controls I/O interface Environment Acer Video Conference, featuring: • Integrated Acer Crystal Eye webcam* • Optional Acer Xpress VoIP phone* • WLAN: Acer InviLink™ 802.11b/g* • WPAN: Bluetooth® 2.0+Enhanced Data Rate (EDR)*...• 3-pin 90 W AC adapter* • 3-pin 65 W AC adapter* • Engergy Star 4.0 • 105/106-key keyboard • Touchpad pointing device • Acer EasyPort IV connector* • ExpressCard™/54 slot • 5-in-1 card reader (SD/MMC/MS/MS PRO/xD) • 4...
English 13 Communication Power subsystem Special keys and controls I/O interface Environment Acer Video Conference, featuring: • Integrated Acer Crystal Eye webcam* • Optional Acer Xpress VoIP phone* • WLAN: Acer InviLink™ 802.11b/g* • WPAN: Bluetooth® 2.0+Enhanced Data Rate (EDR)*...• 3-pin 90 W AC adapter* • 3-pin 65 W AC adapter* • Engergy Star 4.0 • 105/106-key keyboard • Touchpad pointing device • Acer EasyPort IV connector* • ExpressCard™/54 slot • 5-in-1 card reader (SD/MMC/MS/MS PRO/xD) • 4...
Aspire 7230/7530/7530G Service Guide
Page 7
... 1 Features 1 System Block Diagram 4 Your Acer Notebook tour 5 Front View 5 Closed Front View 6 Left View 7 Right View 8 Rear View 8 Bottom View 9 Indicators 10 Easy-Launch Buttons 10 Touch Pad Basics (with fingerprint reader 11 Using the Keyboard 12 Lock Keys and embedded numeric keypad 12 ...Windows Keys 13 Hot Keys 14 Special Key 15 Using the System Utilities 16 Acer GridVista (dual-display compatible 16 Hardware Specifications and Configurations 18 ...
... 1 Features 1 System Block Diagram 4 Your Acer Notebook tour 5 Front View 5 Closed Front View 6 Left View 7 Right View 8 Rear View 8 Bottom View 9 Indicators 10 Easy-Launch Buttons 10 Touch Pad Basics (with fingerprint reader 11 Using the Keyboard 12 Lock Keys and embedded numeric keypad 12 ...Windows Keys 13 Hot Keys 14 Special Key 15 Using the System Utilities 16 Acer GridVista (dual-display compatible 16 Hardware Specifications and Configurations 18 ...

Aspire 7230/7530/7530G Service Guide
Page 8
Table of Contents Removing the Switch Cover 62 Removing the Switch Board 63 Removing the Keyboard 64 Removing the Modem Module 65 Removing the Antenna, MIC and Speaker Cables 66 Removing the LCD Module 68 Removing the Upper Cover 70 Removing ... Replacing the Upper Cover 112 Replacing the LCD Module 116 Replacing the Antenna, MIC and Speaker Cables 117 Replacing the Modem Module 119 Replacing the Keyboard 120 Replacing the Switch Board 121 Replacing the Switch Cover 122 Replacing the ODD Module 123 Replacing the Hard Disk Drive Module 123 Replacing the...
Table of Contents Removing the Switch Cover 62 Removing the Switch Board 63 Removing the Keyboard 64 Removing the Modem Module 65 Removing the Antenna, MIC and Speaker Cables 66 Removing the LCD Module 68 Removing the Upper Cover 70 Removing ... Replacing the Upper Cover 112 Replacing the LCD Module 116 Replacing the Antenna, MIC and Speaker Cables 117 Replacing the Modem Module 119 Replacing the Keyboard 120 Replacing the Switch Board 121 Replacing the Switch Cover 122 Replacing the ODD Module 123 Replacing the Hard Disk Drive Module 123 Replacing the...
Aspire 7230/7530/7530G Service Guide
Page 9
...Common Problems 129 Power On Issue 130 No Display Issue 131 Random Loss of BIOS Settings 132 LCD Failure 133 Built-In Keyboard Failure 133 Touch Pad Failure 134 Internal Speaker Failure 134 Internal Microphone Failure 136 HDD Not Operating Correctly 137 ODD Failure 138...BIOS Recovery by Crisis Disk 160 FRU (Field Replaceable Unit) List 161 Aspire 7230/7530/7530G Exploded Diagram 162 Aspire 7230/7530/7530G FRU List 163 Screw List 171 Model Definition and Configuration 172 Aspire 7230/7530/7530G Series 172 Test Compatible Components 189 Microsoft® Windows® Vista ...
...Common Problems 129 Power On Issue 130 No Display Issue 131 Random Loss of BIOS Settings 132 LCD Failure 133 Built-In Keyboard Failure 133 Touch Pad Failure 134 Internal Speaker Failure 134 Internal Microphone Failure 136 HDD Not Operating Correctly 137 ODD Failure 138...BIOS Recovery by Crisis Disk 160 FRU (Field Replaceable Unit) List 161 Aspire 7230/7530/7530G Exploded Diagram 162 Aspire 7230/7530/7530G FRU List 163 Screw List 171 Model Definition and Configuration 172 Aspire 7230/7530/7530G Series 172 Test Compatible Components 189 Microsoft® Windows® Vista ...
Aspire 7230/7530/7530G Service Guide
Page 12
...8226; 3-pin 65 W AC adapter* • Energy Star 4.0 Special keys and controls • 105/106-key keyboard • Touchpad pointing device I/O interface • Acer EasyPort IV connector* • ExpressCard™/54 slot • 5-in microphone Dimensions and Weight • 402 (W) x...BIOS user, supervisor, HDD passwords • Kensington lock slot Communication • Acer Video Conference, featuring: • Integrated Acer Crystal Eye webcam* • Optional Acer Xpress VoIP phone* • WLAN: Acer InviLink™ 802.11b/g* • WPAN: Bluetooth® 2.0+Enhanced Data Rate...
...8226; 3-pin 65 W AC adapter* • Energy Star 4.0 Special keys and controls • 105/106-key keyboard • Touchpad pointing device I/O interface • Acer EasyPort IV connector* • ExpressCard™/54 slot • 5-in microphone Dimensions and Weight • 402 (W) x...BIOS user, supervisor, HDD passwords • Kensington lock slot Communication • Acer Video Conference, featuring: • Integrated Acer Crystal Eye webcam* • Optional Acer Xpress VoIP phone* • WLAN: Acer InviLink™ 802.11b/g* • WPAN: Bluetooth® 2.0+Enhanced Data Rate...
Aspire 7230/7530/7530G Service Guide
Page 16
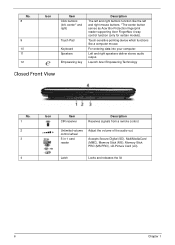
No. 8 9 10 11 12 Icon Item Click buttons (left, center* and right) Touch Pad Keyboard Speakers Empowering key Description The left and right buttons function like a computer mouse. Accepts Secure Digital (SD), MultiMediaCard (MMC), Memory Stick (MS... certain models). Left and right speakers deliver stereo audio output. Unlimited volume control wheel 5-in-1 card reader Adjust the volume of the audio-out. Launch Acer Empowering Technology Closed Front View No. 1 2 3 4 Icon Item CIR receiver Description Receives signals from a remote control. Latch Locks and releases the lid 6...
No. 8 9 10 11 12 Icon Item Click buttons (left, center* and right) Touch Pad Keyboard Speakers Empowering key Description The left and right buttons function like a computer mouse. Accepts Secure Digital (SD), MultiMediaCard (MMC), Memory Stick (MS... certain models). Left and right speakers deliver stereo audio output. Unlimited volume control wheel 5-in-1 card reader Adjust the volume of the audio-out. Launch Acer Empowering Technology Closed Front View No. 1 2 3 4 Icon Item CIR receiver Description Receives signals from a remote control. Latch Locks and releases the lid 6...
Aspire 7230/7530/7530G Service Guide
Page 20
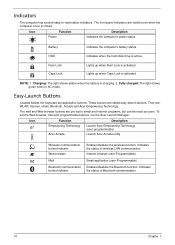
...'s power status. Fully charged: The light shows green when in AC mode. Easy-Launch Buttons Located beside the keyboard are called easy-launch buttons. Internet browser (user-Programmable) Email application (user-Programmable) Enables/disables the Bluetooth function... Lock Indicates when the hard disk drive is charging. 2. Icon Function Empowering Technology Acer Arcade Description Launch Acer Empowering Technology. (user-programmable) Launch Acer Arcade utility Wireless communication button/indicator Web browser Mail Bluetooth communication button/indicator Enables/disables...
...'s power status. Fully charged: The light shows green when in AC mode. Easy-Launch Buttons Located beside the keyboard are called easy-launch buttons. Internet browser (user-Programmable) Email application (user-Programmable) Enables/disables the Bluetooth function... Lock Indicates when the hard disk drive is charging. 2. Icon Function Empowering Technology Acer Arcade Description Launch Acer Empowering Technology. (user-programmable) Launch Acer Arcade utility Wireless communication button/indicator Web browser Mail Bluetooth communication button/indicator Enables/disables...
Aspire 7230/7530/7530G Service Guide
Page 22
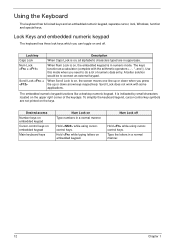
...arithmetic operators +, -, *, and /). It is in uppercase. Desired access Number keys on embedded keypad Cursor-control keys on embedded keypad Main keyboard keys Num Lock on the upper right corner of numeric data entry. The keys function as a calculator (complete with some applications. To simplify the... keyboard legend, cursor-control key symbols are in numeric mode. When Num Lock is on, the embedded keypad is indicated by small characters ...
...arithmetic operators +, -, *, and /). It is in uppercase. Desired access Number keys on embedded keypad Cursor-control keys on embedded keypad Main keyboard keys Num Lock on the upper right corner of numeric data entry. The keys function as a calculator (complete with some applications. To simplify the... keyboard legend, cursor-control key symbols are in numeric mode. When Num Lock is on, the embedded keypad is indicated by small characters ...
Aspire 7230/7530/7530G Service Guide
Page 23
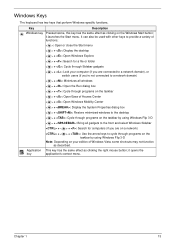
... Windows Vista, some shortcuts may not function as clicking the right mouse button; it opens the key application's context menu. Chapter 1 13 Windows Keys The keyboard has two keys that perform Windows-specific functions. it launches the Start menu. It can also be used with other keys to cycle through Sidebar...
... Windows Vista, some shortcuts may not function as clicking the right mouse button; it opens the key application's context menu. Chapter 1 13 Windows Keys The keyboard has two keys that perform Windows-specific functions. it launches the Start menu. It can also be used with other keys to cycle through Sidebar...
Aspire 7230/7530/7530G Service Guide
Page 25
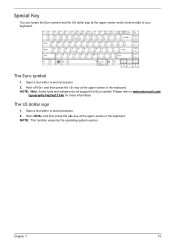
... a text editor or word processor. 2. Hold and then press the key at the upper-center and/or bottom-right of your keyboard. The Euro symbol 1. Chapter 1 15 Please refer to www.microsoft.com/ typography/faq/faq12.htm for more information. NOTE: This function varies by the operating .... Open a text editor or word processor. 2. Special Key You can locate the Euro symbol and the US dollar sign at the upper-center of the keyboard. NOTE: Note: Some fonts and software do not support the Euro symbol.
... a text editor or word processor. 2. Hold and then press the key at the upper-center and/or bottom-right of your keyboard. The Euro symbol 1. Chapter 1 15 Please refer to www.microsoft.com/ typography/faq/faq12.htm for more information. NOTE: This function varies by the operating .... Open a text editor or word processor. 2. Special Key You can locate the Euro symbol and the US dollar sign at the upper-center of the keyboard. NOTE: Note: Some fonts and software do not support the Euro symbol.
Aspire 7230/7530/7530G Service Guide
Page 37
...96k/192kHzsample rate, one for nominal digital audio, the other one for BT optical mouse Specification Aspire series: New Acer Non-Ergo Keyboard 104-key Yes Plug USB keyboard to HDMI transmitter • Enable VoIP function • Subwoofer support Specification BroadCom Lan controller BCM5764... DAC channels support 16/20/24-bit PCM format for 7.1 sound playback, plus 2channels of keypads Windows logo key Internal & external keyboard work simultaneously Chapter 1 Specification EVERLIGHT ELECTRONICS IRM-V038/TR1-P • High immunity against ambient light. • Long reception distance. ...
...96k/192kHzsample rate, one for nominal digital audio, the other one for BT optical mouse Specification Aspire series: New Acer Non-Ergo Keyboard 104-key Yes Plug USB keyboard to HDMI transmitter • Enable VoIP function • Subwoofer support Specification BroadCom Lan controller BCM5764... DAC channels support 16/20/24-bit PCM format for 7.1 sound playback, plus 2channels of keypads Windows logo key Internal & external keyboard work simultaneously Chapter 1 Specification EVERLIGHT ELECTRONICS IRM-V038/TR1-P • High immunity against ambient light. • Long reception distance. ...
Aspire 7230/7530/7530G Service Guide
Page 56
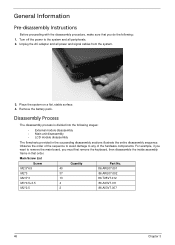
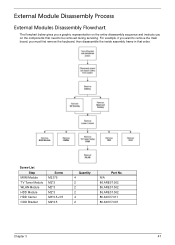
... the following stages: • External module disassembly • Main unit disassembly • LCD module disassembly The flowcharts provided in that you must first remove the keyboard, then disassemble the inside assembly frame in the succeeding disassembly sections illustrate the entire disassembly sequence. Unplug the AC adapter and all peripherals. 2. Place the...
... the following stages: • External module disassembly • Main unit disassembly • LCD module disassembly The flowcharts provided in that you must first remove the keyboard, then disassemble the inside assembly frame in the succeeding disassembly sections illustrate the entire disassembly sequence. Unplug the AC adapter and all peripherals. 2. Place the...
Aspire 7230/7530/7530G Service Guide
Page 57
N/A 86.ARE07.002 86.ARE07.002 86.ARE07.002 86.A03V7.011 86.A03V7.007 Chapter 3 47 For example, if you must first remove the keyboard, then disassemble the inside assembly frame in that need to remove the main board, you want to be removed during servicing. Screw List Step MXM ...
N/A 86.ARE07.002 86.ARE07.002 86.ARE07.002 86.A03V7.011 86.A03V7.007 Chapter 3 47 For example, if you must first remove the keyboard, then disassemble the inside assembly frame in that need to remove the main board, you want to be removed during servicing. Screw List Step MXM ...

Aspire 7230/7530/7530G Service Guide
Page 74
Remove the keyboard and place it over to expose the FFC cable. 3. See "Removing the Switch Cover" on a clean surface. 64 Chapter 3 Remove the Switch Cover. Lift up the locking lever and remove the FFC cable. 4. Removing the Keyboard 1. Grasp the keyboard and turn it on page 62. 2.
Remove the keyboard and place it over to expose the FFC cable. 3. See "Removing the Switch Cover" on a clean surface. 64 Chapter 3 Remove the Switch Cover. Lift up the locking lever and remove the FFC cable. 4. Removing the Keyboard 1. Grasp the keyboard and turn it on page 62. 2.
Aspire 7230/7530/7530G Service Guide
Page 75
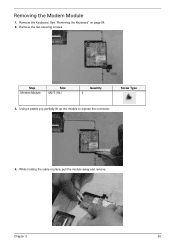
Step Modem Module Size M2*3 (NL) Quantity 2 Screw Type 3. Removing the Modem Module 1. Chapter 3 65 Remove the two securing screws. While holding the cable in place, pull the module away and remove. See "Removing the Keyboard" on page 64. 2. Using a plastic pry, partially lift up the module to expose the connector. 4. Remove the Keyboard.
Step Modem Module Size M2*3 (NL) Quantity 2 Screw Type 3. Removing the Modem Module 1. Chapter 3 65 Remove the two securing screws. While holding the cable in place, pull the module away and remove. See "Removing the Keyboard" on page 64. 2. Using a plastic pry, partially lift up the module to expose the connector. 4. Remove the Keyboard.
Aspire 7230/7530/7530G Service Guide
Page 76
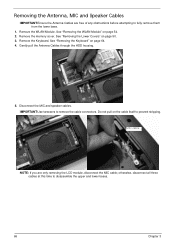
... memory cover. MIC cable NOTE: If you are free of any obstructions before attempting to disassemble the upper and lower bases. 66 Chapter 3 Remove the Keyboard. IMPORTANT:Use tweezers to prevent stripping. otherwise, disconnect all three cables at this time to fully remove them from the lower base. 1. Removing the Antenna...
... memory cover. MIC cable NOTE: If you are free of any obstructions before attempting to disassemble the upper and lower bases. 66 Chapter 3 Remove the Keyboard. IMPORTANT:Use tweezers to prevent stripping. otherwise, disconnect all three cables at this time to fully remove them from the lower base. 1. Removing the Antenna...
Aspire 7230/7530/7530G Service Guide
Page 80
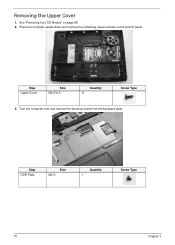
Turn the computer over and remove the securing screw from the keyboard plate. See "Removing the LCD Module" on the bottom panel. Place the computer upside down and remove the remaining eleven screws on page 68. 2. Step DDR Plate Size M2*3 Quantity 1 Screw Type 70 Chapter 3 Step Upper Cover Size M2.5*6.5 Quantity 11 Screw Type 3. Removing the Upper Cover 1.
Turn the computer over and remove the securing screw from the keyboard plate. See "Removing the LCD Module" on the bottom panel. Place the computer upside down and remove the remaining eleven screws on page 68. 2. Step DDR Plate Size M2*3 Quantity 1 Screw Type 70 Chapter 3 Step Upper Cover Size M2.5*6.5 Quantity 11 Screw Type 3. Removing the Upper Cover 1.
Aspire 7230/7530/7530G Service Guide
Page 81
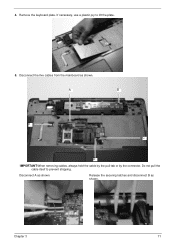
Disconnect A as shown. If necessary, use a plastic pry to prevent stripping. Release the securing latches and disconnect B as shown. Do not pull the cable itself to lift the plate. 5. Chapter 3 71 Remove the keyboard plate. A B E C D IMPORTANT:When removing cables, always hold the cable by the pull-tab or by the connector. Disconnect the five cables from the mainboard as shown. 4.
Disconnect A as shown. If necessary, use a plastic pry to prevent stripping. Release the securing latches and disconnect B as shown. Do not pull the cable itself to lift the plate. 5. Chapter 3 71 Remove the keyboard plate. A B E C D IMPORTANT:When removing cables, always hold the cable by the pull-tab or by the connector. Disconnect the five cables from the mainboard as shown. 4.


