Aspire 7230/7530/7530G Quick Guide
Page 5
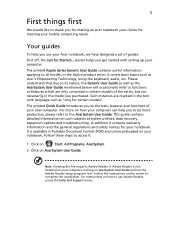
... setting up your mobile computing needs. The printed Aspire Series Generic User Guide contains useful information applying to complete the installation. For instructions on your Acer notebook, we have designed a set of guides: First off, the Just for certain models". Your guides To help you use Adobe Reader, access the Help and Support menu. Such instances are only contained in Portable Document Format (PDF) and comes preloaded on how to the AcerSystem User Guide...
... setting up your mobile computing needs. The printed Aspire Series Generic User Guide contains useful information applying to complete the installation. For instructions on your Acer notebook, we have designed a set of guides: First off, the Just for certain models". Your guides To help you use Adobe Reader, access the Help and Support menu. Such instances are only contained in Portable Document Format (PDF) and comes preloaded on how to the AcerSystem User Guide...
Aspire 7230/7530/7530G Quick Guide
Page 11
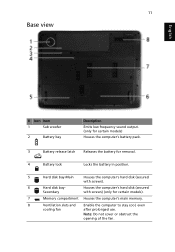
... the computer's hard disk (secured with screws). 6 Hard disk bay- Note: Do not cover or obstruct the opening of the fan. 11 Base view English # Icon Item 1 Sub woofer 2 Battery bay Description Emits low frequency sound output. (only for certain models) Houses the computer's battery pack. 3 Battery release latch Releases the battery for certain models). 7 Memory compartment Houses the computer's main memory. 8 Ventilation slots and Enable the computer...
... the computer's hard disk (secured with screws). 6 Hard disk bay- Note: Do not cover or obstruct the opening of the fan. 11 Base view English # Icon Item 1 Sub woofer 2 Battery bay Description Emits low frequency sound output. (only for certain models) Houses the computer's battery pack. 3 Battery release latch Releases the battery for certain models). 7 Memory compartment Houses the computer's main memory. 8 Ventilation slots and Enable the computer...
Aspire 7230/7530/7530G Quick Guide
Page 13
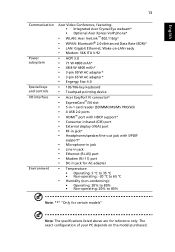
... 4.0 • 105/106-key keyboard • Touchpad pointing device • Acer EasyPort IV connector* • ExpressCard™/54 slot • 5-in-1 card reader (SD/MMC/MS/MS PRO/xD) • 4 USB 2.0 ports • HDMI™ port with HDCP support* • Consumer infrared (CIR) port • External display (VGA) port • RF-in jack* • Headphones/speaker/line-out jack with S/PDIF support* • Microphone-in jack • Line-in jack • Ethernet (RJ-45...
... 4.0 • 105/106-key keyboard • Touchpad pointing device • Acer EasyPort IV connector* • ExpressCard™/54 slot • 5-in-1 card reader (SD/MMC/MS/MS PRO/xD) • 4 USB 2.0 ports • HDMI™ port with HDCP support* • Consumer infrared (CIR) port • External display (VGA) port • RF-in jack* • Headphones/speaker/line-out jack with S/PDIF support* • Microphone-in jack • Line-in jack • Ethernet (RJ-45...
Aspire 7230/7530/7530G Service Guide
Page 7
... 9 Indicators 10 Easy-Launch Buttons 10 Touch Pad Basics (with fingerprint reader 11 Using the Keyboard 12 Lock Keys and embedded numeric keypad 12 Windows Keys 13 Hot Keys 14 Special Key 15 Using the System Utilities 16 Acer GridVista (dual-display compatible 16 Hardware Specifications and Configurations 18 System Utilities 29 BIOS Setup Utility 29 Navigating the BIOS Utility 29 Information 30 Main 31 Advanced 32 Security 34 Boot 37 Power 38 Exit 40 BIOS Flash Utility 41 Remove HDD/BIOS Utility 42 Machine Disassembly and Replacement...
... 9 Indicators 10 Easy-Launch Buttons 10 Touch Pad Basics (with fingerprint reader 11 Using the Keyboard 12 Lock Keys and embedded numeric keypad 12 Windows Keys 13 Hot Keys 14 Special Key 15 Using the System Utilities 16 Acer GridVista (dual-display compatible 16 Hardware Specifications and Configurations 18 System Utilities 29 BIOS Setup Utility 29 Navigating the BIOS Utility 29 Information 30 Main 31 Advanced 32 Security 34 Boot 37 Power 38 Exit 40 BIOS Flash Utility 41 Remove HDD/BIOS Utility 42 Machine Disassembly and Replacement...
Aspire 7230/7530/7530G Service Guide
Page 9
... Intermittent Problems 146 Undetermined Problems 146 POST Codes Tables 147 Chipset POST Codes 147 Core POST Codes 149 Jumper and Connector Locations 157 Top View 157 Bottom View 158 Clearing Password Check and BIOS Recovery 159 Clearing Password Check 159 BIOS Recovery by Crisis Disk 160 FRU (Field Replaceable Unit) List 161 Aspire 7230/7530/7530G Exploded Diagram 162 Aspire 7230/7530/7530G FRU List 163 Screw List 171 Model Definition and Configuration 172 Aspire 7230/7530/7530G Series...
... Intermittent Problems 146 Undetermined Problems 146 POST Codes Tables 147 Chipset POST Codes 147 Core POST Codes 149 Jumper and Connector Locations 157 Top View 157 Bottom View 158 Clearing Password Check and BIOS Recovery 159 Clearing Password Check 159 BIOS Recovery by Crisis Disk 160 FRU (Field Replaceable Unit) List 161 Aspire 7230/7530/7530G Exploded Diagram 162 Aspire 7230/7530/7530G FRU List 163 Screw List 171 Model Definition and Configuration 172 Aspire 7230/7530/7530G Series...
Aspire 7230/7530/7530G Service Guide
Page 20
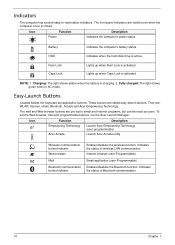
... Lock Caps Lock Indicates when the hard disk drive is charging. 2. Internet browser (user-Programmable) Email application (user-Programmable) Enables/disables the Bluetooth function. Icon Function Power Description Indicates the computer's power status. Fully charged: The light shows green when in AC mode. The mail and Web browser buttons are pre-set the Web browser, mail and programmable buttons, run the Acer Launch Manager. Indicates the status of Bluetooth communication. 10 Chapter 1 Charging: The light shows amber when the battery is active...
... Lock Caps Lock Indicates when the hard disk drive is charging. 2. Internet browser (user-Programmable) Email application (user-Programmable) Enables/disables the Bluetooth function. Icon Function Power Description Indicates the computer's power status. Fully charged: The light shows green when in AC mode. The mail and Web browser buttons are pre-set the Web browser, mail and programmable buttons, run the Acer Launch Manager. Indicates the status of Bluetooth communication. 10 Chapter 1 Charging: The light shows amber when the battery is active...
Aspire 7230/7530/7530G Service Guide
Page 34
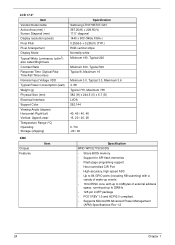
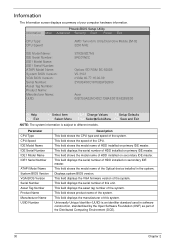
LCD 17.0" Item Vendor/model name Active Area (mm) / Screen Diagonal (mm) Display resolution (pixels) Pixel Pitch Pixel Arrangement Display Mode Typical White Luminance (cd/m2) also called Brightness Contrast Ratio Response Time (Optical Rise Time/Fall Time) msec Nominal Input Voltage VDD Typical Power Consumption (watt) Weight (g) Physical Size (mm) Electrical Interface Support Color Viewing Angle (degree) Horizontal: Right/Left...
LCD 17.0" Item Vendor/model name Active Area (mm) / Screen Diagonal (mm) Display resolution (pixels) Pixel Pitch Pixel Arrangement Display Mode Typical White Luminance (cd/m2) also called Brightness Contrast Ratio Response Time (Optical Rise Time/Fall Time) msec Nominal Input Voltage VDD Typical Power Consumption (watt) Weight (g) Physical Size (mm) Electrical Interface Support Color Viewing Angle (degree) Horizontal: Right/Left...
Aspire 7230/7530/7530G Service Guide
Page 37
... one for digital audio output to the USB port directly: Yes 27 Specification FOXCON T60H928.11 Bluetooth miniUSB module • Internal Mini USB solution with antenna • Bluetooth 2.0+EDR • Bluetooth control for BT optical mouse Specification Aspire series: New Acer Non-Ergo Keyboard 104-key Yes Plug USB keyboard to HDMI transmitter • Enable VoIP function • Subwoofer support Specification BroadCom Lan controller BCM5764 • PCI-E interface LAN controller • PCIE V1.1 compliant. • Support wake on LAN meeting the ACPI...
... one for digital audio output to the USB port directly: Yes 27 Specification FOXCON T60H928.11 Bluetooth miniUSB module • Internal Mini USB solution with antenna • Bluetooth 2.0+EDR • Bluetooth control for BT optical mouse Specification Aspire series: New Acer Non-Ergo Keyboard 104-key Yes Plug USB keyboard to HDMI transmitter • Enable VoIP function • Subwoofer support Specification BroadCom Lan controller BCM5764 • PCI-E interface LAN controller • PCIE V1.1 compliant. • Support wake on LAN meeting the ACPI...
Aspire 7230/7530/7530G Service Guide
Page 40
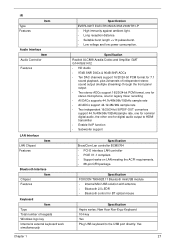
... part of this unit. This field displays the VGA firmware version of the system. This field displays the manufacturer of the Distributed Computing Environment (DCE). 30 Chapter 2 This field shows the model name of HDD installed on secondary IDE master. Displays system BIOS version. This field displays the serial number of HDD installed on primary IDE master. PhoenixBIOS Setup Utility Information Main Advanced Security Boot Power Exit CPU Type: CPU Speed...
... part of this unit. This field displays the VGA firmware version of the system. This field displays the manufacturer of the Distributed Computing Environment (DCE). 30 Chapter 2 This field shows the model name of HDD installed on secondary IDE master. Displays system BIOS version. This field displays the serial number of HDD installed on primary IDE master. PhoenixBIOS Setup Utility Information Main Advanced Security Boot Power Exit CPU Type: CPU Speed...
Aspire 7230/7530/7530G Service Guide
Page 44
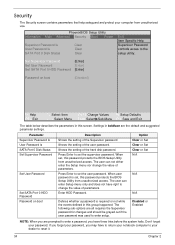
PhoenixBIOS Setup Utility Information Main Advanced Security Boot Power Supervisor Password Is User Password Is SATA Port 0 Disk Status Clear Clear Clear Exit Item Specific Help Supervisor Password controls acces to reset it. 34 Chapter 2 Settings in this screen. Option Clear or Set Clear or Set Clear or Set N/A N/A N/A Disabled or Enabled NOTE: When you are all requires the Supervisor password for changes and should be grayed out if the user password was used to set the user password. Press Enter to enter setup. Press Enter to change the value of...
PhoenixBIOS Setup Utility Information Main Advanced Security Boot Power Supervisor Password Is User Password Is SATA Port 0 Disk Status Clear Clear Clear Exit Item Specific Help Supervisor Password controls acces to reset it. 34 Chapter 2 Settings in this screen. Option Clear or Set Clear or Set Clear or Set N/A N/A N/A Disabled or Enabled NOTE: When you are all requires the Supervisor password for changes and should be grayed out if the user password was used to set the user password. Press Enter to enter setup. Press Enter to change the value of...
Aspire 7230/7530/7530G Service Guide
Page 45
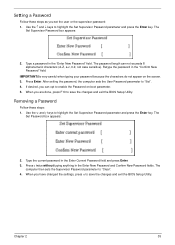
... enable the Password on the screen. 3. The password length can opt to save the changes and exit the BIOS Setup Utility. Use the ↑ and ↓ keys to "Set". 4. Type a password in the "Confirm New Password" field. If desired, you set the user or the supervisor password: 1. The Set Password box appears: 2. Chapter 2 35 After setting the password, the computer sets the User Password parameter to highlight the Set Supervisor Password parameter and press the Enter key. The Set Supervisor Password...
... enable the Password on the screen. 3. The password length can opt to save the changes and exit the BIOS Setup Utility. Use the ↑ and ↓ keys to "Set". 4. Type a password in the "Confirm New Password" field. If desired, you set the user or the supervisor password: 1. The Set Password box appears: 2. Chapter 2 35 After setting the password, the computer sets the User Password parameter to highlight the Set Supervisor Password parameter and press the Enter key. The Set Supervisor Password...
Aspire 7230/7530/7530G Service Guide
Page 46
... current password in the Enter New Password field. After setting the password, the computer sets the User Password parameter to highlight the Set Supervisor Password parameter and press the Enter key. Changing a Password 1. Type a password in the Enter Current Password field and press Enter. 3. If the current password entered does not match the actual current password, the screen will display the following . If desired, you are done, press F10 to save the changes and exit the BIOS Setup Utility...
... current password in the Enter New Password field. After setting the password, the computer sets the User Password parameter to highlight the Set Supervisor Password parameter and press the Enter key. Changing a Password 1. Type a password in the Enter Current Password field and press Enter. 3. If the current password entered does not match the actual current password, the screen will display the following . If desired, you are done, press F10 to save the changes and exit the BIOS Setup Utility...
Aspire 7230/7530/7530G Service Guide
Page 47
... Change Values F9 Setup Defaults ←→ Select Menu Enter SelectXSub-Menu F10 Save and Exit Chapter 2 37 and moves the device up or down. and specfies the device fixed or removable. enables or disables a device. Bootable devices includes the USB diskette drives, the onboard hard disk drive and the DVD drive in the module bay. Loads default boot sequence. exculde or include the device to load the operating system. PhoenixBIOS Setup Utility Information Main Advanced Security Boot Power Boot priority order...
... Change Values F9 Setup Defaults ←→ Select Menu Enter SelectXSub-Menu F10 Save and Exit Chapter 2 37 and moves the device up or down. and specfies the device fixed or removable. enables or disables a device. Bootable devices includes the USB diskette drives, the onboard hard disk drive and the DVD drive in the module bay. Loads default boot sequence. exculde or include the device to load the operating system. PhoenixBIOS Setup Utility Information Main Advanced Security Boot Power Boot priority order...
Aspire 7230/7530/7530G Service Guide
Page 139
... page 195. Non-Acer products, prototype cards, or modified options can give false errors and invalid system responses. 1. Symptoms (Verified) Go To Power On Issue Page 130 No Display Issue Page 131 LCD Failure Page 133 Internal Keyboard Failure Page 133 Touch Pad Failure Page 134 Internal Speaker Failure Page 134 Internal Microphone Failure Page 136 ODD Failure Page 138 Rightside USB Failure Page 141...
... page 195. Non-Acer products, prototype cards, or modified options can give false errors and invalid system responses. 1. Symptoms (Verified) Go To Power On Issue Page 130 No Display Issue Page 131 LCD Failure Page 133 Internal Keyboard Failure Page 133 Touch Pad Failure Page 134 Internal Speaker Failure Page 134 Internal Microphone Failure Page 136 ODD Failure Page 138 Rightside USB Failure Page 141...
Aspire 7230/7530/7530G Service Guide
Page 141
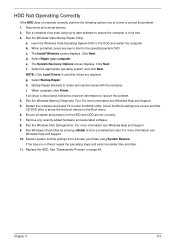
... boots correctly, add the devices one by removing the power cable and battery and holding down the power button for specific model procedures. 2. Disconnect power and all external devices including port replicators or docking stations. Remove the drives (see "LCD Failure" on page 195. On this model). Reconnect the power and reboot the computer. 4. If the Issue is selected. Restart the computer. Make sure that the internal display is still not resolved, see "Power...
... boots correctly, add the devices one by removing the power cable and battery and holding down the power button for specific model procedures. 2. Disconnect power and all external devices including port replicators or docking stations. Remove the drives (see "LCD Failure" on page 195. On this model). Reconnect the power and reboot the computer. 4. If the Issue is selected. Restart the computer. Make sure that the internal display is still not resolved, see "Power...
Aspire 7230/7530/7530G Service Guide
Page 142
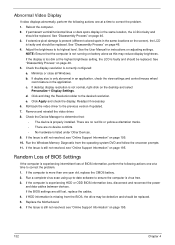
... DVD and follow the onscreen prompts. 11. b. Abnormal Video Display If video displays abnormally, perform the following actions one at the highest brightness setting, the LCD is faulty and should be replaced. See "Disassembly Process" on adjusting settings. See the User Manual for instructions on page 46. 3. Check the display resolution is experiencing HDD or ODD BIOS information loss, disconnect and reconnect the power and data cables between devices. c. If desktop display...
... DVD and follow the onscreen prompts. 11. b. Abnormal Video Display If video displays abnormally, perform the following actions one at the highest brightness setting, the LCD is faulty and should be replaced. See "Disassembly Process" on adjusting settings. See the User Manual for instructions on page 46. 3. Check the display resolution is experiencing HDD or ODD BIOS information loss, disconnect and reconnect the power and data cables between devices. c. If desktop display...
Aspire 7230/7530/7530G Service Guide
Page 147
... the problem. 1. For more information see Windows Help and Support. 9. Restore system and file settings from a command prompt. b. Click Next. Ensure all external devices. 2. For more information see Windows Help and Support. 5. Select Repair your computer. The System Recovery Options screen displays. f. g. Restart the computer and press F2 to the operating system DVD. Check the BIOS settings are required. Replace the HDD. c. d. Select Startup Repair. Click Next. NOTE: Click Load Drivers if controller drives are...
... the problem. 1. For more information see Windows Help and Support. 9. Restore system and file settings from a command prompt. b. Click Next. Ensure all external devices. 2. For more information see Windows Help and Support. 5. Select Repair your computer. The System Recovery Options screen displays. f. g. Restart the computer and press F2 to the operating system DVD. Check the BIOS settings are required. Replace the HDD. c. d. Select Startup Repair. Click Next. NOTE: Click Load Drivers if controller drives are...
Aspire 7230/7530/7530G Service Guide
Page 155
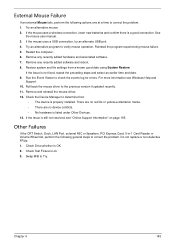
Try an alternative mouse. 2. If the mouse uses a wireless connection, insert new batteries and confirm there is ok. 3. Restore system and file settings from a known good date using System Restore. Roll back the mouse driver to correct the problem. Remove and reinstall the mouse driver. 12. Other Failures If the CRT Switch, Dock, LAN Port, external MIC or Speakers, PCI Express Card, 5-in-1 Card Reader or Volume Wheel fail, perform the following actions one at a time...
Try an alternative mouse. 2. If the mouse uses a wireless connection, insert new batteries and confirm there is ok. 3. Restore system and file settings from a known good date using System Restore. Roll back the mouse driver to correct the problem. Remove and reinstall the mouse driver. 12. Other Failures If the CRT Switch, Dock, LAN Port, external MIC or Speakers, PCI Express Card, 5-in-1 Card Reader or Volume Wheel fail, perform the following actions one at a time...
Aspire 7230/7530/7530G Service Guide
Page 162
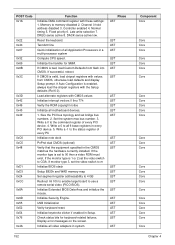
... CPU speed. Controller enabled 4. If Auto Configuration is set the video switch to the command register of all video adapters in the CMOS matches the hardware currently installed. Write a 0 to CGA. If the monitor type is enabled, always load the chipset registers with values from flash into CMOS. Fixed priority 6. Load alternate registers with these settings: 1. Channel 0 hold address disabled 3. DACK sense active low. Check status bits for SMM. Initialize Extended BIOS...
... CPU speed. Controller enabled 4. If Auto Configuration is set the video switch to the command register of all video adapters in the CMOS matches the hardware currently installed. Write a 0 to CGA. If the monitor type is enabled, always load the chipset registers with values from flash into CMOS. Fixed priority 6. Load alternate registers with these settings: 1. Channel 0 hold address disabled 3. DACK sense active low. Check status bits for SMM. Initialize Extended BIOS...
Aspire 7230/7530/7530G Service Guide
Page 165
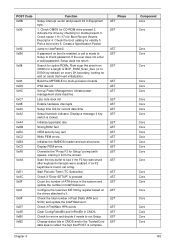
... need initialization. Search for option ROMs. Rom scan the area from the screen. Initiate power management state machine. Count the number of ATA drives in the system and update the number in CMOS. Check CMOS for add on boot is enabled, a call is found, set a flag. Activate the drive by default) on the drives attached to run Setup. Display a message if key switch is pressed. Check the boot catalog for media present 3. Build the MPTABLE for errors...
... need initialization. Search for option ROMs. Rom scan the area from the screen. Initiate power management state machine. Count the number of ATA drives in the system and update the number in CMOS. Check CMOS for add on boot is enabled, a call is found, set a flag. Activate the drive by default) on the drives attached to run Setup. Display a message if key switch is pressed. Check the boot catalog for media present 3. Build the MPTABLE for errors...


