
Acer Aspire 7250 Service Guide
Page 37
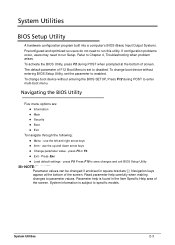
The default parameter of screen. Navigating the BIOS Utility 0 Five menu options are: Information Main Security Boot Exit To navigate through the following: Menu - Navigation keys appear at the bottom of F12 Boot Menu is set the parameter to enabled. Parameter help carefully when making changes to specific ... values can be changed if enclosed in the Item Specific Help area of the screen. To change boot device without entering BIOS Setup Utility, set to enter multi-boot menu. use the left and right arrow keys Item - Preconfigured and optimized so users do not need to...
The default parameter of screen. Navigating the BIOS Utility 0 Five menu options are: Information Main Security Boot Exit To navigate through the following: Menu - Navigation keys appear at the bottom of F12 Boot Menu is set the parameter to enabled. Parameter help carefully when making changes to specific ... values can be changed if enclosed in the Item Specific Help area of the screen. To change boot device without entering BIOS Setup Utility, set to enter multi-boot menu. use the left and right arrow keys Item - Preconfigured and optimized so users do not need to...
Acer Aspire 7250 Service Guide
Page 41
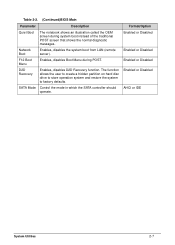
Enabled or Disabled Network Boot Enables, disables the system boot from LAN (remote server). Enabled or Disabled D2D Recovery Enables, disables D2D Recovery function. The function allows the user to create a ...should operate. Table 2-2. (Continued)BIOS Main Parameter Description Format/Option Quiet Boot The notebook shows an illustration called the OEM screen during POST. AHCI or IDE System Utilities 2-7 Enabled or Disabled F12 Boot Menu Enables, disables Boot Menu during system boot instead of the traditional POST screen that shows the normal diagnostic messages....
Enabled or Disabled Network Boot Enables, disables the system boot from LAN (remote server). Enabled or Disabled D2D Recovery Enables, disables D2D Recovery function. The function allows the user to create a ...should operate. Table 2-2. (Continued)BIOS Main Parameter Description Format/Option Quiet Boot The notebook shows an illustration called the OEM screen during POST. AHCI or IDE System Utilities 2-7 Enabled or Disabled F12 Boot Menu Enables, disables Boot Menu during system boot instead of the traditional POST screen that shows the normal diagnostic messages....
Acer Aspire 7250 Service Guide
Page 42
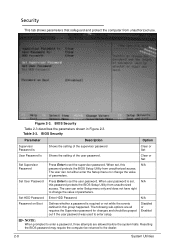
...BIOS Setup Utility from unauthorized access. When user password is required or not while the events defined in Figure 2-3. N/A Password on Boot Defines whether a password is set the user password. Figure 2-3. BIOS Security Parameter Description Option Supervisor Password Is Shows the setting ... parameters shown in this password protects the BIOS Setup Utility from unauthorized use. The user can not either enter the Setup menu nor change the value of parameters. When set the supervisor password. Disabled or Enabled NOTE: When prompted to enter a ...
...BIOS Setup Utility from unauthorized access. When user password is required or not while the events defined in Figure 2-3. N/A Password on Boot Defines whether a password is set the user password. Figure 2-3. BIOS Security Parameter Description Option Supervisor Password Is Shows the setting ... parameters shown in this password protects the BIOS Setup Utility from unauthorized use. The user can not either enter the Setup menu nor change the value of parameters. When set the supervisor password. Disabled or Enabled NOTE: When prompted to enter a ...

Acer Aspire 7250 Service Guide
Page 49
DOS Flash Utility 0 Perform the following to modify the boot priority order. BIOS Boot 3. Select Boot Menu to use the DOS Flash Utility: 1. System Utilities 2-15 The flash process begins as shown in Figure 2-13. Press F2 during boot to update BIOS. Figure 2-12. Execute the < FLASH.BAT > batch file to enter the Setup Menu. 2. Example: If using USB HDD to Update BIOS, move USB HDD to position 1.
DOS Flash Utility 0 Perform the following to modify the boot priority order. BIOS Boot 3. Select Boot Menu to use the DOS Flash Utility: 1. System Utilities 2-15 The flash process begins as shown in Figure 2-13. Press F2 during boot to update BIOS. Figure 2-12. Execute the < FLASH.BAT > batch file to enter the Setup Menu. 2. Example: If using USB HDD to Update BIOS, move USB HDD to position 1.

Acer Aspire 7250 Service Guide
Page 62
... of the MAC folder to enter the setup menu. 4. Read LAN MAC address 2-28 System Utilities Create a DOS bootable USB HDD. 2. Refer to Read MAC address(Figure 2-30). 8. Insert the USB HDD and reboot the computer. 6. Execute < ReadMAC.bat > to Boot. 5. LAN EEPROM Utilities 0 LAN EEPROM Utility...the MAC folder. 7. At the command prompt, navigate to check and change the MAC address. Reboot when the process has completed. Select the Boot menu item and move the entry "USB HDD" to use the LAN EEPROM Utility: To read the Mac address, 1. Perform the following steps to...
... of the MAC folder to enter the setup menu. 4. Read LAN MAC address 2-28 System Utilities Create a DOS bootable USB HDD. 2. Refer to Read MAC address(Figure 2-30). 8. Insert the USB HDD and reboot the computer. 6. Execute < ReadMAC.bat > to Boot. 5. LAN EEPROM Utilities 0 LAN EEPROM Utility...the MAC folder. 7. At the command prompt, navigate to check and change the MAC address. Reboot when the process has completed. Select the Boot menu item and move the entry "USB HDD" to use the LAN EEPROM Utility: To read the Mac address, 1. Perform the following steps to...

Acer Aspire 7250 Service Guide
Page 63
... when the process has completed. Figure 2-32. Execute < WriteMAC.bat >. 8. Insert the USB HDD and reboot the computer. 6. Select the Boot menu item and move the entry "USB HDD" to the HDD and remove the HDD form the computer. 3. Press Enter(Figure 2-31). 10. Copy the contents ...of the MAC folder to the first position. Refer to Boot. 5. At prompt type in MAC address. 9. Write LAN MAC address System Utilities 2-29 To write the MAC address, 1.
... when the process has completed. Figure 2-32. Execute < WriteMAC.bat >. 8. Insert the USB HDD and reboot the computer. 6. Select the Boot menu item and move the entry "USB HDD" to the HDD and remove the HDD form the computer. 3. Press Enter(Figure 2-31). 10. Copy the contents ...of the MAC folder to the first position. Refer to Boot. 5. At prompt type in MAC address. 9. Write LAN MAC address System Utilities 2-29 To write the MAC address, 1.
Acer Aspire 7250 Service Guide
Page 148
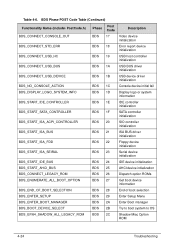
... BDS 25 AHCI device initialization BDS_CONNECT_LEGACY_ROM BDS 26 Dispatch option ROMs BDS_ENUMERATE_ALL_BOOT_OPTION BDS 27 Get boot device information BDS_END_OF_BOOT_SELECTION BDS 28 End of boot selection BDS_ENTER_SETUP BDS 29 Enter Setup Menu BDS_ENTER_BOOT_MANAGER BDS 2A Enter Boot manager BDS_BOOT_DEVICE_SELECT BDS 2B Try to boot system to OS BDS_EFI64_SHADOW_ALL_LEGACY_ROM BDS 2C Shadow Misc Option ROM 4-24 Troubleshooting
... BDS 25 AHCI device initialization BDS_CONNECT_LEGACY_ROM BDS 26 Dispatch option ROMs BDS_ENUMERATE_ALL_BOOT_OPTION BDS 27 Get boot device information BDS_END_OF_BOOT_SELECTION BDS 28 End of boot selection BDS_ENTER_SETUP BDS 29 Enter Setup Menu BDS_ENTER_BOOT_MANAGER BDS 2A Enter Boot manager BDS_BOOT_DEVICE_SELECT BDS 2B Try to boot system to OS BDS_EFI64_SHADOW_ALL_LEGACY_ROM BDS 2C Shadow Misc Option ROM 4-24 Troubleshooting


