
Acer Aspire 5951G Service Guide
Page 5
... and Control 1-9 Input and Output 1-9 Software 1-10 Optional Items 1-11 Warranty 1-11 Notebook Tour 1-12 Top View 1-12 Acer MediaRemote 1-14 Front View 1-18 Left View 1-19 Right View 1-20 Base View 1-22 Touchpad Basics 1-23 Using the Keyboard 1-24 Windows Keys 1-25 Hotkeys 1-26 System Block Diagram 1-28 Specification Tables 1-29...
... and Control 1-9 Input and Output 1-9 Software 1-10 Optional Items 1-11 Warranty 1-11 Notebook Tour 1-12 Top View 1-12 Acer MediaRemote 1-14 Front View 1-18 Left View 1-19 Right View 1-20 Base View 1-22 Touchpad Basics 1-23 Using the Keyboard 1-24 Windows Keys 1-25 Hotkeys 1-26 System Block Diagram 1-28 Specification Tables 1-29...

Acer Aspire 5951G Service Guide
Page 7
... HDD Module Installation 3-15 HDD Brackets Removal 3-16 HDD Carrier Installation 3-16 WLAN (Wireless Local Area Network) Module Removal . . . 3-17 WLAN Module Installation 3-18 Touchpad Removal 3-19 Touchpad Installation 3-20 ODD (Optical Disk Drive) Module Removal 3-21 ODD Module Installation 3-23 Keyboard Assembly Removal 3-25 Keyboard Assembly Installation 3-29 Keyboard Removal 3-31...
... HDD Module Installation 3-15 HDD Brackets Removal 3-16 HDD Carrier Installation 3-16 WLAN (Wireless Local Area Network) Module Removal . . . 3-17 WLAN Module Installation 3-18 Touchpad Removal 3-19 Touchpad Installation 3-20 ODD (Optical Disk Drive) Module Removal 3-21 ODD Module Installation 3-23 Keyboard Assembly Removal 3-25 Keyboard Assembly Installation 3-29 Keyboard Removal 3-31...

Acer Aspire 5951G Service Guide
Page 8
... DC-IN Cable Removal 3-69 DC-IN Cable Installation 3-70 CHAPTER 4 Troubleshooting Introduction 4-3 General Information 4-3 Power On Issues 4-4 No Display Issues 4-5 LCD Failure 4-7 Keyboard Failure 4-8 Touchpad Failure 4-9 Internal Speaker Failure 4-10 Microphone Failure 4-12 USB Failure 4-13 Other Functions Failure 4-14 Intermittent Problems 4-15 Undetermined Problems 4-16 Post Codes 4-17 viii
... DC-IN Cable Removal 3-69 DC-IN Cable Installation 3-70 CHAPTER 4 Troubleshooting Introduction 4-3 General Information 4-3 Power On Issues 4-4 No Display Issues 4-5 LCD Failure 4-7 Keyboard Failure 4-8 Touchpad Failure 4-9 Internal Speaker Failure 4-10 Microphone Failure 4-12 USB Failure 4-13 Other Functions Failure 4-14 Intermittent Problems 4-15 Undetermined Problems 4-16 Post Codes 4-17 viii

Acer Aspire 5951G Service Guide
Page 12
... and Control 1-9 Input and Output 1-9 Software 1-10 Optional Items 1-11 Warranty 1-11 Notebook Tour 1-12 Top View 1-12 Acer MediaRemote 1-14 Front View 1-18 Left View 1-19 Right View 1-20 Base View 1-22 Touchpad Basics 1-23 Using the Keyboard 1-24 Windows Keys 1-25 Hotkeys 1-26 System Block Diagram 1-28 Specification Tables 1-29...
... and Control 1-9 Input and Output 1-9 Software 1-10 Optional Items 1-11 Warranty 1-11 Notebook Tour 1-12 Top View 1-12 Acer MediaRemote 1-14 Front View 1-18 Left View 1-19 Right View 1-20 Base View 1-22 Touchpad Basics 1-23 Using the Keyboard 1-24 Windows Keys 1-25 Hotkeys 1-26 System Block Diagram 1-28 Specification Tables 1-29...

Acer Aspire 5951G Service Guide
Page 19
Input and Control 0 Keyboard 103-/104-/107-key backlit back-mounted keyboard with independent standard numeric keypad, international language support Touchpad Acer MediaRemote detachable touchpad with Media Console mode Media keys Touch-sensitive Media Console, featuring: Video, music shortcuts Media controls: play/pause, stop...
Input and Control 0 Keyboard 103-/104-/107-key backlit back-mounted keyboard with independent standard numeric keypad, international language support Touchpad Acer MediaRemote detachable touchpad with Media Console mode Media keys Touch-sensitive Media Console, featuring: Video, music shortcuts Media controls: play/pause, stop...
Acer Aspire 5951G Service Guide
Page 23
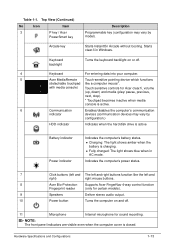
...10 Power button Turns the computer on and off. 11 Microphone Internal microphone for Acer clear.fi, volume (up, down) and media (play/ pause, previous, next, stop). * Touchpad becomes inactive when media console is active. 6 Communication Enables/disables the computer's communication...backlight Turns the keyboard backlight on or off. 4 Keyboard For entering data into your computer. 5 Acer MediaRemote Touch-sensitive pointing device which functions (detachable touchpad like the left and right buttons function like a computer mouse*. with media console) Touch sensitive ...
...10 Power button Turns the computer on and off. 11 Microphone Internal microphone for Acer clear.fi, volume (up, down) and media (play/ pause, previous, next, stop). * Touchpad becomes inactive when media console is active. 6 Communication Enables/disables the computer's communication...backlight Turns the keyboard backlight on or off. 4 Keyboard For entering data into your computer. 5 Acer MediaRemote Touch-sensitive pointing device which functions (detachable touchpad like the left and right buttons function like a computer mouse*. with media console) Touch sensitive ...

Acer Aspire 5951G Service Guide
Page 24
... control cursor movements and tap the surface twice to control Acer clear.fi and Windows Media Player. Figure 1-2. Using the MediaRemote as a Touchpad Hardware Specifications and Configurations Media Remote as a touchpad 0 While the MediaRemote is in the touchpad dock. Acer MediaRemote To detach the touchpad, slide the touchpad release latch and lift the MediaRemote from the dock...
... control cursor movements and tap the surface twice to control Acer clear.fi and Windows Media Player. Figure 1-2. Using the MediaRemote as a Touchpad Hardware Specifications and Configurations Media Remote as a touchpad 0 While the MediaRemote is in the touchpad dock. Acer MediaRemote To detach the touchpad, slide the touchpad release latch and lift the MediaRemote from the dock...

Acer Aspire 5951G Service Guide
Page 25
...you can still be used for use 0 Before using the MediaRemote as a pointing device. NOTE: NOTE: The Touchpad mode key is illuminated while the MediaRemote touchpad surface is charging. Table 1-2. The MediaRemote is active and attached to the computer. The MediaRemote will enter sleep mode... after three minutes of the touchpad varies, depending on or off. The light shows blue. Touchpad commands 0 The function of inactivity. The light shows amber when the battery is active. Preparing the ...
...you can still be used for use 0 Before using the MediaRemote as a pointing device. NOTE: NOTE: The Touchpad mode key is illuminated while the MediaRemote touchpad surface is charging. Table 1-2. The MediaRemote is active and attached to the computer. The MediaRemote will enter sleep mode... after three minutes of the touchpad varies, depending on or off. The light shows blue. Touchpad commands 0 The function of inactivity. The light shows amber when the battery is active. Preparing the ...

Acer Aspire 5951G Service Guide
Page 26
Open the main menu in clear.fi. NOTE: NOTE: If you press the touchpad mode button. Table 1-5. Stop Stop playing the selected media file. 1-16 Hardware Specifications and Configurations Open the Music section of clear.fi. Media Console Icon ...Item Previous Description Return to the next media file. Next Jump to the previous media file. Media console 0 Press the Touchpad Mode button again to toggle between clear.fi sections: Photo, Video and Music. Reduce volume Reduce the media playback volume. Open the Video section of...
Open the main menu in clear.fi. NOTE: NOTE: If you press the touchpad mode button. Table 1-5. Stop Stop playing the selected media file. 1-16 Hardware Specifications and Configurations Open the Music section of clear.fi. Media Console Icon ...Item Previous Description Return to the next media file. Next Jump to the previous media file. Media console 0 Press the Touchpad Mode button again to toggle between clear.fi sections: Photo, Video and Music. Reduce volume Reduce the media playback volume. Open the Video section of...

Acer Aspire 5951G Service Guide
Page 27
... 0 If the MediaRemote is detached, you may rotate it from the usual landscape orientation and use the touchpad in portrait mode. Hardware Specifications and Configurations 1-17 If the touchpad controls do not match the orientation of the MediaRemote, tilt the MediaRemote towards you (at least 30º...;) for at least three seconds. Press the left and right click buttons for a couple of the touchpad controls. G-sensor 0 While the MediaRemote is fully charged but does not work correctly with your computer, you should pair the devices. &#...
... 0 If the MediaRemote is detached, you may rotate it from the usual landscape orientation and use the touchpad in portrait mode. Hardware Specifications and Configurations 1-17 If the touchpad controls do not match the orientation of the MediaRemote, tilt the MediaRemote towards you (at least 30º...;) for at least three seconds. Press the left and right click buttons for a couple of the touchpad controls. G-sensor 0 While the MediaRemote is fully charged but does not work correctly with your computer, you should pair the devices. &#...

Acer Aspire 5951G Service Guide
Page 28
Front View 0 1 2 3 Figure 1-5. NOTE: Push to be removed. 1-18 Hardware Specifications and Configurations Lifts the touchpad and allows it to remove/install the card. Only one card can operate at any given time. Front View No Icon Item 1 Communication key 2 Multi-in-1 card reader 3 Touchpad release latch Description Enables/disables the computer's communication devices. (Communication devices may vary by configuration.) Accepts Secure Digital (SD), MultiMediaCard (MMC), Memory Stick PRO (MS PRO), xD-Picture Card (xD). Front View Table 1-6.
Front View 0 1 2 3 Figure 1-5. NOTE: Push to be removed. 1-18 Hardware Specifications and Configurations Lifts the touchpad and allows it to remove/install the card. Only one card can operate at any given time. Front View No Icon Item 1 Communication key 2 Multi-in-1 card reader 3 Touchpad release latch Description Enables/disables the computer's communication devices. (Communication devices may vary by configuration.) Accepts Secure Digital (SD), MultiMediaCard (MMC), Memory Stick PRO (MS PRO), xD-Picture Card (xD). Front View Table 1-6.

Acer Aspire 5951G Service Guide
Page 33
...cursor. Press the left button. Tapping too hard will not increase the TouchPad's responsiveness. Touchpad Basics 0 1 3 2 Figure 1-9. Touchpad Move finger across the Touchpad (1) to drag the cursor. Touchpad Function Main TouchPad (1) Left Button (2) Right Button (3) Execute Tap twice (at the same speed as... click twice. Drag Tap twice (at the same speed as double-clicking a mouse button); NOTE: When using the TouchPad, keep it - double-clicking a mouse button). Click and hold, then use finger on the second tap and drag the cursor. ...
...cursor. Press the left button. Tapping too hard will not increase the TouchPad's responsiveness. Touchpad Basics 0 1 3 2 Figure 1-9. Touchpad Move finger across the Touchpad (1) to drag the cursor. Touchpad Function Main TouchPad (1) Left Button (2) Right Button (3) Execute Tap twice (at the same speed as... click twice. Drag Tap twice (at the same speed as double-clicking a mouse button); NOTE: When using the TouchPad, keep it - double-clicking a mouse button). Click and hold, then use finger on the second tap and drag the cursor. ...
Acer Aspire 5951G Service Guide
Page 36
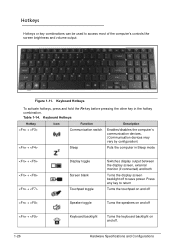
...(Communication devices may vary by configuration) + Sleep Puts the computer in the hotkey combination. Press any key to return Turns the touchpad on and off + Speaker toggle Turns the speakers on and off + Keyboard backlight Turns the keyboard backlight on and off to access... To activate hotkeys, press and hold the Fn key before pressing the other key in Sleep mode + + + Display toggle Screen blank Touchpad toggle Switches display output between the display screen, external monitor (if connected) and both Turns the display screen backlight off . 1-26 Hardware...
...(Communication devices may vary by configuration) + Sleep Puts the computer in the hotkey combination. Press any key to return Turns the touchpad on and off + Speaker toggle Turns the speakers on and off + Keyboard backlight Turns the keyboard backlight on and off to access... To activate hotkeys, press and hold the Fn key before pressing the other key in Sleep mode + + + Display toggle Screen blank Touchpad toggle Switches display output between the display screen, external monitor (if connected) and both Turns the display screen backlight off . 1-26 Hardware...

Acer Aspire 5951G Service Guide
Page 61
System Interrupt Specification Hardware IRQ IRQ0 IRQ1 IRQ2 IRQ3 IRQ4* IRQ5* IRQ6 IRQ7* IRQ8 IRQ9* IRQ10* IRQ11* IRQ12 IRQ13 IRQ14* IRQ15* System Function System timer Standard PS/2 Keyboard Not in use Not in use Direct memory access controller Not in use Not in use Not in use System CMOS/real-time clock Not in use Not in use Not in use Synaptics PS/2 Port Touchpad Numeric data processor Not in use Not in use Hardware Specifications and Configurations 1-51
System Interrupt Specification Hardware IRQ IRQ0 IRQ1 IRQ2 IRQ3 IRQ4* IRQ5* IRQ6 IRQ7* IRQ8 IRQ9* IRQ10* IRQ11* IRQ12 IRQ13 IRQ14* IRQ15* System Function System timer Standard PS/2 Keyboard Not in use Not in use Direct memory access controller Not in use Not in use Not in use System CMOS/real-time clock Not in use Not in use Not in use Synaptics PS/2 Port Touchpad Numeric data processor Not in use Not in use Hardware Specifications and Configurations 1-51

Acer Aspire 5951G Service Guide
Page 98
... HDD Module Installation 3-15 HDD Brackets Removal 3-16 HDD Carrier Installation 3-16 WLAN (Wireless Local Area Network) Module Removal . . . 3-17 WLAN Module Installation 3-18 Touchpad Removal 3-19 Touchpad Installation 3-20 ODD (Optical Disk Drive) Module Removal 3-21 ODD Module Installation 3-23 Keyboard Assembly Removal 3-25 Keyboard Assembly Installation 3-29 Keyboard Removal 3-31...
... HDD Module Installation 3-15 HDD Brackets Removal 3-16 HDD Carrier Installation 3-16 WLAN (Wireless Local Area Network) Module Removal . . . 3-17 WLAN Module Installation 3-18 Touchpad Removal 3-19 Touchpad Installation 3-20 ODD (Optical Disk Drive) Module Removal 3-21 ODD Module Installation 3-23 Keyboard Assembly Removal 3-25 Keyboard Assembly Installation 3-29 Keyboard Removal 3-31...

Acer Aspire 5951G Service Guide
Page 115
Figure 3-19. Locate touchpad removal switch (A). (Figure 3-18) A Figure 3-18. Move and hold switch as shown in Figure 3-19. Machine Maintenance Procedures 3-19 Touchpad Removal Switch 2. Touchpad Removal 0 Prerequisite: Logic Door Removal 1. Removing Touchpad 3. Remove touchpad.
Figure 3-19. Locate touchpad removal switch (A). (Figure 3-18) A Figure 3-18. Move and hold switch as shown in Figure 3-19. Machine Maintenance Procedures 3-19 Touchpad Removal Switch 2. Touchpad Removal 0 Prerequisite: Logic Door Removal 1. Removing Touchpad 3. Remove touchpad.

Acer Aspire 5951G Service Guide
Page 116
Connect touchpad (B) to mainboard connector. 3. Install logic door. 3-20 Machine Maintenance Procedures Touchpad Installation 0 1. Locate mainboard connector (A) in touchpad bay. (Figure 3-20) A B Figure 3-20. Touchpad Installation 2.
Connect touchpad (B) to mainboard connector. 3. Install logic door. 3-20 Machine Maintenance Procedures Touchpad Installation 0 1. Locate mainboard connector (A) in touchpad bay. (Figure 3-20) A B Figure 3-20. Touchpad Installation 2.

Acer Aspire 5951G Service Guide
Page 139
Removing Upper Cover (2 of 2) 9. Removing Upper Cover (1 of 2) Machine Maintenance Procedures 3-43 Use caution when removing upper cover. 8. Lift side (J) of upper cover then lift left side (M) to remove from lower cover. (Figure 3-56) M L Figure 3-56. Rotate upper cover until separated from upper cover. CAUTION: Touchpad connector extends out from lower cover. (Figure 3-55) J K Figure 3-55. Unlock locking latch (L) on right side of upper cover until opening clears touchpad connector (K). 10. !
Removing Upper Cover (2 of 2) 9. Removing Upper Cover (1 of 2) Machine Maintenance Procedures 3-43 Use caution when removing upper cover. 8. Lift side (J) of upper cover then lift left side (M) to remove from lower cover. (Figure 3-56) M L Figure 3-56. Rotate upper cover until separated from upper cover. CAUTION: Touchpad connector extends out from lower cover. (Figure 3-55) J K Figure 3-55. Unlock locking latch (L) on right side of upper cover until opening clears touchpad connector (K). 10. !

Acer Aspire 5951G Service Guide
Page 140
... screw (G) and screws (H) to lower cover. 4. Connect and secure LVDS cable (A) to locking latches (P) on lower cover. (Figure 3-57) N P Figure 3-57. Install upper cover so touchpad connector (K) is inserted through opening in upper cover guides (C). (Figure 3-52) 9. Install LAN board. 12. Install and secure LVDS and microphone cables in upper cover...
... screw (G) and screws (H) to lower cover. 4. Connect and secure LVDS cable (A) to locking latches (P) on lower cover. (Figure 3-57) N P Figure 3-57. Install upper cover so touchpad connector (K) is inserted through opening in upper cover guides (C). (Figure 3-52) 9. Install LAN board. 12. Install and secure LVDS and microphone cables in upper cover...

Acer Aspire 5951G Service Guide
Page 151
To free mainboard ports (E) from mainboard connector (g). (Figure 3-74) Machine Maintenance Procedures 3-55 CAUTION: After mainboard removal, use caution not to show battery cable and mainboard connector as shown in Figure 3-73. Disconnect battery cable (G) from lower cover slots (F), lift mainboard as shown in Figure 3-72. Clearing Mainboard Ports ! Turn mainboard to damage touchpad connector. 4. 3. Mainboard Overview (Bottom) with Battery Cable 5. Figure 3-73. F E Figure 3-72.
To free mainboard ports (E) from mainboard connector (g). (Figure 3-74) Machine Maintenance Procedures 3-55 CAUTION: After mainboard removal, use caution not to show battery cable and mainboard connector as shown in Figure 3-73. Disconnect battery cable (G) from lower cover slots (F), lift mainboard as shown in Figure 3-72. Clearing Mainboard Ports ! Turn mainboard to damage touchpad connector. 4. 3. Mainboard Overview (Bottom) with Battery Cable 5. Figure 3-73. F E Figure 3-72.


