Quick Start Guide
Page 3
...setting up your computer. If Adobe Reader is available in Portable Document Format (PDF) and comes preloaded on such subjects as Acer's Empowering Technology, using the keyboard, audio, etc. Please understand that due to the basic features and functions of guides: First off, the Just for certain .... Follow the instructions on how to complete the installation. 3 First things first We would like to all models in the Aspire product series. The Aspire Series Generic User Guide contains useful information applying to thank you to its nature, the Generic User Guide as well as "...
...setting up your computer. If Adobe Reader is available in Portable Document Format (PDF) and comes preloaded on such subjects as Acer's Empowering Technology, using the keyboard, audio, etc. Please understand that due to the basic features and functions of guides: First off, the Just for certain .... Follow the instructions on how to complete the installation. 3 First things first We would like to all models in the Aspire product series. The Aspire Series Generic User Guide contains useful information applying to thank you to its nature, the Generic User Guide as well as "...
Quick Start Guide
Page 5
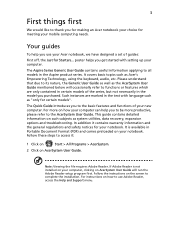
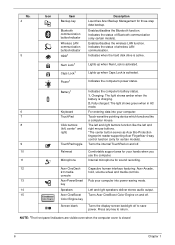
... function. Num Lock1 Lights up when Caps Lock is activated. Fully charged: The light shows blue when in AC mode. 6 Keyboard For entering data into your hands when you use the computer. 9 Touchpad toggle Turns the internal touchpad on and off. 11 ... Icon Item Description 4 Wireless LAN Enables/disables the wireless LAN function. Battery1 Indicates the computer's battery status. 1. Backup key Launches Acer Backup Management for sound recording. 12 Acer CineDash 2.0 Capactive human interface featuring: Acer media console Arcade, hold, volume wheel and media controls.
... function. Num Lock1 Lights up when Caps Lock is activated. Fully charged: The light shows blue when in AC mode. 6 Keyboard For entering data into your hands when you use the computer. 9 Touchpad toggle Turns the internal touchpad on and off. 11 ... Icon Item Description 4 Wireless LAN Enables/disables the wireless LAN function. Battery1 Indicates the computer's battery status. 1. Backup key Launches Acer Backup Management for sound recording. 12 Acer CineDash 2.0 Capactive human interface featuring: Acer media console Arcade, hold, volume wheel and media controls.
Quick Start Guide
Page 6
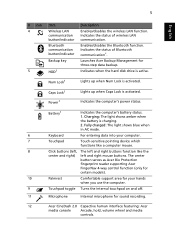
...The computer employs hotkeys or key combinations to return. 1. Enables/disables the Bluetooth function*. Left and right speakers deliver stereo audio output. Turns Acer CineBoost Color Engine on and off . To activate hotkeys, press and hold the key before pressing the other key in Sleep mode. +...cover is closed up Turns the keyboard backlight on and off . Puts the computer in the hotkey combination. Keyboard backlight toggle Brightness up . Increases the screen brightness. 6 English # Icon 13 14 15 Item Acer PowerSmart key Speakers Acer CineBoost Color Engine key Screen blank...
...The computer employs hotkeys or key combinations to return. 1. Enables/disables the Bluetooth function*. Left and right speakers deliver stereo audio output. Turns Acer CineBoost Color Engine on and off . To activate hotkeys, press and hold the key before pressing the other key in Sleep mode. +...cover is closed up Turns the keyboard backlight on and off . Puts the computer in the hotkey combination. Keyboard backlight toggle Brightness up . Increases the screen brightness. 6 English # Icon 13 14 15 Item Acer PowerSmart key Speakers Acer CineBoost Color Engine key Screen blank...
Quick Start Guide
Page 12
...battery* 71 W 4800 mAh battery* 3-pin 90 W AC adapter ENERGY STAR®* 86-/87-/91-key keyboard Multi-gesture touchpad pointing device Acer Bio-Protection fingerprint reader Acer CineDash 2.0 ExpressCard®/54 slot Multi-in-1 card reader (SD/MMC/MS/MS PRO/xD) Three USB ...; • • I/O interface • • • • • • • • • • • • • Integrated Acer Crystal Eye webcam* WLAN: • Intel® Wireless-WiFi Link 5100/5300 a/b/g/n* Wi-Fi®/WiMAX • Intel® Wireless WiFi Link 5150/5350* WPAN...
...battery* 71 W 4800 mAh battery* 3-pin 90 W AC adapter ENERGY STAR®* 86-/87-/91-key keyboard Multi-gesture touchpad pointing device Acer Bio-Protection fingerprint reader Acer CineDash 2.0 ExpressCard®/54 slot Multi-in-1 card reader (SD/MMC/MS/MS PRO/xD) Three USB ...; • • I/O interface • • • • • • • • • • • • • Integrated Acer Crystal Eye webcam* WLAN: • Intel® Wireless-WiFi Link 5100/5300 a/b/g/n* Wi-Fi®/WiMAX • Intel® Wireless WiFi Link 5150/5350* WPAN...
Service Guide
Page 7
...of Contents System Specifications 1 Features 1 System Block Diagram 4 Your Acer Notebook tour 5 Front View 5 Closed Front View 7 Rear View 7 Left View 7 Right View 9 Bottom View 10 TouchPad Basics (with fingerprint reader 11 Using the Keyboard 12 Lock Keys and embedded numeric keypad 12 Windows Keys 13 Hot ...WLAN Module 53 Main Unit Disassembly Process 55 Upper Cover Disassembly Flowchart 55 Lower Cover Disassembly Flowchart 56 Removing the Keyboard 57 Removing the Upper Cover 59 Removing the Media Board 62 Removing the Launch Board 64 Removing the Speaker Module 66 VII
...of Contents System Specifications 1 Features 1 System Block Diagram 4 Your Acer Notebook tour 5 Front View 5 Closed Front View 7 Rear View 7 Left View 7 Right View 9 Bottom View 10 TouchPad Basics (with fingerprint reader 11 Using the Keyboard 12 Lock Keys and embedded numeric keypad 12 Windows Keys 13 Hot ...WLAN Module 53 Main Unit Disassembly Process 55 Upper Cover Disassembly Flowchart 55 Lower Cover Disassembly Flowchart 56 Removing the Keyboard 57 Removing the Upper Cover 59 Removing the Media Board 62 Removing the Launch Board 64 Removing the Speaker Module 66 VII
Service Guide
Page 8
... Saving Board 113 Replacing the Speaker Module 115 Replacing the Launch Board 117 Replacing the Media Board 119 Replacing the Upper Cover 120 Replacing the Keyboard 124 Replacing the WLAN Module 125 Replacing the DIMM Modules 127 Replacing the Hard Disk Drive Module 127 Replacing the ODD Module 128 Replacing the... 130 Troubleshooting 131 Common Problems 131 Power On Issue 132 No Display Issue 133 Random Loss of BIOS Settings 134 LCD Failure 135 Built-In Keyboard Failure 135 VIII
... Saving Board 113 Replacing the Speaker Module 115 Replacing the Launch Board 117 Replacing the Media Board 119 Replacing the Upper Cover 120 Replacing the Keyboard 124 Replacing the WLAN Module 125 Replacing the DIMM Modules 127 Replacing the Hard Disk Drive Module 127 Replacing the ODD Module 128 Replacing the... 130 Troubleshooting 131 Common Problems 131 Power On Issue 132 No Display Issue 133 Random Loss of BIOS Settings 134 LCD Failure 135 Built-In Keyboard Failure 135 VIII

Service Guide
Page 12
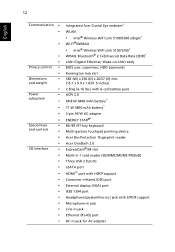
... Dimensions and Weight • 383 (W) x 250 (D) x 26/37 (H) mm (15.1 x 9.9 x 1.03/1.5 inches) • 2.8 kg (6.16 lbs.) with 6-cell battery pack Communication • Integrated Acer Crystal Eye webcam* • WLAN: • Intel® Wireless-WiFi Link 5100/5300 a/b/g/n* • Wi-Fi®/WiMAX • Intel® Wireless WiFi Link 5150...* • 71 W 4800 mAh battery* • 3-pin 90 W AC adapter • ENERGY STAR®* Special keys and controls • 86-/87-/91-key keyboard • Multi-gesture touchpad pointing device • Acer Bio-Protection fingerprint reader •...
... Dimensions and Weight • 383 (W) x 250 (D) x 26/37 (H) mm (15.1 x 9.9 x 1.03/1.5 inches) • 2.8 kg (6.16 lbs.) with 6-cell battery pack Communication • Integrated Acer Crystal Eye webcam* • WLAN: • Intel® Wireless-WiFi Link 5100/5300 a/b/g/n* • Wi-Fi®/WiMAX • Intel® Wireless WiFi Link 5150...* • 71 W 4800 mAh battery* • 3-pin 90 W AC adapter • ENERGY STAR®* Special keys and controls • 86-/87-/91-key keyboard • Multi-gesture touchpad pointing device • Acer Bio-Protection fingerprint reader •...
Service Guide
Page 16
...left, center* and right mouse buttons. Press any key to save power. Fully charged: The light shows green when in AC mode. 6 Keyboard For entering data into your computer into power-saving mode. NOTE: 1The front panel indicators are visible even when the computer cover is charging.... Turns the internal TouchPad on and off to return. key 14 Speakers Left and right speakers deliver stereo audio output. 15 Acer CineBoost Turns Acer CineBoost Color Engine on and off. 10 Palmrest Comfortable support area for your hands when you use the computer. 11 Microphone Internal...
...left, center* and right mouse buttons. Press any key to save power. Fully charged: The light shows green when in AC mode. 6 Keyboard For entering data into your computer into power-saving mode. NOTE: 1The front panel indicators are visible even when the computer cover is charging.... Turns the internal TouchPad on and off to return. key 14 Speakers Left and right speakers deliver stereo audio output. 15 Acer CineBoost Turns Acer CineBoost Color Engine on and off. 10 Palmrest Comfortable support area for your hands when you use the computer. 11 Microphone Internal...

Service Guide
Page 22
...does not work with the arithmetic operators +, -, *, and /). Desired access Number keys on embedded keypad Cursor-control keys on embedded keypad Main keyboard keys Num Lock on Type numbers in a normal manner. 12 Chapter 1 When Num Lock is on, the embedded keypad is indicated by small... characters located on and off Hold while using cursorcontrol keys. Lock Keys and embedded numeric keypad The keyboard has three lock keys which you press the up or down arrow keys respectively. It is in uppercase. Hold while using cursorcontrol...
...does not work with the arithmetic operators +, -, *, and /). Desired access Number keys on embedded keypad Cursor-control keys on embedded keypad Main keyboard keys Num Lock on Type numbers in a normal manner. 12 Chapter 1 When Num Lock is on, the embedded keypad is indicated by small... characters located on and off Hold while using cursorcontrol keys. Lock Keys and embedded numeric keypad The keyboard has three lock keys which you press the up or down arrow keys respectively. It is in uppercase. Hold while using cursorcontrol...
Service Guide
Page 23
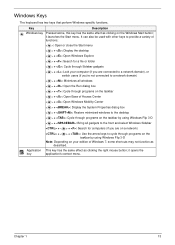
... cycle through programs on the taskbar by using Windows Flip 3-D Note: Depending on the Windows Start button; it launches the Start menu. Windows Keys The keyboard has two keys that perform Windows-specific functions.
... cycle through programs on the taskbar by using Windows Flip 3-D Note: Depending on the Windows Start button; it launches the Start menu. Windows Keys The keyboard has two keys that perform Windows-specific functions.

Service Guide
Page 24
...'s controls like screen brightness, volume output and the BIOS utility. Enables/disables the Bluetooth function*. + + + + + + < > + < > + < > Sleep Display toggle Screen blank Speaker toggle Keyboard backlight toggle Brightness up Brightness down Decreases the screen sound volume. 14 Chapter 1 Turns the display screen backlight off . To activate hot keys, press and...external monitor (if connected) and both. Increases the screen brightness. Hot Keys The computer employs hotkeys or key combinations to return. Turns the keyboard backlight on and off to save power.
...'s controls like screen brightness, volume output and the BIOS utility. Enables/disables the Bluetooth function*. + + + + + + < > + < > + < > Sleep Display toggle Screen blank Speaker toggle Keyboard backlight toggle Brightness up Brightness down Decreases the screen sound volume. 14 Chapter 1 Turns the display screen backlight off . To activate hot keys, press and...external monitor (if connected) and both. Increases the screen brightness. Hot Keys The computer employs hotkeys or key combinations to return. Turns the keyboard backlight on and off to save power.

Service Guide
Page 25
Hold and then press the key at the upper-center of your keyboard. Open a text editor or word processor. 2. Open a text editor or word processor. 2. NOTE: Note: Some fonts and software do not support the Euro symbol. NOTE: ... dollar sign 1. Special Keys You can locate the Euro symbol and the US dollar sign at the upper-center and/or bottom-right of the keyboard. Chapter 1 15 Hold and then press the key at the upper-center of the...
Hold and then press the key at the upper-center of your keyboard. Open a text editor or word processor. 2. Open a text editor or word processor. 2. NOTE: Note: Some fonts and software do not support the Euro symbol. NOTE: ... dollar sign 1. Special Keys You can locate the Euro symbol and the US dollar sign at the upper-center and/or bottom-right of the keyboard. Chapter 1 15 Hold and then press the key at the upper-center of the...

Service Guide
Page 33
... simultaneously Controller • Realtek ALC669-X for High Definition Audio Codec with Dolby Digital Live • ENE KB926 for Keyboard Controller, Battery management Unit • JMB380 card reader Specification KB926 86-/87-/91-key keyboard Yes Yes Battery Item Vendor & model name Battery Type Pack capacity Number of battery cell Package configuration Specification...
... simultaneously Controller • Realtek ALC669-X for High Definition Audio Codec with Dolby Digital Live • ENE KB926 for Keyboard Controller, Battery management Unit • JMB380 card reader Specification KB926 86-/87-/91-key keyboard Yes Yes Battery Item Vendor & model name Battery Type Pack capacity Number of battery cell Package configuration Specification...
Service Guide
Page 54
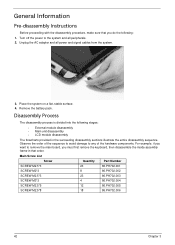
... process is divided into the following : 1. Observe the order of the sequence to avoid damage to remove the main board, you must first remove the keyboard, then disassemble the inside assembly frame in the succeeding disassembly sections illustrate the entire disassembly sequence. Place the system on a flat, stable surface. 4. Turn off...
... process is divided into the following : 1. Observe the order of the sequence to avoid damage to remove the main board, you must first remove the keyboard, then disassemble the inside assembly frame in the succeeding disassembly sections illustrate the entire disassembly sequence. Place the system on a flat, stable surface. 4. Turn off...

Service Guide
Page 55
External Modules Disassembly Flowchart The flowchart below gives you a graphic representation on the entire disassembly sequence and instructs you must first remove the keyboard, then disassemble the inside assembly frame in that need to remove the main board, you on the components that order. For example, if you want ...
External Modules Disassembly Flowchart The flowchart below gives you a graphic representation on the entire disassembly sequence and instructs you must first remove the keyboard, then disassemble the inside assembly frame in that need to remove the main board, you on the components that order. For example, if you want ...

Service Guide
Page 67
Main Unit Disassembly Process Upper Cover Disassembly Flowchart Remove External Modules before proceeding Rem ove Keyboard Rem ove Upper Cover Lower Cover (see page 54) Upper Cover Rem ove Media Board Rem ove Launch Board Rem ove Speaker Module Rem ove ...
Main Unit Disassembly Process Upper Cover Disassembly Flowchart Remove External Modules before proceeding Rem ove Keyboard Rem ove Upper Cover Lower Cover (see page 54) Upper Cover Rem ove Media Board Rem ove Launch Board Rem ove Speaker Module Rem ove ...

Service Guide
Page 68
Lower Cover Disassembly Flowchart Remove External Modules before proceeding Rem ove Keyboard Rem ove Upper Cover Rem ove LCD Module Rem ove Bluetooth Module Rem ove Card Reader Board Rem ove Saddle Rem ove Subwoofer Rem ove ...
Lower Cover Disassembly Flowchart Remove External Modules before proceeding Rem ove Keyboard Rem ove Upper Cover Rem ove LCD Module Rem ove Bluetooth Module Rem ove Card Reader Board Rem ove Saddle Rem ove Subwoofer Rem ove ...

Service Guide
Page 69
Starting with the central clip, release all five securing clips by pressing down with a suitable plastic tool. 3. Locate the five securing clips on the top edge of the Keyboard as shown. Chapter 3 57 Pry up the centre of the Keyboard. 2. Removing the Keyboard 1.
Starting with the central clip, release all five securing clips by pressing down with a suitable plastic tool. 3. Locate the five securing clips on the top edge of the Keyboard as shown. Chapter 3 57 Pry up the centre of the Keyboard. 2. Removing the Keyboard 1.

Service Guide
Page 70
Rotate the Keyboard upward away from the Upper Cover. 58 Chapter 3 Open the Keyboard backlight FFC connector and disconnect the FFC. 6. Remove the Keyboard from the Upper Cover and place it face down on the TouchPad area. 5. 4. Open the Keyboard FFC connector and disconnect the FFC. 7.
Rotate the Keyboard upward away from the Upper Cover. 58 Chapter 3 Open the Keyboard backlight FFC connector and disconnect the FFC. 6. Remove the Keyboard from the Upper Cover and place it face down on the TouchPad area. 5. 4. Open the Keyboard FFC connector and disconnect the FFC. 7.

Service Guide
Page 71
Remove the twenty-three screws on page 57. 2. Turn the computer over . Turn the computer over . Removing the Upper Cover 1. Step Upper Cover (red callout) Upper Cover (blue callout) Upper Cover (green callout) Size M2.5*8 M2.5*5 M2.5*3 Quantity 18 2 3 Screw Type 3. Open the Launch Board FFC connector and disconnect the FFC. Chapter 3 59 See "Removing the Keyboard" on the bottom panel.
Remove the twenty-three screws on page 57. 2. Turn the computer over . Turn the computer over . Removing the Upper Cover 1. Step Upper Cover (red callout) Upper Cover (blue callout) Upper Cover (green callout) Size M2.5*8 M2.5*5 M2.5*3 Quantity 18 2 3 Screw Type 3. Open the Launch Board FFC connector and disconnect the FFC. Chapter 3 59 See "Removing the Keyboard" on the bottom panel.


