Service Guide
Page 21
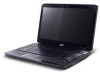
...speed as double-clicking a mouse button) Tap once Tap twice (at the same speed as clicking the left button. • Use Acer Bio-Protection fingerprint reader (3) supporting Acer FingerNav 4-way control function (only for certain models) or the 4-way scroll (3) button (only for certain models) to scroll up ...clicking a mouse button); rest your finger on the touchpad on a mouse. hence, the lighter the touch, the better the response. dry and clean. These two buttons are similar to the left and right buttons on the second tap and drag the cursor NOTE: When using the TouchPad, keep...
...speed as double-clicking a mouse button) Tap once Tap twice (at the same speed as clicking the left button. • Use Acer Bio-Protection fingerprint reader (3) supporting Acer FingerNav 4-way control function (only for certain models) or the 4-way scroll (3) button (only for certain models) to scroll up ...clicking a mouse button); rest your finger on the touchpad on a mouse. hence, the lighter the touch, the better the response. dry and clean. These two buttons are similar to the left and right buttons on the second tap and drag the cursor NOTE: When using the TouchPad, keep...
Service Guide
Page 48
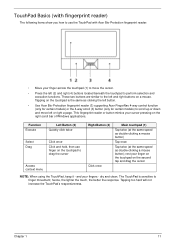
From a DOS prompt, execute clnpwd.exe 2. Removing BIOS Passwords: To clear the User or Supervisor passwords, open the RAM door and use a metal instrument to clean the desired password shown on the screen. J4 J5 Cleaning BIOS Passwords To clean the User or Supervisor passwords, perform the following steps: 1. Press 1 or 2 to short the J4 / J5 jumper as shown below. The onscreen message determines whether the function is successful or not. 36 Chapter 2
From a DOS prompt, execute clnpwd.exe 2. Removing BIOS Passwords: To clear the User or Supervisor passwords, open the RAM door and use a metal instrument to clean the desired password shown on the screen. J4 J5 Cleaning BIOS Passwords To clean the User or Supervisor passwords, perform the following steps: 1. Press 1 or 2 to short the J4 / J5 jumper as shown below. The onscreen message determines whether the function is successful or not. 36 Chapter 2

Service Guide
Page 103
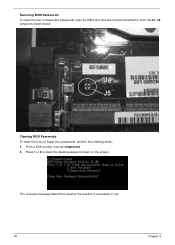
Place the Mainboard on page 90. 2. Removing the Mainboard 1. Chapter 3 91 Pivot the Mainboard upward and remove it from the chassis, right side first. Remove the single screw securing the Mainboard to the Lower Cover. Step Mainboard Size M2.5*3 Quantity 1 Screw Type 3. See "Removing the Hinge Wells" on a clean, dust-free surface.
Place the Mainboard on page 90. 2. Removing the Mainboard 1. Chapter 3 91 Pivot the Mainboard upward and remove it from the chassis, right side first. Remove the single screw securing the Mainboard to the Lower Cover. Step Mainboard Size M2.5*3 Quantity 1 Screw Type 3. See "Removing the Hinge Wells" on a clean, dust-free surface.

Service Guide
Page 108
Removing the CPU 1. Place the CPU on the underside of the CPU are damaged, the CPU may malfunction. If they are very delicate. Turn the securing screw 180° to release the CPU from the socket as shown. IMPORTANT: The pins on a clean, dry surface when it is not installed. 96 Chapter 3 See "Removing the Thermal Module" on page 94. 2. Remove the CPU from the socket. 3.
Removing the CPU 1. Place the CPU on the underside of the CPU are damaged, the CPU may malfunction. If they are very delicate. Turn the securing screw 180° to release the CPU from the socket as shown. IMPORTANT: The pins on a clean, dry surface when it is not installed. 96 Chapter 3 See "Removing the Thermal Module" on page 94. 2. Remove the CPU from the socket. 3.
Service Guide
Page 110
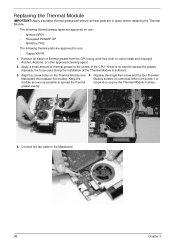
... the four Thermal Module screws (in numerical order from the CPU using a lint-free cloth or cotton swab and Isopropyl Alcohol, Acetone, or other approved cleaning agent. 2. Replacing the Thermal Module IMPORTANT: Apply a suitable thermal grease and ensure all traces of the CPU-there is sufficient. 3. Apply a small amount of thermal...
... the four Thermal Module screws (in numerical order from the CPU using a lint-free cloth or cotton swab and Isopropyl Alcohol, Acetone, or other approved cleaning agent. 2. Replacing the Thermal Module IMPORTANT: Apply a suitable thermal grease and ensure all traces of the CPU-there is sufficient. 3. Apply a small amount of thermal...
Service Guide
Page 153
..., then click the DVD Region tab. Discs Do Not Burn Properly If discs can only be changed even Windows is reinstalled or the drive is clean and scratch free. 3. Navigate to another computer. Select the Recording tab. c. Check that system resources are no yellow exclamation marks against the items in the...
..., then click the DVD Region tab. Discs Do Not Burn Properly If discs can only be changed even Windows is reinstalled or the drive is clean and scratch free. 3. Navigate to another computer. Select the Recording tab. c. Check that system resources are no yellow exclamation marks against the items in the...
Service Guide
Page 154
... and remove the cover to inspect the connections to correct the problem. 1. Double-click IDE ATA/ATAPI controllers, then right-click ATA Device 0. Remove and clean the failed disc. 2. a. Try an alternate cable, if available. b. c. Click Properties and select the Advanced Settings tab. d. Drive Not Detected If Windows cannot detect the...
... and remove the cover to inspect the connections to correct the problem. 1. Double-click IDE ATA/ATAPI controllers, then right-click ATA Device 0. Remove and clean the failed disc. 2. a. Try an alternate cable, if available. b. c. Click Properties and select the Advanced Settings tab. d. Drive Not Detected If Windows cannot detect the...


