
Quick Start Guide
Page 5
...) and comes preloaded on AcerSystem User Guide. If Adobe Reader is available in the text with setting up your new computer. The Aspire Generic User Guide contains useful information applying to all models in the model you to the basic features and functions of your computer....complete the installation. Follow the instructions on the screen to access it contains warranty information and the general regulations and safety notices for meeting your Acer notebook, we have designed a set of the series, but not necessarily in the Aspire product series. For instructions on how your ...
...) and comes preloaded on AcerSystem User Guide. If Adobe Reader is available in the text with setting up your new computer. The Aspire Generic User Guide contains useful information applying to all models in the model you to the basic features and functions of your computer....complete the installation. Follow the instructions on the screen to access it contains warranty information and the general regulations and safety notices for meeting your Acer notebook, we have designed a set of the series, but not necessarily in the Aspire product series. For instructions on how your ...

Quick Start Guide
Page 7
.... Fully charged: The light shows blue when in -1 card reader Indicates the computer's battery status. 1. Internal microphone for sound recording. 5 English # Icon 2 3 4 5 6 7 8 9 10 Item Display screen HDD indicator Description Also called Liquid-Crystal Display (LCD), displays computer output. Delivers audio output. Indicates when the hard disk drive is charging. 2. For entering...
.... Fully charged: The light shows blue when in -1 card reader Indicates the computer's battery status. 1. Internal microphone for sound recording. 5 English # Icon 2 3 4 5 6 7 8 9 10 Item Display screen HDD indicator Description Also called Liquid-Crystal Display (LCD), displays computer output. Delivers audio output. Indicates when the hard disk drive is charging. 2. For entering...
Quick Start Guide
Page 8
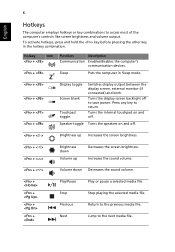
... the key before pressing the other key in Sleep mode. + + + + Display toggle Screen blank Touchpad toggle Switches display output between the display screen, external monitor (if connected) and both. Return to the next media file. Speaker toggle Turns... Icon + + Function Description Communication Enables/disables the computer's communication devices. Increases the sound volume. + < > Volume down Volume up Increases the screen brightness. + < > + < > Brightness down Decreases the sound volume. + + + + Play/Pause Stop Previous Next Play or pause ...
... the key before pressing the other key in Sleep mode. + + + + Display toggle Screen blank Touchpad toggle Switches display output between the display screen, external monitor (if connected) and both. Return to the next media file. Speaker toggle Turns... Icon + + Function Description Communication Enables/disables the computer's communication devices. Increases the sound volume. + < > Volume down Volume up Increases the screen brightness. + < > + < > Brightness down Decreases the sound volume. + + + + Play/Pause Stop Previous Next Play or pause ...

Service Guide
Page 4
... NOTE WARNING CAUTION IMPORTANT Denotes actual messages that appear on screen. Conventions The following conventions are used in the Service Guide designates a component that should be recycled according to the current topic. IV Gives bits and ...
... NOTE WARNING CAUTION IMPORTANT Denotes actual messages that appear on screen. Conventions The following conventions are used in the Service Guide designates a component that should be recycled according to the current topic. IV Gives bits and ...
Service Guide
Page 19
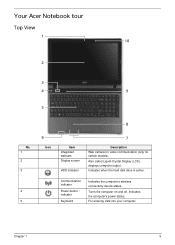
Communication indicator Power button / indicator Keyboard Indicates the computer's wireless connectivity device status. Your Acer Notebook tour Top View 1 10 2 3 4 9 5 No. 1 2 3 4 5 8 6 Icon Item Integrated webcam Display screen HDD indicator 7 Description Web camera for video communication (only for certain models). Indicates when the hard disk drive is active. Chapter 1 9 Also called Liquid-Crystal Display (LCD), displays computer output. Indicates the computer's power status. For entering data into your computer. Turns the computer on and off.
Communication indicator Power button / indicator Keyboard Indicates the computer's wireless connectivity device status. Your Acer Notebook tour Top View 1 10 2 3 4 9 5 No. 1 2 3 4 5 8 6 Icon Item Integrated webcam Display screen HDD indicator 7 Description Web camera for video communication (only for certain models). Indicates when the hard disk drive is active. Chapter 1 9 Also called Liquid-Crystal Display (LCD), displays computer output. Indicates the computer's power status. For entering data into your computer. Turns the computer on and off.

Service Guide
Page 28
...to the next media file. 18 Chapter 1 Hot Keys The computer employs hotkeys or key combinations to access most of the computer's controls like screen brightness, volume output and the BIOS utility. To activate hot keys, press and hold the key before pressing the other key in Sleep mode. ...Turns the speakers on and off . Decreases the screen brightness. Turns the internal touchpad on and off . Puts the computer in the hotkey combination. Stop Previous Stop playing the selected media file.
...to the next media file. 18 Chapter 1 Hot Keys The computer employs hotkeys or key combinations to access most of the computer's controls like screen brightness, volume output and the BIOS utility. To activate hot keys, press and hold the key before pressing the other key in Sleep mode. ...Turns the speakers on and off . Decreases the screen brightness. Turns the internal touchpad on and off . Puts the computer in the hotkey combination. Stop Previous Stop playing the selected media file.
Service Guide
Page 33
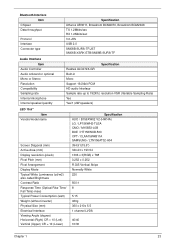
.../24bit PCM HD audio Interface Sample rate up to 192Khz resolution VSR (Variable Sampling Rate) Yes Yes/1 (2W speakers) LED 15.6" Item Vendor/model name Screen Diagonal (mm) Active Area (mm) Display resolution (pixels) Pixel Pitch (mm) Pixel Arrangement Display Mode Typical White Luminance (cd/m2) also called Brightness Contrast Ratio...
.../24bit PCM HD audio Interface Sample rate up to 192Khz resolution VSR (Variable Sampling Rate) Yes Yes/1 (2W speakers) LED 15.6" Item Vendor/model name Screen Diagonal (mm) Active Area (mm) Display resolution (pixels) Pixel Pitch (mm) Pixel Arrangement Display Mode Typical White Luminance (cd/m2) also called Brightness Contrast Ratio...
Service Guide
Page 41
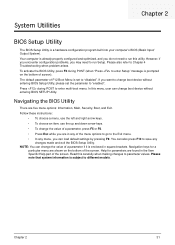
...Setup Utility. System Utilities Chapter 2 BIOS Setup Utility The BIOS Setup Utility is subject to different models. The default parameter of the screen. NOTE: You can load default settings by pressing F9. Help for a particular menu are found in the Item Specific Help part of... F12 Boot Menu is prompted on the bottom of screen). However, if you encounter configuration problems, you are five menu options: Information, Main, Security, Boot, and Exit. In this carefully ...
...Setup Utility. System Utilities Chapter 2 BIOS Setup Utility The BIOS Setup Utility is subject to different models. The default parameter of the screen. NOTE: You can load default settings by pressing F9. Help for a particular menu are found in the Item Specific Help part of... F12 Boot Menu is prompted on the bottom of screen). However, if you encounter configuration problems, you are five menu options: Information, Main, Security, Boot, and Exit. In this carefully ...
Service Guide
Page 42
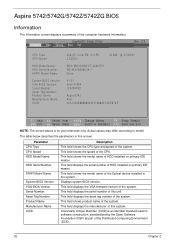
... Name: Manufacturer Name: UUID: Intel(R) Core(TM) i3 CPU 2.53GHz M 380 @ 2.53GHz WDC WD2500BEVT-22A23T0 WD-WX30AA9U3617 None V1.01 Intel V1994 123456789 Aspire5742 Acer 3A1243A988698043211288AE1D5E974E F1 Help ESC Exit Select Item F5/F6 Change Values F9 Setup Default Select Menu Enter Select SubMenu F10 Save and Exit NOTE: The... VGA firmware version of the system. This field shows product name of the system. This field shows the speed of the computer hardware information. Aspire 5742/5742G/5742Z/5742ZG BIOS Information The Information screen displays a summary of the CPU.
... Name: Manufacturer Name: UUID: Intel(R) Core(TM) i3 CPU 2.53GHz M 380 @ 2.53GHz WDC WD2500BEVT-22A23T0 WD-WX30AA9U3617 None V1.01 Intel V1994 123456789 Aspire5742 Acer 3A1243A988698043211288AE1D5E974E F1 Help ESC Exit Select Item F5/F6 Change Values F9 Setup Default Select Menu Enter Select SubMenu F10 Save and Exit NOTE: The... VGA firmware version of the system. This field shows product name of the system. This field shows the speed of the computer hardware information. Aspire 5742/5742G/5742Z/5742ZG BIOS Information The Information screen displays a summary of the CPU.
Service Guide
Page 43
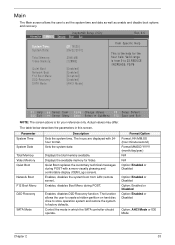
... set the system time and date as well as enable and disable boot options and recovery. Control the mode in this screen. Main The Main screen allows the user to factory defaults. The table below describes the parameters in which the SATA controller should operate. The hours... are displayed with a more visually pleasing and comfortable display (OEM Logo screen). Format/Option Format: HH:MM:SS (hour:minute:second) Format MM/DD/YYYY (month/day/year) N/A N/A Option: Enabled or Disabled Option...
... set the system time and date as well as enable and disable boot options and recovery. Control the mode in this screen. Main The Main screen allows the user to factory defaults. The table below describes the parameters in which the SATA controller should operate. The hours... are displayed with a more visually pleasing and comfortable display (OEM Logo screen). Format/Option Format: HH:MM:SS (hour:minute:second) Format MM/DD/YYYY (month/day/year) N/A N/A Option: Enabled or Disabled Option...
Service Guide
Page 44
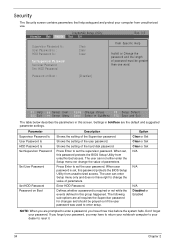
... Item F5/F6 Change Values F9 Setup Default Select Menu Enter Select SubMenu F10 Save and Exit The table below describes the parameters in this screen. The user can enter Setup menu only and does not have to return your notebook computer to your dealer to set , this password protects the... Specific Help Install or Change the password and the length of the hard disk password. Enter HDD Password. Don't forget your password. Security The Security screen contains parameters that help safeguard and protect your computer from unauthorized access.
... Item F5/F6 Change Values F9 Setup Default Select Menu Enter Select SubMenu F10 Save and Exit The table below describes the parameters in this screen. The user can enter Setup menu only and does not have to return your notebook computer to your dealer to set , this password protects the... Specific Help Install or Change the password and the length of the hard disk password. Enter HDD Password. Don't forget your password. Security The Security screen contains parameters that help safeguard and protect your computer from unauthorized access.
Service Guide
Page 45
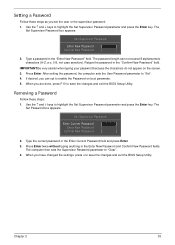
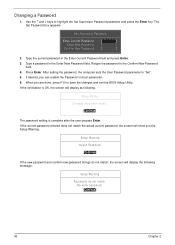
The password length can opt to enable the Password on the screen. 3. Use the ↑ and ↓ keys to highlight the Set Supervisor Password parameter and press the Enter key. Type the current password in the Enter ...
The password length can opt to enable the Password on the screen. 3. Use the ↑ and ↓ keys to highlight the Set Supervisor Password parameter and press the Enter key. Type the current password in the Enter ...
Service Guide
Page 46
... Setup Warning Invalid Password. [Continue] If the new password and confirm new password strings do not match. Setup Warning Passwords do not match, the screen will display the following . Re-enter password. [Continue] 36 Chapter 2 Changing a Password 1. Set Supervisor Password Enter Current Password [ ] Enter ... Current Password field and press Enter. 3. Setup Notice Changes have been saved. [Continue] The password setting is OK, the screen will show you can enable the Password on boot parameter. 6. After setting the password, the computer sets the User Password parameter...
... Setup Warning Invalid Password. [Continue] If the new password and confirm new password strings do not match. Setup Warning Passwords do not match, the screen will display the following . Re-enter password. [Continue] 36 Chapter 2 Changing a Password 1. Set Supervisor Password Enter Current Password [ ] Enter ... Current Password field and press Enter. 3. Setup Notice Changes have been saved. [Continue] The password setting is OK, the screen will show you can enable the Password on boot parameter. 6. After setting the password, the computer sets the User Password parameter...
Service Guide
Page 48
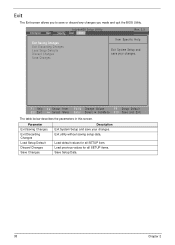
... Item F5/F6 Change Values F9 Setup Default Select Menu Enter Select SubMenu F10 Save and Exit The table below describes the parameters in this screen. Exit The Exit screen allows you made and quit the BIOS Utility.
... Item F5/F6 Change Values F9 Setup Default Select Menu Enter Select SubMenu F10 Save and Exit The table below describes the parameters in this screen. Exit The Exit screen allows you made and quit the BIOS Utility.

Service Guide
Page 51
Plug in the AC power to use the WinFlash Utility: 1. Chapter 2 41 WinFlash Utility Perform the following message displays. Click OK to begin the update. A progress screen displays. NOTE: If the AC power is complete when the message Flash programming complete displays. Flash is not connected, the following steps to continue. 5. 4. In flash BIOS, the message Please do not remove AC Power Source displays. Double-click the WinFlash executable. 2.
Plug in the AC power to use the WinFlash Utility: 1. Chapter 2 41 WinFlash Utility Perform the following message displays. Click OK to begin the update. A progress screen displays. NOTE: If the AC power is complete when the message Flash programming complete displays. Flash is not connected, the following steps to continue. 5. 4. In flash BIOS, the message Please do not remove AC Power Source displays. Double-click the WinFlash executable. 2.
Service Guide
Page 52
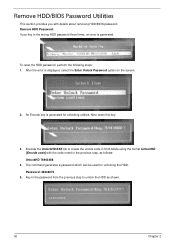
An Encode key is displayed, select the Enter Unlock Password option on the screen. 2. Key in the password from the previous step to create the unlock code in DOS Mode using the format UnlockHD [Encode code] with details about ...
An Encode key is displayed, select the Enter Unlock Password option on the screen. 2. Key in the password from the previous step to create the unlock code in DOS Mode using the format UnlockHD [Encode code] with details about ...

Service Guide
Page 53
Removing BIOS Passwords: To clear the User or Supervisor passwords, open the DIMM door and use a metal instrument to clean the desired password shown on the screen. The onscreen message determines whether the function is successful or not. Press 1 or 2 to short the RTC_RST point. Chapter 2 43 From a DOS prompt, execute clnpwd.exe 2. Cleaning BIOS Passwords To clean the User or Supervisor passwords, perform the following steps: 1.
Removing BIOS Passwords: To clear the User or Supervisor passwords, open the DIMM door and use a metal instrument to clean the desired password shown on the screen. The onscreen message determines whether the function is successful or not. Press 1 or 2 to short the RTC_RST point. Chapter 2 43 From a DOS prompt, execute clnpwd.exe 2. Cleaning BIOS Passwords To clean the User or Supervisor passwords, perform the following steps: 1.
Service Guide
Page 54
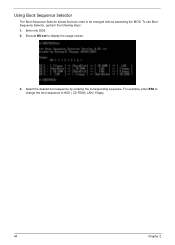
For example, enter BS2 to change the boot sequence to display the usage screen. 3. Select the desired boot sequence by entering the corresponding sequence. Enter into DOS. 2. Execute BS.exe to HDD | CD ROM | LAN | Floppy. 44 Chapter 2 Using Boot Sequence Selector The Boot Sequence Selector allows the boot order to be changed without accessing the BIOS. To use Boot Sequence Selector, perform the following steps: 1.
For example, enter BS2 to change the boot sequence to display the usage screen. 3. Select the desired boot sequence by entering the corresponding sequence. Enter into DOS. 2. Execute BS.exe to HDD | CD ROM | LAN | Floppy. 44 Chapter 2 Using Boot Sequence Selector The Boot Sequence Selector allows the boot order to be changed without accessing the BIOS. To use Boot Sequence Selector, perform the following steps: 1.
Service Guide
Page 55
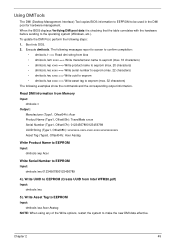
... correlates with the hardware before sending to EEPROM Input: dmitools /ws 01234567890123456789 4). The following messages report to screen to confirm completion: • dmitools /r ==> Read dmi string from Memory Input: dmitools /r Output: Manufacturer (Type1, Offset04h): Acer Product Name (Type1, Offset05h): TravelMate xxxxx Serial Number (Type1, Offset07h): 01234567890123456789 UUID String (Type1, Offset08h): xxxxxxxx-xxxx...
... correlates with the hardware before sending to EEPROM Input: dmitools /ws 01234567890123456789 4). The following messages report to screen to confirm completion: • dmitools /r ==> Read dmi string from Memory Input: dmitools /r Output: Manufacturer (Type1, Offset04h): Acer Product Name (Type1, Offset05h): TravelMate xxxxx Serial Number (Type1, Offset07h): 01234567890123456789 UUID String (Type1, Offset08h): xxxxxxxx-xxxx...
Service Guide
Page 172
... setting, the LCD is only abnormal in an application, check the view settings and control/mouse wheel zoom feature in the same locations on the screen), the LCD is not running on page 49). 8. If the BIOS settings are no device conflicts. • No hardware is experiencing intermittent loss of BIOS...
... setting, the LCD is only abnormal in an application, check the view settings and control/mouse wheel zoom feature in the same locations on the screen), the LCD is not running on page 49). 8. If the BIOS settings are no device conflicts. • No hardware is experiencing intermittent loss of BIOS...


