
Aspire 5335 / 5735 / 5735Z User's Guide EN
Page 3
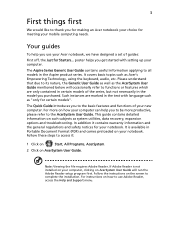
.... Such instances are only contained in certain models of the series, but not necessarily in Portable Document Format (PDF) and comes preloaded on the screen to complete the installation. In addition it : 1 Click on Start, All Programs, AcerSystem. 2 Click on such subjects as "only for certain...User Guide will occasionally refer to functions or features which are marked in the Aspire product series. 3 First things first We would like to thank you for making an Acer notebook your choice for meeting your Acer notebook, we have designed a set of guides: First off, the Just for...
.... Such instances are only contained in certain models of the series, but not necessarily in Portable Document Format (PDF) and comes preloaded on the screen to complete the installation. In addition it : 1 Click on Start, All Programs, AcerSystem. 2 Click on such subjects as "only for certain...User Guide will occasionally refer to functions or features which are marked in the Aspire product series. 3 First things first We would like to thank you for making an Acer notebook your choice for meeting your Acer notebook, we have designed a set of guides: First off, the Just for...
Aspire 5335 / 5735 / 5735Z User's Guide EN
Page 5
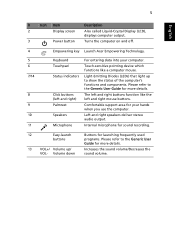
... to show the status of the computer's functions and components. 5 English # Icon Item Description 2 Display screen Also called Liquid-Crystal Display (LCD), displays computer output. 3 Power button Turns the computer on and off. 4 Empowering key Launch Acer Empowering Technology. 5 Keyboard For entering data into your hands when you use the computer. 10...
... to show the status of the computer's functions and components. 5 English # Icon Item Description 2 Display screen Also called Liquid-Crystal Display (LCD), displays computer output. 3 Power button Turns the computer on and off. 4 Empowering key Launch Acer Empowering Technology. 5 Keyboard For entering data into your hands when you use the computer. 10...
Aspire 5335 / 5735 / 5735Z Service Guide
Page 4
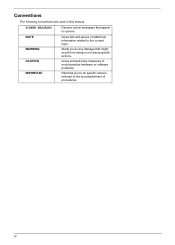
NOTE WARNING CAUTION IMPORTANT Gives bits and pieces of procedures. Gives precautionary measures to avoid possible hardware or software problems. Reminds you to the current topic. Alerts you to do specific actions relevant to the accomplishment of additional information related to any damage that appear on screen. IV Conventions The following conventions are used in this manual: SCREEN MESSAGES Denotes actual messages that might result from doing or not doing specific actions.
NOTE WARNING CAUTION IMPORTANT Gives bits and pieces of procedures. Gives precautionary measures to avoid possible hardware or software problems. Reminds you to the current topic. Alerts you to do specific actions relevant to the accomplishment of additional information related to any damage that appear on screen. IV Conventions The following conventions are used in this manual: SCREEN MESSAGES Denotes actual messages that might result from doing or not doing specific actions.
Aspire 5335 / 5735 / 5735Z Service Guide
Page 14
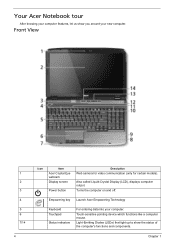
... which functions like a computer mouse. Your Acer Notebook tour After knowing your computer features, let us show the status of the computer's functions and components. Front View 1 2 3 4 5 6 7/14 4 Icon Item Description Acer Crystal Eye webcam Web camera for video communication... (only for certain models). Power button Turns the computer on and off. Chapter 1 Display screen Also called Liquid-Crystal Display (LCD), displays computer output. Light-Emitting ...
... which functions like a computer mouse. Your Acer Notebook tour After knowing your computer features, let us show the status of the computer's functions and components. Front View 1 2 3 4 5 6 7/14 4 Icon Item Description Acer Crystal Eye webcam Web camera for video communication... (only for certain models). Power button Turns the computer on and off. Chapter 1 Display screen Also called Liquid-Crystal Display (LCD), displays computer output. Light-Emitting ...
Aspire 5335 / 5735 / 5735Z Service Guide
Page 21
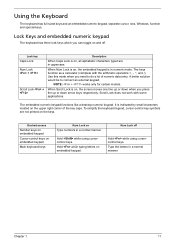
...: + works only for certain models. Hold while typing letters on Type numbers in uppercase. When Scroll Lock is indicated by small characters located on , the screen moves one line up or down arrow keys respectively. Scroll Lock does not work with the arithmetic operators +, -, *, and /). Type the letters in numeric mode...
...: + works only for certain models. Hold while typing letters on Type numbers in uppercase. When Scroll Lock is indicated by small characters located on , the screen moves one line up or down arrow keys respectively. Scroll Lock does not work with the arithmetic operators +, -, *, and /). Type the letters in numeric mode...
Aspire 5335 / 5735 / 5735Z Service Guide
Page 23
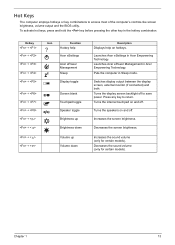
... the sound volume (only for certain models). Launches Acer ePower Management in the hotkey combination. Puts the computer in Acer Empowering Technology. Launches Acer eSettings in Sleep mode. Decreases the screen brightness. Switches display output between the display screen, external monitor (if connected) and both. Increases the screen brightness. Decreases the sound volume (only for certain...
... the sound volume (only for certain models). Launches Acer ePower Management in the hotkey combination. Puts the computer in Acer Empowering Technology. Launches Acer eSettings in Sleep mode. Decreases the screen brightness. Switches display output between the display screen, external monitor (if connected) and both. Increases the screen brightness. Decreases the sound volume (only for certain...
Aspire 5335 / 5735 / 5735Z Service Guide
Page 34
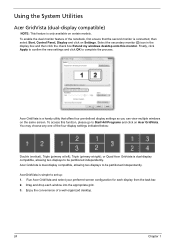
...can view multiple windows on Settings. To access this monitor. Acer GridVista is a handy utility that the second monitor is connected, then select Start, Control Panel, Display and click on the same screen. Acer Gridvista is dual-display compatible, allowing two displays to set up...: 1. Run Acer GridVista and select your preferred screen configuration for each window into the appropriate grid. 3. Using the System Utilities Acer GridVista (dual-display compatible) NOTE: ...
...can view multiple windows on Settings. To access this monitor. Acer GridVista is a handy utility that the second monitor is connected, then select Start, Control Panel, Display and click on the same screen. Acer Gridvista is dual-display compatible, allowing two displays to set up...: 1. Run Acer GridVista and select your preferred screen configuration for each window into the appropriate grid. 3. Using the System Utilities Acer GridVista (dual-display compatible) NOTE: ...
Aspire 5335 / 5735 / 5735Z Service Guide
Page 41
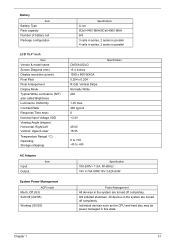
... are turned off completely. Chapter 1 31 Battery Item Battery Type Pack capacity Number of battery cell Package configuration LCD 15.4" inch Item Vendor & model name Screen Diagonal (mm) Display resolution (pixels) Pixel Pitch Pixel Arrangement Display Mode Typical White Luminance (NIT) also called Brightness Luminance Uniformity Contrast Ratio Response Time msec...
... are turned off completely. Chapter 1 31 Battery Item Battery Type Pack capacity Number of battery cell Package configuration LCD 15.4" inch Item Vendor & model name Screen Diagonal (mm) Display resolution (pixels) Pixel Pitch Pixel Arrangement Display Mode Typical White Luminance (NIT) also called Brightness Luminance Uniformity Contrast Ratio Response Time msec...
Aspire 5335 / 5735 / 5735Z Service Guide
Page 43
... GHz 2.53 GHz XXXXXXXXXXX-(XX) XXXXXXXX XXXXXXXXXXX-XXX XX-XXXX-(XX) VX.XX XX-XXX XXXXXX.XXX.XXX.XXX.XXXXXX XX.XX XXXXXXXXXXXXXXXXXXXXXXX None Aspire 5730 Acer XXXxXxXX-xXxX-XXxx-xXXx-xXXxXXxXxxXX F1 Help Esc Exit Select Item -/+ Change Values F9 Setup Defaults Select Menu Enter Select Sub-Menu F10 Save and... you encounter configuration problems, you do not need to run Setup. Press F2 to enter multi-boot menu. In this utility. The default parameter of screen).
... GHz 2.53 GHz XXXXXXXXXXX-(XX) XXXXXXXX XXXXXXXXXXX-XXX XX-XXXX-(XX) VX.XX XX-XXX XXXXXX.XXX.XXX.XXX.XXXXXX XX.XX XXXXXXXXXXXXXXXXXXXXXXX None Aspire 5730 Acer XXXxXxXX-xXxX-XXxx-xXXx-xXXxXXxXxxXX F1 Help Esc Exit Select Item -/+ Change Values F9 Setup Defaults Select Menu Enter Select Sub-Menu F10 Save and... you encounter configuration problems, you do not need to run Setup. Press F2 to enter multi-boot menu. In this utility. The default parameter of screen).
Aspire 5335 / 5735 / 5735Z Service Guide
Page 44
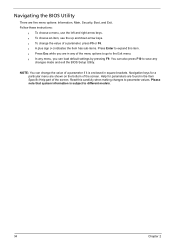
... Exit. Please note that system information is enclosed in the Item Specific Help part of the menu options to go to save any of the screen. Navigating the BIOS Utility There are in any changes made and exit the BIOS Setup Utility. q A plus sign (+) indicates the item has sub-items. Press... making changes to expand this item. Follow these instructions: q To choose a menu, use the up and down arrow keys. q To change the value of the screen.
... Exit. Please note that system information is enclosed in the Item Specific Help part of the menu options to go to save any of the screen. Navigating the BIOS Utility There are in any changes made and exit the BIOS Setup Utility. q A plus sign (+) indicates the item has sub-items. Press... making changes to expand this item. Follow these instructions: q To choose a menu, use the up and down arrow keys. q To change the value of the screen.
Aspire 5335 / 5735 / 5735Z Service Guide
Page 45
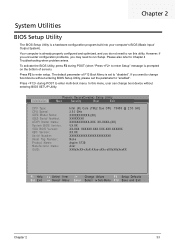
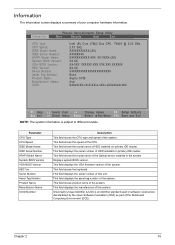
...device installed in software construction, standardized by the Open Software Foundation (OSF) as part of the system. Chapter 2 35 Information The Information screen displays a summary of the system. Parameter CPU Type CPU Speed IDE0 Model Name IDE0 Serial Number ATAPI Model Name System BIOS Version VGA ... GHz XXXXXXXXXXX-(XX) XXXXXXXX XXXXXXXXXXX-XXX XX-XXXX-(XX) VX.XX XX-XXX XXXXXX.XXX.XXX.XXX.XXXXXX XX.XX XXXXXXXXXXXXXXXXXXXXXXX None Aspire 5730 Acer XXXxXxXX-xXxX-XXxx-xXXx-xXXxXXxXxxXX F1 Help Esc Exit Select Item -/+ Change Values F9 Setup Defaults Select Menu Enter Select Sub-Menu ...
...device installed in software construction, standardized by the Open Software Foundation (OSF) as part of the system. Chapter 2 35 Information The Information screen displays a summary of the system. Parameter CPU Type CPU Speed IDE0 Model Name IDE0 Serial Number ATAPI Model Name System BIOS Version VGA ... GHz XXXXXXXXXXX-(XX) XXXXXXXX XXXXXXXXXXX-XXX XX-XXXX-(XX) VX.XX XX-XXX XXXXXX.XXX.XXX.XXX.XXXXXX XX.XX XXXXXXXXXXXXXXXXXXXXXXX None Aspire 5730 Acer XXXxXxXX-xXxX-XXxx-xXXx-xXXxXXxXxxXX F1 Help Esc Exit Select Item -/+ Change Values F9 Setup Defaults Select Menu Enter Select Sub-Menu ...

Aspire 5335 / 5735 / 5735Z Service Guide
Page 46
...] [Enabled] [AHCI] F1 Help Esc Exit Select Item -/+ Change Values F9 Setup Defaults Select Menu Enter Select Sub-Menu F10 Save and Exit NOTE: The screen above is for your reference only. Information Phoenix SecureCore(tm) Setup Utility Main Security Boot Exit System Time: System Date: System Memory: Extended Memory: Video...:10] [07/26/2008] 640 KB 4061 MB 32 MB Item Specific Help , , or selects field. Actual values may differ. 36 Chapter 2 Main The Main screen allows the user to set the system time and date as well as enable and disable boot option and recovery.
...] [Enabled] [AHCI] F1 Help Esc Exit Select Item -/+ Change Values F9 Setup Defaults Select Menu Enter Select Sub-Menu F10 Save and Exit NOTE: The screen above is for your reference only. Information Phoenix SecureCore(tm) Setup Utility Main Security Boot Exit System Time: System Date: System Memory: Extended Memory: Video...:10] [07/26/2008] 640 KB 4061 MB 32 MB Item Specific Help , , or selects field. Actual values may differ. 36 Chapter 2 Main The Main screen allows the user to set the system time and date as well as enable and disable boot option and recovery.

Aspire 5335 / 5735 / 5735Z Service Guide
Page 47
...to control the settings in boldface are displayed with 24-hour format. Chapter 2 37 Option: Enabled or Disabled Control the mode in this screen. This is because the user is enabled. Format: HH:MM:SS (hour:minute:second) System Time Sets the system date. Option: ...Enabled or Disabled Enables, disables the system boot from LAN (remote server). Disabled: Customer Logo is not displayed, and Summary Screen is not allowed to factory defaults. Extended Memory size=Total memory size-1MB Shows the VGA memory size. The table below describes the ...
...to control the settings in boldface are displayed with 24-hour format. Chapter 2 37 Option: Enabled or Disabled Control the mode in this screen. This is because the user is enabled. Format: HH:MM:SS (hour:minute:second) System Time Sets the system date. Option: ...Enabled or Disabled Enables, disables the system boot from LAN (remote server). Disabled: Customer Logo is not displayed, and Summary Screen is not allowed to factory defaults. Extended Memory size=Total memory size-1MB Shows the VGA memory size. The table below describes the ...
Aspire 5335 / 5735 / 5735Z Service Guide
Page 48
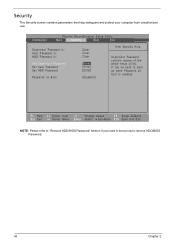
... Password on Boot: Clear Clear Clear [Enter] [Enter] [Enter] [Disabled] Item Specific Help Supervisor Password controls access of the whole setup utility. Security The Security screen contains parameters that help safeguard and protect your computer from unauthorized use.
... Password on Boot: Clear Clear Clear [Enter] [Enter] [Enter] [Disabled] Item Specific Help Supervisor Password controls access of the whole setup utility. Security The Security screen contains parameters that help safeguard and protect your computer from unauthorized use.
Aspire 5335 / 5735 / 5735Z Service Guide
Page 49
... your dealer to "Set". 4. The Set Supervisor Password box appears: 2. IMPORTANT:Be very careful when typing your password. When set, this screen. Defines whether a password is set the user or the supervisor password: 1. Press e. The table below describes the parameters in the "Enter ... password in this password protects the BIOS Setup Utility from unauthorized access. Don't forget your password because the characters do not appear on the screen. 3. Use the "w" and "y" keys to enter setup. When you are done, press u to enter a password, you are the ...
... your dealer to "Set". 4. The Set Supervisor Password box appears: 2. IMPORTANT:Be very careful when typing your password. When set, this screen. Defines whether a password is set the user or the supervisor password: 1. Press e. The table below describes the parameters in the "Enter ... password in this password protects the BIOS Setup Utility from unauthorized access. Don't forget your password because the characters do not appear on the screen. 3. Use the "w" and "y" keys to enter setup. When you are done, press u to enter a password, you are the ...
Aspire 5335 / 5735 / 5735Z Service Guide
Page 50
... e. The computer then sets the Supervisor Password parameter to highlight the Set Supervisor Password parameter and press the e key. The password setting is OK, the screen will display as following. Changing a Password 1.
... e. The computer then sets the Supervisor Password parameter to highlight the Set Supervisor Password parameter and press the e key. The password setting is OK, the screen will display as following. Changing a Password 1.
Aspire 5335 / 5735 / 5735Z Service Guide
Page 51
Chapter 2 41 If the new password and confirm new password strings do not match, the screen will show you the Setup Warning. If the current password entered does not match the actual current password, the screen will display the following message.
Chapter 2 41 If the new password and confirm new password strings do not match, the screen will show you the Setup Warning. If the current password entered does not match the actual current password, the screen will display the following message.
Aspire 5335 / 5735 / 5735Z Service Guide
Page 53
... Setup and save your changes to CMOS. Exit utility without saving setup data to CMOS. Exit The Exit screen contains parameters that confirmed or discard the changes made to the parameters in this screen. Load previous values from CMOS for all SETUP items. Save Setup Data to CMOS. Load default values for...
... Setup and save your changes to CMOS. Exit utility without saving setup data to CMOS. Exit The Exit screen contains parameters that confirmed or discard the changes made to the parameters in this screen. Load previous values from CMOS for all SETUP items. Save Setup Data to CMOS. Load default values for...

Aspire 5335 / 5735 / 5735Z Service Guide
Page 55
Remove HDD/BIOS Utility This section provide you with removing HDD/BIOS method: Remove HDD Password: q If you can run HDD_PW.EXE 1. Select "2" 3. Chapter 2 45 q If you need to HDD user password. Choose one upper-case string q Reboot system and key in "hdd_pw 15494 0" 2. Key in "0KJFN42" or "UVEIQ96" to solve HDD password locked problem, you key in wrong HDD password for three time, "HDD password error code" would display on the screen. See the image below.
Remove HDD/BIOS Utility This section provide you with removing HDD/BIOS method: Remove HDD Password: q If you can run HDD_PW.EXE 1. Select "2" 3. Chapter 2 45 q If you need to HDD user password. Choose one upper-case string q Reboot system and key in "hdd_pw 15494 0" 2. Key in "0KJFN42" or "UVEIQ96" to solve HDD password locked problem, you key in wrong HDD password for three time, "HDD password error code" would display on the screen. See the image below.

Aspire 5335 / 5735 / 5735Z Service Guide
Page 107
...displayed messages on page 116 Chapter 4 97 No beep or error "Power-On Self-Test (POST) Error codes are intended to test only Acer products. Obtain the failing symptoms in as much detail as a guide for computer problems. NOTE: The diagnostic tests are indicated. Chapter 4 Troubleshooting... by attempting to "Power-On Self-Test (POST) Error Message" on page 102 "Intermittent Problems" on page 115 "Undetermined Problems" on screen. Use the customer-reported symptoms and go to re-create the failure by running the diagnostic test or by repeating the same operation. 3. POST...
...displayed messages on page 116 Chapter 4 97 No beep or error "Power-On Self-Test (POST) Error codes are intended to test only Acer products. Obtain the failing symptoms in as much detail as a guide for computer problems. NOTE: The diagnostic tests are indicated. Chapter 4 Troubleshooting... by attempting to "Power-On Self-Test (POST) Error Message" on page 102 "Intermittent Problems" on page 115 "Undetermined Problems" on screen. Use the customer-reported symptoms and go to re-create the failure by running the diagnostic test or by repeating the same operation. 3. POST...

