Aspire 5680/5650/5630/5610/5610Z/3690 User's Guide
Page 41
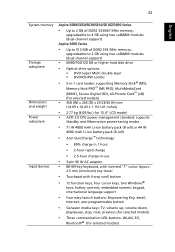
...devices Aspire 5680/5650/5630/5610/5610Z/3690 Series • Up to 2 GB of DDR2 533/667 MHz memory, upgradeable to 4 GB using two soDIMM modules (dual-channel support) Aspire 3690...4800 mAh Li-ion battery pack (8-cell) or 44 W 4000 mAh Li-ion battery pack (6-cell) • Acer QuicCharge™ technology: • 80% charge in 1 hour • 2-hour rapid charge • 2.5-hour ...charge-in-use • 3-pin 90 W AC adapter • 88-/89-key keyboard, with inverted "T" cursor layout; 2.5 mm (minimum) key travel • Touchpad with 4-way scroll button • 12 function keys...
...devices Aspire 5680/5650/5630/5610/5610Z/3690 Series • Up to 2 GB of DDR2 533/667 MHz memory, upgradeable to 4 GB using two soDIMM modules (dual-channel support) Aspire 3690...4800 mAh Li-ion battery pack (8-cell) or 44 W 4000 mAh Li-ion battery pack (6-cell) • Acer QuicCharge™ technology: • 80% charge in 1 hour • 2-hour rapid charge • 2.5-hour ...charge-in-use • 3-pin 90 W AC adapter • 88-/89-key keyboard, with inverted "T" cursor layout; 2.5 mm (minimum) key travel • Touchpad with 4-way scroll button • 12 function keys...
Service Guide
Page 47
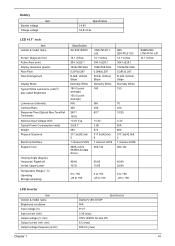
.../25 3.3V N/A 600 317.3x242.0x6. 5 1 channel LVDS 262,144 40/40 20/40 0 to +50 -20 to +60 SAMSUNG LTN141W1-L01 14.1 inches LCD Inverter Item Vendor & model name Brightness conditions Input voltage (V) Input current (mA) Output voltage (V, rms) Output current (mA, rms) Output voltage frequency (k Hz) Specification Darfon/V189...
.../25 3.3V N/A 600 317.3x242.0x6. 5 1 channel LVDS 262,144 40/40 20/40 0 to +50 -20 to +60 SAMSUNG LTN141W1-L01 14.1 inches LCD Inverter Item Vendor & model name Brightness conditions Input voltage (V) Input current (mA) Output voltage (V, rms) Output current (mA, rms) Output voltage frequency (k Hz) Specification Darfon/V189...

Service Guide
Page 75
...Disconnect the LCD power cable on the other side. 7. Remove the four screws fastening the LCD right bracket. 11. Remove the screw fastening the LCD inverter. 5. Tear off the tape fastening the LCD cable. 10. Remove the LCD right bracket. Take out the LCD assembly from the LCD module. 4.... 3 69 Remove the four screw caps as shown. 2. Then detach the LCD bezel from the LCD panel. 9. Take out the LCD inverter from the LCD cover, then disconnect the LCD cable from the inverter. 6. Remove the two screws fastening the LCD assembly. 8. Disassembling the LCD Module 1.
...Disconnect the LCD power cable on the other side. 7. Remove the four screws fastening the LCD right bracket. 11. Remove the screw fastening the LCD inverter. 5. Tear off the tape fastening the LCD cable. 10. Remove the LCD right bracket. Take out the LCD assembly from the LCD module. 4.... 3 69 Remove the four screw caps as shown. 2. Then detach the LCD bezel from the LCD panel. 9. Take out the LCD inverter from the LCD cover, then disconnect the LCD cable from the inverter. 6. Remove the two screws fastening the LCD assembly. 8. Disassembling the LCD Module 1.

Service Guide
Page 87
.... Reconnect the LCD connectors. Ensure every connector is connected tightly and correctly. Power source (battery pack and power adapter). LCD inverter ID LCD cable LCD inverter LCD System board No beep, power-on indicator turns on and a blinking cursor shown on indicator turns off and LCD is ... System Check" on page 75.. Ensure every connector is connected tightly and correctly. Reconnect the LCD connector Hard disk drive LCD inverter ID LCD cable LCD Inverter LCD System board No beep, power-on indicator turns on and LCD is blank. Speaker System board Chapter 4 81 Power source...
.... Reconnect the LCD connectors. Ensure every connector is connected tightly and correctly. Power source (battery pack and power adapter). LCD inverter ID LCD cable LCD inverter LCD System board No beep, power-on indicator turns on and a blinking cursor shown on indicator turns off and LCD is ... System Check" on page 75.. Ensure every connector is connected tightly and correctly. Reconnect the LCD connector Hard disk drive LCD inverter ID LCD cable LCD Inverter LCD System board No beep, power-on indicator turns on and LCD is blank. Speaker System board Chapter 4 81 Power source...

Service Guide
Page 92
... and press the power switch for more than 4 seconds. LCD inverter ID LCD cable LCD inverter LCD System board Reconnect the LCD connector LCD inverter ID LCD cable LCD inverter LCD System board LCD inverter ID LCD inverter LCD cable LCD System board Indicator-Related Symptoms Symptom / Error Action...and power adapter). See "Power System Check" on . The system doesn't power-off or on, but system runs correctly Reconnect the inverter board Inverter board System board Power-Related Symptoms Symptom / Error Power shuts down during operation The system doesn't power-on page 75. Reconnect the ...
... and press the power switch for more than 4 seconds. LCD inverter ID LCD cable LCD inverter LCD System board Reconnect the LCD connector LCD inverter ID LCD cable LCD inverter LCD System board LCD inverter ID LCD inverter LCD cable LCD System board Indicator-Related Symptoms Symptom / Error Action...and power adapter). See "Power System Check" on . The system doesn't power-off or on, but system runs correctly Reconnect the inverter board Inverter board System board Power-Related Symptoms Symptom / Error Power shuts down during operation The system doesn't power-on page 75. Reconnect the ...


