Acer Aspire 5538 Notebook Series Start Guide
Page 9
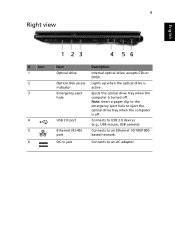
Note: Insert a paper clip to the emergency eject hole to an Ethernet 10/100/1000based network. Connects to eject the optical drive tray when the computer is off . 9 Right view English # Icon 1 2 3 4 5 6 Item Optical drive Optical disk access indicator Emergency eject hole USB 2.0 port Ethernet (RJ-45) port DC-in jack Description Internal optical drive; Ejects the optical drive tray when the computer is active. accepts CDs or DVDs. Lights up when the optical drive is turned off . Connects to an AC adapter. Connects to USB 2.0 devices (e.g., USB mouse, USB camera).
Note: Insert a paper clip to the emergency eject hole to an Ethernet 10/100/1000based network. Connects to eject the optical drive tray when the computer is off . 9 Right view English # Icon 1 2 3 4 5 6 Item Optical drive Optical disk access indicator Emergency eject hole USB 2.0 port Ethernet (RJ-45) port DC-in jack Description Internal optical drive; Ejects the optical drive tray when the computer is active. accepts CDs or DVDs. Lights up when the optical drive is turned off . Connects to an AC adapter. Connects to USB 2.0 devices (e.g., USB mouse, USB camera).

Acer Aspire 5538 Notebook Series Start Guide
Page 12
English 12 Power subsystem Special keys and controls I/O interface Environment • ACPI 3.0 • 48.84 W 4400 mAh • 3-pin 65 W AC adapter • ENERGY STAR®* • 103-/104-/107-key keyboard • Touchpad pointing device • 5-in-1 card reader (SD/MMC/MS... (VGA) port • Headphones/speaker/line-out jack with S/PDIF support • Microphone-in jack • Ethernet (RJ-45) port • DC-in jack for AC adapter • Temperature: • Operating: 5 °C to 35 °C • Non-operating: -20 °C to 65 °C • Humidity (non-condensing): &#...
English 12 Power subsystem Special keys and controls I/O interface Environment • ACPI 3.0 • 48.84 W 4400 mAh • 3-pin 65 W AC adapter • ENERGY STAR®* • 103-/104-/107-key keyboard • Touchpad pointing device • 5-in-1 card reader (SD/MMC/MS... (VGA) port • Headphones/speaker/line-out jack with S/PDIF support • Microphone-in jack • Ethernet (RJ-45) port • DC-in jack for AC adapter • Temperature: • Operating: 5 °C to 35 °C • Non-operating: -20 °C to 65 °C • Humidity (non-condensing): &#...

Acer Aspire 5538 Series Service Guide
Page 12
...8226; Headphones/speaker/line-out jack with S/PDIF support • Microphone-in jack • Ethernet (RJ-45) port • DC-in jack for AC adapter Environment • Temperature: • Operating: 5 °C to 35 °C • Non-operating: -20 °C to 65 °C •...; Humidity (non-condensing): 2 Chapter 1 Communication • Integrated Acer Crystal Eye webcam • WLAN: • Acer InviLink™ Nplify™ 802.11b/g/Draft-N* • Acer InviLink™ 802.11b/g* • WPAN: Bluetooth® 2.1+Enhanced Data Rate (EDR)* • LAN: ...
...8226; Headphones/speaker/line-out jack with S/PDIF support • Microphone-in jack • Ethernet (RJ-45) port • DC-in jack for AC adapter Environment • Temperature: • Operating: 5 °C to 35 °C • Non-operating: -20 °C to 65 °C •...; Humidity (non-condensing): 2 Chapter 1 Communication • Integrated Acer Crystal Eye webcam • WLAN: • Acer InviLink™ Nplify™ 802.11b/g/Draft-N* • Acer InviLink™ 802.11b/g* • WPAN: Bluetooth® 2.1+Enhanced Data Rate (EDR)* • LAN: ...

Acer Aspire 5538 Series Service Guide
Page 17
.... 2 3 4 5 6 Icon HDMI Right View Item Ventilation slots External display (VGA) port HDMI port USB 2.0 port Microphone-in jack Description Internal optical drive; Connects to an AC adapter. Connects to a display device (e.g., external monitor, LCD projector). Supports high definition digital video connections. Lights up when the optical drive is turned off . No. 1 2 3 4 5 6 Icon...
.... 2 3 4 5 6 Icon HDMI Right View Item Ventilation slots External display (VGA) port HDMI port USB 2.0 port Microphone-in jack Description Internal optical drive; Connects to an AC adapter. Connects to a display device (e.g., external monitor, LCD projector). Supports high definition digital video connections. Lights up when the optical drive is turned off . No. 1 2 3 4 5 6 Icon...
Acer Aspire 5538 Series Service Guide
Page 53
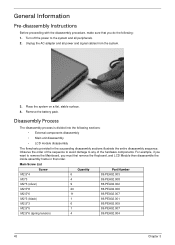
....PEA02.007 M2*3 (black) 1 86.PEA02.001 M2.5*3 6 86.PEA02.009 M2.5*5 1 86.PEA02.007 M2.5*6 (spring tension) 4 86.PEA02.004 43 Chapter 3 Unplug the AC adapter and all peripherals. 2. Remove the battery pack. Turn off the power to the system and all power and signal cables from the system. 3. Place the...
....PEA02.007 M2*3 (black) 1 86.PEA02.001 M2.5*3 6 86.PEA02.009 M2.5*5 1 86.PEA02.007 M2.5*6 (spring tension) 4 86.PEA02.004 43 Chapter 3 Unplug the AC adapter and all peripherals. 2. Remove the battery pack. Turn off the power to the system and all power and signal cables from the system. 3. Place the...
Acer Aspire 5538 Series Service Guide
Page 189
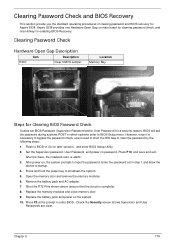
...prompts to BIOS Setup menu. After power-on password. Press and hold the power key to enter BIOS. Remove the battery pack and AC adapter. 7. Check the Security screen shows Supervisor and User Passwords are clear. Clearing Password Check Hardware Open Gap Description Item Description R397 Clear ...door and remove the memory modules. 6. Replace the battery pack and power on main board for clearing password check, and one Hotkey for Aspire 5538. However, once it is complete). 8. Short the R72 Pins shown above (ensure that the circuit is necessary to bypass the password...
...prompts to BIOS Setup menu. After power-on password. Press and hold the power key to enter BIOS. Remove the battery pack and AC adapter. 7. Check the Security screen shows Supervisor and User Passwords are clear. Clearing Password Check Hardware Open Gap Description Item Description R397 Clear ...door and remove the memory modules. 6. Replace the battery pack and power on main board for clearing password check, and one Hotkey for Aspire 5538. However, once it is complete). 8. Short the R72 Pins shown above (ensure that the circuit is necessary to bypass the password...
Acer Aspire 5538 Series Service Guide
Page 190
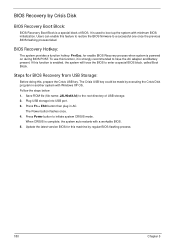
... a workable BIOS. 5. When CRISIS is strongly recommended to enter a special BIOS block, called Boot Block. If this machine by executing the Crisis Disk program in AC. The Power button flashes once. 4. Press Power button to the root directory of BIOS. Follow the steps below: 1. BIOS Recovery Hotkey: The system provides a function.... 180 Chapter 5 Update the latest version BIOS for enable BIOS Recovery process when system is enabled, the system will force the BIOS to have the AC adapter and Battery present.
... a workable BIOS. 5. When CRISIS is strongly recommended to enter a special BIOS block, called Boot Block. If this machine by executing the Crisis Disk program in AC. The Power button flashes once. 4. Press Power button to the root directory of BIOS. Follow the steps below: 1. BIOS Recovery Hotkey: The system provides a function.... 180 Chapter 5 Update the latest version BIOS for enable BIOS Recovery process when system is enabled, the system will force the BIOS to have the AC adapter and Battery present.


