Aspire 5534 Service Guide
Page 7
... 35 WinFlash Utility 36 Remove HDD/BIOS Password Utilities 37 Removing BIOS Passwords 38 Miscellaneous Utilities 39 Machine Disassembly and Replacement 43 Disassembly Requirements 43 Related Information 43 43 General Information 44 Pre-disassembly Instructions 44 Disassembly Process 44 External Module ...Disassembly Process 45 External Modules Disassembly Flowchart 45 Removing the Battery Pack 46 Removing the Hard Disk Drive Module 47 Removing the Optical Disk Drive Module 49 Removing the DIMM Module...
... 35 WinFlash Utility 36 Remove HDD/BIOS Password Utilities 37 Removing BIOS Passwords 38 Miscellaneous Utilities 39 Machine Disassembly and Replacement 43 Disassembly Requirements 43 Related Information 43 43 General Information 44 Pre-disassembly Instructions 44 Disassembly Process 44 External Module ...Disassembly Process 45 External Modules Disassembly Flowchart 45 Removing the Battery Pack 46 Removing the Hard Disk Drive Module 47 Removing the Optical Disk Drive Module 49 Removing the DIMM Module...
Aspire 5534 Service Guide
Page 8
... Replacing the Speaker Modules 125 Replacing the Power Board 127 Replacing the Touchpad Bracket 128 Replacing the Button Board 130 Replacing the Upper Cover 131 Replacing the Keyboard 136 External Module Reassembly Process 138 Replacing the WLAN Board 138 Replacing the DIMM Modules 139 Replacing the Hard Disk Drive Module 141 Replacing the ODD 143 Replacing the Lower Covers 145 Replacing the Battery...
... Replacing the Speaker Modules 125 Replacing the Power Board 127 Replacing the Touchpad Bracket 128 Replacing the Button Board 130 Replacing the Upper Cover 131 Replacing the Keyboard 136 External Module Reassembly Process 138 Replacing the WLAN Board 138 Replacing the DIMM Modules 139 Replacing the Hard Disk Drive Module 141 Replacing the ODD 143 Replacing the Lower Covers 145 Replacing the Battery...

Aspire 5534 Service Guide
Page 63
See "Removing the Battery Pack" on both sides of SODIMM slot 0 and SODIMM slot 1. Identify the SODIMM to release the seven clips securing the cover in the Memory Cover. 3. Slot 0 must be populated first when installing or replacing defective memory. 01 5. Push out the release latches on page 46 2. Lift the Memory Cover...
See "Removing the Battery Pack" on both sides of SODIMM slot 0 and SODIMM slot 1. Identify the SODIMM to release the seven clips securing the cover in the Memory Cover. 3. Slot 0 must be populated first when installing or replacing defective memory. 01 5. Push out the release latches on page 46 2. Lift the Memory Cover...
Aspire 5534 Service Guide
Page 70
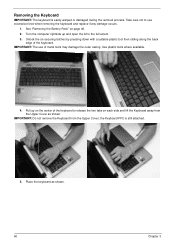
.... IMPORTANT: Do not remove the Keyboard from the Upper Cover as shown. 60 Chapter 3 IMPORTANT: The use excessive force when removing the keyboard and replace if any damage occurs. 1. Pull up and open the lid to use of the keyboard. Use plastic tools where available. 4. See "Removing the... Battery Pack" on each side and lift the Keyboard away from the Upper Cover; Unlock the six securing latches by pressing down with a suitable plastic ...
.... IMPORTANT: Do not remove the Keyboard from the Upper Cover as shown. 60 Chapter 3 IMPORTANT: The use excessive force when removing the keyboard and replace if any damage occurs. 1. Pull up and open the lid to use of the keyboard. Use plastic tools where available. 4. See "Removing the... Battery Pack" on each side and lift the Keyboard away from the Upper Cover; Unlock the six securing latches by pressing down with a suitable plastic ...
Aspire 5534 Service Guide
Page 157
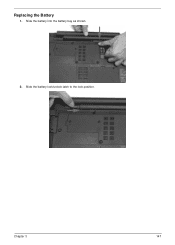
Chapter 3 147 Slide the battery lock/unlock latch to the lock position. Slide the battery into the battery bay as shown. 2. Replacing the Battery 1.
Chapter 3 147 Slide the battery lock/unlock latch to the lock position. Slide the battery into the battery bay as shown. 2. Replacing the Battery 1.
Aspire 5534 Service Guide
Page 160
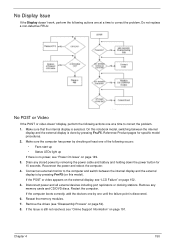
...Fn+F5. Reference Product pages for 10 seconds. Remove any stored power by pressing Fn+F5 (on page 191. Reseat the memory modules. 7. Do not replace a non-defective FRUs: No POST or Video If the POST or video doesn't display, perform the following actions one at a time to correct the ..., perform the following actions one at a time to correct the problem. 1. Make sure that the internal display is by removing the power cable and battery and holding down the power button for specific model procedures. 2. Make sure the computer has power by checking at least one of the following occurs...
...Fn+F5. Reference Product pages for 10 seconds. Remove any stored power by pressing Fn+F5 (on page 191. Reseat the memory modules. 7. Do not replace a non-defective FRUs: No POST or Video If the POST or video doesn't display, perform the following actions one at a time to correct the ..., perform the following actions one at a time to correct the problem. 1. Make sure that the internal display is by removing the power cable and battery and holding down the power button for specific model procedures. 2. Make sure the computer has power by checking at least one of the following occurs...
Aspire 5534 Service Guide
Page 161
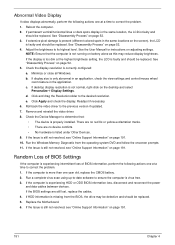
...power and data cables between devices. If HDD information is still not resolved, see "Online Support Information" on battery alone as this may be defective and should be replaced. Replace the Motherboard. 6. If extensive pixel damage is only abnormal in an application, check the view settings and ...the Device Manager to the desired resolution. Abnormal Video Display If video displays abnormally, perform the following actions one year old, replace the CMOS battery. 2. If permanent vertical/horizontal lines or dark spots display in the same location, the LCD is faulty and should be...
...power and data cables between devices. If HDD information is still not resolved, see "Online Support Information" on battery alone as this may be defective and should be replaced. Replace the Motherboard. 6. If extensive pixel damage is only abnormal in an application, check the view settings and ...the Device Manager to the desired resolution. Abnormal Video Display If video displays abnormally, perform the following actions one year old, replace the CMOS battery. 2. If permanent vertical/horizontal lines or dark spots display in the same location, the LCD is faulty and should be...
Aspire 5534 Service Guide
Page 174
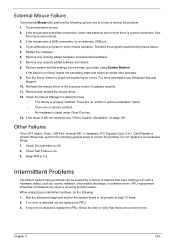
...or software errors. If the Issue is detected, do the following: 1. Swap M/B to the previous version if updated recently. 11. FRU replacement should be caused by a variety of reasons that have nothing to correct the problem. If any recently added hardware and associated software. 7. .... 12. Check Test Fixture is OK. 2. When analyzing an intermittent problem, do not replace any recently added software and reboot. 8. If the mouse uses a wireless connection, insert new batteries and confirm there is properly installed. Rerun the test to correct the problem. 1. Check ...
...or software errors. If the Issue is detected, do the following: 1. Swap M/B to the previous version if updated recently. 11. FRU replacement should be caused by a variety of reasons that have nothing to correct the problem. If any recently added hardware and associated software. 7. .... 12. Check Test Fixture is OK. 2. When analyzing an intermittent problem, do not replace any recently added software and reboot. 8. If the mouse uses a wireless connection, insert new batteries and confirm there is properly installed. Rerun the test to correct the problem. 1. Check ...
Aspire 5534 Service Guide
Page 175
... if the problem has changed. 6. Visually check them for damage. If the problem remains, replace the following devices: • Non-Acer devices • Printer, mouse, and other external devices • Battery pack • Hard disk drive • DIMM • CD-ROM/Diskette drive Module &#...8226; PC Cards 4. Power-on page 149): 1. Do not replace a non-defective FRU: • System board ...
... if the problem has changed. 6. Visually check them for damage. If the problem remains, replace the following devices: • Non-Acer devices • Printer, mouse, and other external devices • Battery pack • Hard disk drive • DIMM • CD-ROM/Diskette drive Module &#...8226; PC Cards 4. Power-on page 149): 1. Do not replace a non-defective FRU: • System board ...
Aspire 5534 Service Guide
Page 185
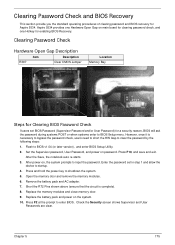
Aspire 5534 provides one Hardware Open Gap on the system. 10. Replace the battery pack and power on main board for clearing password check, and one Hotkey for enabling BIOS Recovery. Check the Security screen shows Supervisor and User ... the password set BIOS Password (Supervisor Password and/or User Password) for Aspire 5534. Press and hold the power key to BIOS v1.04 (or later version), and enter BIOS Setup Utility. 2. Replace the memory modules and close memory door. 9. Remove the battery pack and AC adapter. 7. Chapter 5 175 Clearing Password Check Hardware Open...
Aspire 5534 provides one Hardware Open Gap on the system. 10. Replace the battery pack and power on main board for clearing password check, and one Hotkey for enabling BIOS Recovery. Check the Security screen shows Supervisor and User ... the password set BIOS Password (Supervisor Password and/or User Password) for Aspire 5534. Press and hold the power key to BIOS v1.04 (or later version), and enter BIOS Setup Utility. 2. Replace the memory modules and close memory door. 9. Remove the battery pack and AC adapter. 7. Chapter 5 175 Clearing Password Check Hardware Open...
Aspire 5534 Service Guide
Page 221
...Antennas Removing 101 Replacing 103 B Battery Replacing 147 Battery Pack Removing 46 BIOS ROM type 18 vendor 18 Version 18 BIOS Utility 23-34 Advanced 28 Boot 32 Exit 33 Navigating 23 Power 31 Save and Exit 33 Security 28 System Security 33 Bluetooth Module Removing 76 Replacing 123 Board Layout ...Top View 173 brightness hotkeys 12 Button Board Removing 66 Replacing 130 C Camera Board Removing 94 Replacing 109 caps lock on indicator 8 CPU Removing 89 Replacing 113 CPU Fan Replacing 116 Index D DC-In Cable Removing 80 DIMM Module Removing 53 Replacing 139 Display 3 display hotkeys 12 E Euro Key ...
...Antennas Removing 101 Replacing 103 B Battery Replacing 147 Battery Pack Removing 46 BIOS ROM type 18 vendor 18 Version 18 BIOS Utility 23-34 Advanced 28 Boot 32 Exit 33 Navigating 23 Power 31 Save and Exit 33 Security 28 System Security 33 Bluetooth Module Removing 76 Replacing 123 Board Layout ...Top View 173 brightness hotkeys 12 Button Board Removing 66 Replacing 130 C Camera Board Removing 94 Replacing 109 caps lock on indicator 8 CPU Removing 89 Replacing 113 CPU Fan Replacing 116 Index D DC-In Cable Removing 80 DIMM Module Removing 53 Replacing 139 Display 3 display hotkeys 12 E Euro Key ...


