
Acer Aspire User's Guide
Page 13
... get started with language such as the AcerSystem User Guide mentioned below the LCD screen beside the easy-launch buttons. The printed Aspire Series Generic User Guide contains useful information applying to all models in the text with setting up your computer, clicking on how ...Adobe Reader setup program first. It covers basic topics such as system utilities, data recovery, expansion options and troubleshooting. xiii First things first We would like to thank you for making an Acer notebook your choice for meeting your new computer. Follow these steps to complete the installation...
... get started with language such as the AcerSystem User Guide mentioned below the LCD screen beside the easy-launch buttons. The printed Aspire Series Generic User Guide contains useful information applying to all models in the text with setting up your computer, clicking on how ...Adobe Reader setup program first. It covers basic topics such as system utilities, data recovery, expansion options and troubleshooting. xiii First things first We would like to thank you for making an Acer notebook your choice for meeting your new computer. Follow these steps to complete the installation...

Acer Aspire User's Guide
Page 19
... and AV-in cables (only for certain models) 56 BIOS utility 59 Boot sequence 59 Enable disk-to-disk recovery 59 Password 59 Using software 60 Playing DVD movies 60 Power management 61 Acer eRecovery Management 62 Burn backup discs 63 Create a user backup 64 Manage user backups 66 Restore 67 Restore...
... and AV-in cables (only for certain models) 56 BIOS utility 59 Boot sequence 59 Enable disk-to-disk recovery 59 Password 59 Using software 60 Playing DVD movies 60 Power management 61 Acer eRecovery Management 62 Burn backup discs 63 Create a user backup 64 Manage user backups 66 Restore 67 Restore...

Acer Aspire User's Guide
Page 32
To ensure the best results when recovering your system using a CD or Acer eRecovery Management, detach all peripherals (except the external Acer ODD, if your computer has one), including your computer did not come with a Recovery CD or System CD, please use Acer eRecovery Management's Backup factory default to CD/DVD feature to burn a backup image to "Acer eRecovery Management" on page 62 in the Acer System User Guide. Note: If your Acer ezDock. Empowering Technology 12 For more information, please refer to CD or DVD.
To ensure the best results when recovering your system using a CD or Acer eRecovery Management, detach all peripherals (except the external Acer ODD, if your computer has one), including your computer did not come with a Recovery CD or System CD, please use Acer eRecovery Management's Backup factory default to CD/DVD feature to burn a backup image to "Acer eRecovery Management" on page 62 in the Acer System User Guide. Note: If your Acer ezDock. Empowering Technology 12 For more information, please refer to CD or DVD.

Acer Aspire User's Guide
Page 51
...restore operation, please check the BIOS settings. 1 Check to see if Acer disk-to back up all data will be the only option for future recovery operations. English 31 I want to restore my computer to perform system recovery. Note: If your system is showing, press + at the same ...time to enter the recovery process. 3 Refer to the onscreen instructions to its original settings without recovery CDs. To start the recovery process: 1 Restart the system. 2 While the Acer logo is the multilingual version, the operating system and language you choose ...
...restore operation, please check the BIOS settings. 1 Check to see if Acer disk-to back up all data will be the only option for future recovery operations. English 31 I want to restore my computer to perform system recovery. Note: If your system is showing, press + at the same ...time to enter the recovery process. 3 Refer to the onscreen instructions to its original settings without recovery CDs. To start the recovery process: 1 Restart the system. 2 While the Acer logo is the multilingual version, the operating system and language you choose ...

Acer Aspire User's Guide
Page 79
English 59 BIOS utility The BIOS utility is being displayed. Enable disk-to-disk recovery To enable disk-to-disk recovery (hard disk recovery), activate the BIOS utility, then select Main from the categories listed at the bottom of the screen. To activate the BIOS utility, press ...during the POST; while the notebook PC logo is a hardware configuration program built into your computer's BIOS. Find D2D Recovery at the top of the screen and use the and keys to Enabled. However, if you encounter configuration problems, you do not need to run...
English 59 BIOS utility The BIOS utility is being displayed. Enable disk-to-disk recovery To enable disk-to-disk recovery (hard disk recovery), activate the BIOS utility, then select Main from the categories listed at the bottom of the screen. To activate the BIOS utility, press ...during the POST; while the notebook PC logo is a hardware configuration program built into your computer's BIOS. Find D2D Recovery at the top of the screen and use the and keys to Enabled. However, if you encounter configuration problems, you do not need to run...

Acer Aspire User's Guide
Page 88
Restart your computer and insert the first system recovery disc into the optical disc drive. English 68 Restore Windows Vista from backup discs To restore Windows Vista from your previously burned backup discs, you ... to insert the first backup disc and enable the F12 Boot Menu via the BIOS Setup Utility. 1 Turn on your computer. 2 During startup when the Acer logo shows, press the F2 key to enter BIOS Setup, where you will reboot. Press the ENTER key again to select Yes. The system will...
Restart your computer and insert the first system recovery disc into the optical disc drive. English 68 Restore Windows Vista from backup discs To restore Windows Vista from your previously burned backup discs, you ... to insert the first backup disc and enable the F12 Boot Menu via the BIOS Setup Utility. 1 Turn on your computer. 2 During startup when the Acer logo shows, press the F2 key to enter BIOS Setup, where you will reboot. Press the ENTER key again to select Yes. The system will...

Acer Aspire User's Guide
Page 89
Note: This feature is complete. English 69 7 After rebooting, when the Acer logo shows, press the F12 key to select the IDE CD, then press the ENTER key. Do this before rebooting your computer. Here you can select which device to boot from the optical drive once the restore is only available on certain models. Windows will be installed from the recovery disc. 9 Insert the second recovery disc when prompted, then follow the onscreen prompts to complete the restore. 10 Remove the recovery disc from . 8 Use the arrow keys to open the Boot Menu.
Note: This feature is complete. English 69 7 After rebooting, when the Acer logo shows, press the F12 key to select the IDE CD, then press the ENTER key. Do this before rebooting your computer. Here you can select which device to boot from the optical drive once the restore is only available on certain models. Windows will be installed from the recovery disc. 9 Insert the second recovery disc when prompted, then follow the onscreen prompts to complete the restore. 10 Remove the recovery disc from . 8 Use the arrow keys to open the Boot Menu.

Acer Aspire User's Guide
Page 90
... key again to a lower boot priority. Ensure that the IDE CD device is complete. Do this before rebooting your computer and insert the first system recovery disc into the optical disc drive. English 70 If you prefer to set system parameters. 3 Use the left and right arrow keys to select the... keys to select the IDE CD device. 5 Use the F6 key to move other devices to select Yes. Restart your computer. 2 During startup when the Acer logo shows, press the F2 key to enter BIOS Setup, where you can set the boot priority for long-term use the F5 key to...
... key again to a lower boot priority. Ensure that the IDE CD device is complete. Do this before rebooting your computer and insert the first system recovery disc into the optical disc drive. English 70 If you prefer to set system parameters. 3 Use the left and right arrow keys to select the... keys to select the IDE CD device. 5 Use the F6 key to move other devices to select Yes. Restart your computer. 2 During startup when the Acer logo shows, press the F2 key to enter BIOS Setup, where you can set the boot priority for long-term use the F5 key to...
Service Guide
Page 9
... Codes Tables 161 Chipset POST Codes 161 Jumper and Connector Locations 165 Top View 165 Bottom View 166 Clearing Password Check and BIOS Recovery 167 Clearing Password Check 167 BIOS Recovery by Crisis Disk 168 FRU (Field Replaceable Unit) List 171 Aspire 5530 Exploded Diagrams 172 Discrete SKU 172 UMA SKU 173 IX
... Codes Tables 161 Chipset POST Codes 161 Jumper and Connector Locations 165 Top View 165 Bottom View 166 Clearing Password Check and BIOS Recovery 167 Clearing Password Check 167 BIOS Recovery by Crisis Disk 168 FRU (Field Replaceable Unit) List 171 Aspire 5530 Exploded Diagrams 172 Discrete SKU 172 UMA SKU 173 IX
Service Guide
Page 39
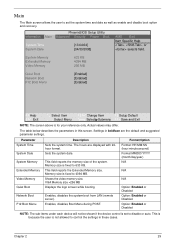
... SelectXSubmenu F10 Save and Exit NOTE: The screen above is set the system time and date as well as enable and disable boot option and recovery. This field reports the memory size of the system. Enables, disables the system boot from LAN (remote server). PhoenixBIOS Setup Utility Information Main Advanced Security...
... SelectXSubmenu F10 Save and Exit NOTE: The screen above is set the system time and date as well as enable and disable boot option and recovery. This field reports the memory size of the system. Enables, disables the system boot from LAN (remote server). PhoenixBIOS Setup Utility Information Main Advanced Security...
Service Guide
Page 49
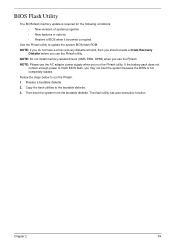
... supply when you run the Phlash. 1. Use the Phlash utility to the bootable diskette. 3. NOTE: If you do not have a crisis recovery diskette at hand, then you should create a Crisis Recovery Diskette before you may not boot the system because the BIOS is required for the following conditions: • New versions of...
... supply when you run the Phlash. 1. Use the Phlash utility to the bootable diskette. 3. NOTE: If you do not have a crisis recovery diskette at hand, then you should create a Crisis Recovery Diskette before you may not boot the system because the BIOS is required for the following conditions: • New versions of...
Service Guide
Page 161
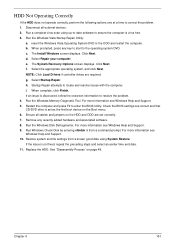
... an issue is set correctly. 7. Restore system and file settings from a command prompt. Replace the HDD. Chapter 4 151 The Install Windows screen displays. e. The System Recovery Options screen displays. h. i. Run the Windows Disk Defragmenter. For more information see Windows Help and Support. 5. HDD Not Operating Correctly If the HDD does not...
... an issue is set correctly. 7. Restore system and file settings from a command prompt. Replace the HDD. Chapter 4 151 The Install Windows screen displays. e. The System Recovery Options screen displays. h. i. Run the Windows Disk Defragmenter. For more information see Windows Help and Support. 5. HDD Not Operating Correctly If the HDD does not...
Service Guide
Page 172
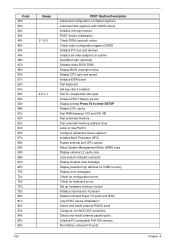
... Setup System Management Mode (SMM) area Display external L2 cache size Load custom defaults (optional) Display shadow-area message Display possible high address for UMB recovery Display error messages Check for configuration errors Check for keyboard errors Set up hardware interrupt vectors Initialize coprocessor if present Disable onboard Super I/O ports and...
... Setup System Management Mode (SMM) area Display external L2 cache size Load custom defaults (optional) Display shadow-area message Display possible high address for UMB recovery Display error messages Check for configuration errors Check for keyboard errors Set up hardware interrupt vectors Initialize coprocessor if present Disable onboard Super I/O ports and...
Service Guide
Page 174
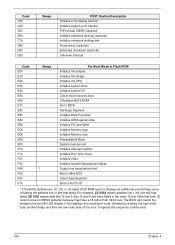
... F6h F7h Beeps 1 For Boot Block in Flash ROM Initialize the chipset Initialize the bridge Initialize the CPU Initialize system timer Initialize system I/O Check force recovery boot Checksum BIOS ROM Go to BIOS Set Huge Segment Initialize Multi Processor Initialize OEM special code Initialize PIC and DMA Initialize Memory type Initialize...
... F6h F7h Beeps 1 For Boot Block in Flash ROM Initialize the chipset Initialize the bridge Initialize the CPU Initialize system timer Initialize system I/O Check force recovery boot Checksum BIOS ROM Go to BIOS Set Huge Segment Initialize Multi Processor Initialize OEM special code Initialize PIC and DMA Initialize Memory type Initialize...
Service Guide
Page 177
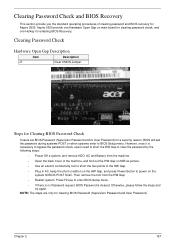
... will ask the password during systems POST or when systems enter to short the two points of clearing password and BIOS recovery for Aspire 5530. Clearing Password Check and BIOS Recovery This section provide you the standard operating procedures of the HW Gap. • Plug in AC, keep the short ...Power Off a system, and remove HDD, AC and Battery from the HW Gap. • Restart system. NOTE: The steps are only for enabling BIOS Recovery. Otherwise, please follow the steps and try again. Then remove the tool from the machine. • Open the back cover of the machine, and find...
... will ask the password during systems POST or when systems enter to short the two points of clearing password and BIOS recovery for Aspire 5530. Clearing Password Check and BIOS Recovery This section provide you the standard operating procedures of the HW Gap. • Plug in AC, keep the short ...Power Off a system, and remove HDD, AC and Battery from the HW Gap. • Restart system. NOTE: The steps are only for enabling BIOS Recovery. Otherwise, please follow the steps and try again. Then remove the tool from the machine. • Open the back cover of the machine, and find...

Service Guide
Page 178
... another system with minimum BIOS initialization. Execute wincris.exe to a successful one Crisis Diskette should be made by Crisis Disk BIOS Recovery Boot Block: BIOS Recovery Boot Block is powered on during BIOS POST. Users can enable this function is used to enter a special BIOS block, called... Boot Block. Select Format Disk and click Start. 168 Chapter 5 BIOS Recovery by executing the Crisis Disk program in hand. Select Removable and click Start. 6. If this feature to restore the BIOS firmware to start ...
... another system with minimum BIOS initialization. Execute wincris.exe to a successful one Crisis Diskette should be made by Crisis Disk BIOS Recovery Boot Block: BIOS Recovery Boot Block is powered on during BIOS POST. Users can enable this function is used to enter a special BIOS block, called... Boot Block. Select Format Disk and click Start. 168 Chapter 5 BIOS Recovery by executing the Crisis Disk program in hand. Select Removable and click Start. 6. If this feature to restore the BIOS firmware to start ...
Service Guide
Page 179
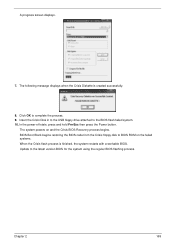
...+Esc then press the Power button. Insert the Crisis Disk in to the USB floppy drive attached to BIOS ROM on and the Crisis BIOS Recovery process begins. Chapter 2 169 The following message displays when the Crisis Diskette is finished, the system restarts with a workable BIOS.
...+Esc then press the Power button. Insert the Crisis Disk in to the USB floppy drive attached to BIOS ROM on and the Crisis BIOS Recovery process begins. Chapter 2 169 The following message displays when the Crisis Diskette is finished, the system restarts with a workable BIOS.


