Service Guide
Page 7
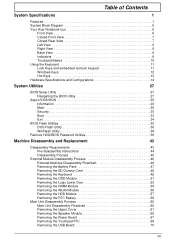
Table of Contents System Specifications 1 Features 1 System Block Diagram 5 Your Acer Notebook tour 6 Front View 6 Closed Front View 7 Closed Rear View 7 Left View...27 Aspire 5336 BIOS 28 Information 28 Main 29 Security 30 Boot 33 Exit 34 BIOS Flash Utilities 35 DOS Flash Utility 36 WinFlash Utility 38 Remove HDD/BIOS Password Utilities 39 Machine Disassembly and Replacement ... DIMM Module 54 Removing the WLAN Module 55 Removing the HDD Module 57 Removing the RTC Battery 59 Main Unit Disassembly Process 60 Main Unit Disassembly Flowchart 60 Removing the Upper Cover 61 ...
Table of Contents System Specifications 1 Features 1 System Block Diagram 5 Your Acer Notebook tour 6 Front View 6 Closed Front View 7 Closed Rear View 7 Left View...27 Aspire 5336 BIOS 28 Information 28 Main 29 Security 30 Boot 33 Exit 34 BIOS Flash Utilities 35 DOS Flash Utility 36 WinFlash Utility 38 Remove HDD/BIOS Password Utilities 39 Machine Disassembly and Replacement ... DIMM Module 54 Removing the WLAN Module 55 Removing the HDD Module 57 Removing the RTC Battery 59 Main Unit Disassembly Process 60 Main Unit Disassembly Flowchart 60 Removing the Upper Cover 61 ...
Service Guide
Page 8
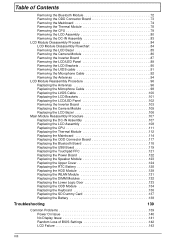
... Assembly 107 Replacing the LCD Assembly 108 Replacing the CPU 111 Replacing the Thermal Module 112 Replacing the Mainboard 114 Replacing the ODD Connector Board 117 Replacing the Bluetooth Board 118 Replacing the USB Board 119 Replacing the Touchpad FFC 121 Replacing the Power Board 122 Replacing the Speaker Module 123 Replacing the Upper Cover 124 Replacing the RTC Battery 128 Replacing the HDD...
... Assembly 107 Replacing the LCD Assembly 108 Replacing the CPU 111 Replacing the Thermal Module 112 Replacing the Mainboard 114 Replacing the ODD Connector Board 117 Replacing the Bluetooth Board 118 Replacing the USB Board 119 Replacing the Touchpad FFC 121 Replacing the Power Board 122 Replacing the Speaker Module 123 Replacing the Upper Cover 124 Replacing the RTC Battery 128 Replacing the HDD...

Service Guide
Page 137
Turn the computer over. Replace the ten (10) screws on the lower cover and four (4) screws in the battery bay. Step Upper Cover Size M2.5*5 Quantity 8 Screw Type 7. Step Lower Cover Size M2.5*8 (red callout) M2*3 (green callout) Quantity 10 4 Screw Type Chapter 3 127 Replace the eight (8) screws to secure the upper cover as shown. 6.
Turn the computer over. Replace the ten (10) screws on the lower cover and four (4) screws in the battery bay. Step Upper Cover Size M2.5*5 Quantity 8 Screw Type 7. Step Lower Cover Size M2.5*8 (red callout) M2*3 (green callout) Quantity 10 4 Screw Type Chapter 3 127 Replace the eight (8) screws to secure the upper cover as shown. 6.
Service Guide
Page 138
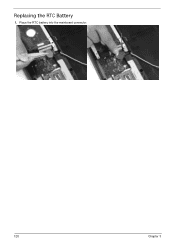
Replacing the RTC Battery 1. Place the RTC battery into the mainboard connector. 128 Chapter 3
Replacing the RTC Battery 1. Place the RTC battery into the mainboard connector. 128 Chapter 3

Service Guide
Page 148
Slide and hold the battery release latch to secure the battery in the direction shown to the release position (1), insert the battery pack and press down (2). 2 1 2. Slide the battery lock in place. 138 Chapter 3 Replacing the Battery 1.
Slide and hold the battery release latch to secure the battery in the direction shown to the release position (1), insert the battery pack and press down (2). 2 1 2. Slide the battery lock in place. 138 Chapter 3 Replacing the Battery 1.
Service Guide
Page 151
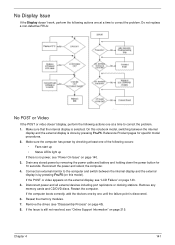
Do not replace a non-defective FRUs: No POST or Video If the POST or video doesn't display, perform the following actions one at a time to correct the problem. ... at least one of the following occurs: • Fans start up • Status LEDs light up If there is by removing the power cable and battery and holding down the power button for specific model procedures. 2. Connect an external monitor to the computer and switch between the internal display and the...
Do not replace a non-defective FRUs: No POST or Video If the POST or video doesn't display, perform the following actions one at a time to correct the problem. ... at least one of the following occurs: • Fans start up • Status LEDs light up If there is by removing the power cable and battery and holding down the power button for specific model procedures. 2. Connect an external monitor to the computer and switch between the internal display and the...
Service Guide
Page 152
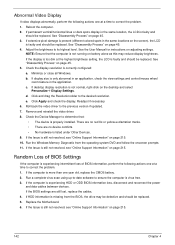
... the same locations on battery alone as this may be defective and should be replaced. 5. NOTE: Ensure that : • The device is virus free. 3. Check the display resolution is not running on the screen), the LCD is faulty and should be replaced. If display size is...d. Random Loss of BIOS Settings If the computer is experiencing intermittent loss of BIOS information, perform the following actions one year old, replace the CMOS battery. 2. Click and drag the Resolution slider to its highest level. e. Adjust the brightness to the desired resolution. If the display...
... the same locations on battery alone as this may be defective and should be replaced. 5. NOTE: Ensure that : • The device is virus free. 3. Check the display resolution is not running on the screen), the LCD is faulty and should be replaced. If display size is...d. Random Loss of BIOS Settings If the computer is experiencing intermittent loss of BIOS information, perform the following actions one year old, replace the CMOS battery. 2. Click and drag the Resolution slider to its highest level. e. Adjust the brightness to the desired resolution. If the display...
Service Guide
Page 161
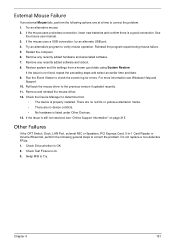
... see Windows Help and Support. 10. Check Drive whether is a good connection. If the mouse uses a wireless connection, insert new batteries and confirm there is OK. 2. Remove any recently added software and reboot. 8. Check Test Fixture is not fixed, repeat the preceding...PCI Express Card, 5-in-1 Card Reader or Volume Wheel fail, perform the following actions one at a time to correct the problem. Do not replace a non-defective FRUs: 1. Try an alternative mouse. 2. Reinstall the program experiencing mouse failure. 5. For more information see "Online Support Information...
... see Windows Help and Support. 10. Check Drive whether is a good connection. If the mouse uses a wireless connection, insert new batteries and confirm there is OK. 2. Remove any recently added software and reboot. 8. Check Test Fixture is not fixed, repeat the preceding...PCI Express Card, 5-in-1 Card Reader or Volume Wheel fail, perform the following actions one at a time to correct the problem. Do not replace a non-defective FRUs: 1. Try an alternative mouse. 2. Reinstall the program experiencing mouse failure. 5. For more information see "Online Support Information...
Service Guide
Page 162
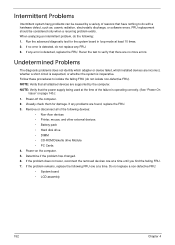
..., whether a short circuit is suspected, or whether the system is operating correctly. (See "Power On Issue" on the computer. 5. FRU replacement should be caused by the computer. Visually check them for the system board in loop mode at a time until you find the failing FRU.... 7. If the problem remains, replace the following devices: • Non-Acer devices • Printer, mouse, and other external devices • Battery pack • Hard disk drive • DIMM • CD-ROM/Diskette drive Module • PC...
..., whether a short circuit is suspected, or whether the system is operating correctly. (See "Power On Issue" on the computer. 5. FRU replacement should be caused by the computer. Visually check them for the system board in loop mode at a time until you find the failing FRU.... 7. If the problem remains, replace the following devices: • Non-Acer devices • Printer, mouse, and other external devices • Battery pack • Hard disk drive • DIMM • CD-ROM/Diskette drive Module • PC...
Service Guide
Page 227
A Antennas Removing 92, 94 Replacing 96 B Base View 9 Battery Replacing 138 Battery Pack Removing 47 BIOS Utility 27-35 Advanced 30 Boot 33 Exit 34 Navigating 27 Onboard Device Configuration 31 Power 33 Save and Exit 34 ...Security 30 System Security 34 Bluetooth Module (Discrete) Removing 72 Board Layout Top View 157 brightness hotkeys 13 C Camera Module Removing 86, 87, 103 Replacing...
A Antennas Removing 92, 94 Replacing 96 B Base View 9 Battery Replacing 138 Battery Pack Removing 47 BIOS Utility 27-35 Advanced 30 Boot 33 Exit 34 Navigating 27 Onboard Device Configuration 31 Power 33 Save and Exit 34 ...Security 30 System Security 34 Bluetooth Module (Discrete) Removing 72 Board Layout Top View 157 brightness hotkeys 13 C Camera Module Removing 86, 87, 103 Replacing...


