
Aspire 3100 - 5100 - 5110 User's Guide
Page 8
...Follow these steps to the AcerSystem User's Guide. See "Front view" on how your computer can help you for making an Acer notebook your choice for your notebook. For more productive, please refer to access it contains warranty information and the general regulations and ...safety notices for meeting your computer. This guide contains detailed information on such subjects as system utilities, data recovery, expansion options and troubleshooting. Your guides To help you get started with setting up your mobile computing needs. Note: Viewing the...
...Follow these steps to the AcerSystem User's Guide. See "Front view" on how your computer can help you for making an Acer notebook your choice for your notebook. For more productive, please refer to access it contains warranty information and the general regulations and ...safety notices for meeting your computer. This guide contains detailed information on such subjects as system utilities, data recovery, expansion options and troubleshooting. Your guides To help you get started with setting up your mobile computing needs. Note: Viewing the...
Aspire 3100 - 5100 - 5110 User's Guide
Page 13
... 67 Installing memory 68 Connecting your TV and AV-in cables 69 Acer Arcade TV set-up wizard (Windows XP Home and Professional) 71 BIOS utility 72 Boot sequence 72 Enable disk-to-disk recovery 72 Password 72 Using software 73 Playing DVD movies 73 Power management ...74 Acer eRecovery Management 74 Create backup 75 Restore from backup 75 Create factory default image CD 76 Re...
... 67 Installing memory 68 Connecting your TV and AV-in cables 69 Acer Arcade TV set-up wizard (Windows XP Home and Professional) 71 BIOS utility 72 Boot sequence 72 Enable disk-to-disk recovery 72 Password 72 Using software 73 Playing DVD movies 73 Power management ...74 Acer eRecovery Management 74 Create backup 75 Restore from backup 75 Create factory default image CD 76 Re...
Aspire 3100 - 5100 - 5110 User's Guide
Page 20
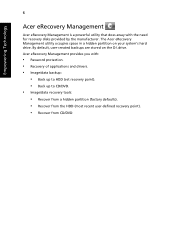
.... • Image/data recovery tools: • Recover from a hidden partition (factory defaults). • Recover from the HDD (most recent user-defined recovery point). • Recover from CD/DVD Acer eRecovery Management provides you with the need for recovery disks provided by the manufacturer.... By default, user-created backups are stored on your system's hard drive. The Acer eRecovery Management utility occupies...
.... • Image/data recovery tools: • Recover from a hidden partition (factory defaults). • Recover from the HDD (most recent user-defined recovery point). • Recover from CD/DVD Acer eRecovery Management provides you with the need for recovery disks provided by the manufacturer.... By default, user-created backups are stored on your system's hard drive. The Acer eRecovery Management utility occupies...
Aspire 3100 - 5100 - 5110 User's Guide
Page 21
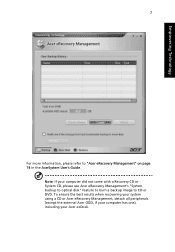
To ensure the best results when recovering your system using a CD or Acer eRecovery Management, detach all peripherals (except the external Acer ODD, if your computer has one), including your computer did not come with a Recovery CD or System CD, please use Acer eRecovery Management's "System backup to optical disk" feature to burn a backup image to "Acer eRecovery Management" on page 74 in the AcerSystem User's Guide. Note: If your Acer ezDock. Empowering Technology 7 For more information, please refer to CD or DVD.
To ensure the best results when recovering your system using a CD or Acer eRecovery Management, detach all peripherals (except the external Acer ODD, if your computer has one), including your computer did not come with a Recovery CD or System CD, please use Acer eRecovery Management's "System backup to optical disk" feature to burn a backup image to "Acer eRecovery Management" on page 74 in the AcerSystem User's Guide. Note: If your Acer ezDock. Empowering Technology 7 For more information, please refer to CD or DVD.
Aspire 3100 - 5100 - 5110 User's Guide
Page 55
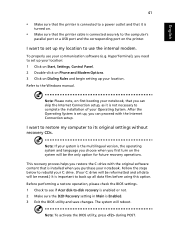
...Note: If your system is installed when you first turn on the printer. The system will be the only option for future recovery operations. This recovery process helps you restore the C: drive with the Internet Connection setup. After the Operating System is set up all data will ... I want to set up your communication software (e.g. Before performing a restore operation, please check the BIOS settings. 1 Check to see if Acer disk-to-disk recovery is enabled or not. 2 Make sure the D2D Recovery setting in Main is important to back up , you need to the Windows manual.
...Note: If your system is installed when you first turn on the printer. The system will be the only option for future recovery operations. This recovery process helps you restore the C: drive with the Internet Connection setup. After the Operating System is set up all data will ... I want to set up your communication software (e.g. Before performing a restore operation, please check the BIOS settings. 1 Check to see if Acer disk-to-disk recovery is enabled or not. 2 Make sure the D2D Recovery setting in Main is important to back up , you need to the Windows manual.
Aspire 3100 - 5100 - 5110 User's Guide
Page 56
...Read this handy booklet. If the country you are there to provide the following information available when you call Acer for online service, and please be at the same time to enter the recovery process. 3 Refer to the onscreen instructions to 5 GB in a hidden partition on your hard disk. Requesting...the flap located inside the front cover of beeps). An ITW passport comes with our offices worldwide. English 42 To start the recovery process: 1 Restart the system. 2 While the Acer logo is showing, press + at your problems efficiently. This feature occupies 4 to perform system...
...Read this handy booklet. If the country you are there to provide the following information available when you call Acer for online service, and please be at the same time to enter the recovery process. 3 Refer to the onscreen instructions to 5 GB in a hidden partition on your hard disk. Requesting...the flap located inside the front cover of beeps). An ITW passport comes with our offices worldwide. English 42 To start the recovery process: 1 Restart the system. 2 While the Acer logo is showing, press + at your problems efficiently. This feature occupies 4 to perform system...

Aspire 3100 - 5100 - 5110 User's Guide
Page 86
... 72 BIOS utility The BIOS utility is being displayed. Your computer is already properly configured and optimized, and you may need to -disk recovery (hard disk recovery), activate the BIOS utility, then select Main from the categories listed at the top of the screen. Boot sequence To set the boot ...the top of the screen and use the and keys to Enabled. To activate the BIOS utility, press during the POST; Enable disk-to-disk recovery To enable disk-to run it. while the notebook PC logo is a hardware configuration program built into your computer's BIOS. However, if you ...
... 72 BIOS utility The BIOS utility is being displayed. Your computer is already properly configured and optimized, and you may need to -disk recovery (hard disk recovery), activate the BIOS utility, then select Main from the categories listed at the top of the screen. Boot sequence To set the boot ...the top of the screen and use the and keys to Enabled. To activate the BIOS utility, press during the POST; Enable disk-to-disk recovery To enable disk-to run it. while the notebook PC logo is a hardware configuration program built into your computer's BIOS. However, if you ...
Aspire 3100 - 5100 - 5110 User's Guide
Page 89
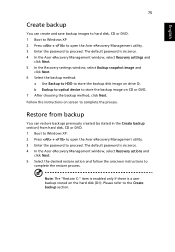
... Management utility. 3 Enter the password to proceed. The default password is six zeros. 4 In the Acer eRecovery Management window, select Recovery settings and click Next. 5 In the Recovery settings window, select Backup snapshot image and click Next. 6 Select the backup method. Note: The "Restore C:" item ... is a user backup stored on screen to complete the process. The default password is six zeros. 4 In the Acer eRecovery Management window, select Recovery actions and click Next. 5 Select the desired restore action and follow the onscreen instructions to the Create backup section.
... Management utility. 3 Enter the password to proceed. The default password is six zeros. 4 In the Acer eRecovery Management window, select Recovery settings and click Next. 5 In the Recovery settings window, select Backup snapshot image and click Next. 6 Select the backup method. Note: The "Restore C:" item ... is a user backup stored on screen to complete the process. The default password is six zeros. 4 In the Acer eRecovery Management window, select Recovery actions and click Next. 5 Select the desired restore action and follow the onscreen instructions to the Create backup section.
Aspire 3100 - 5100 - 5110 User's Guide
Page 90
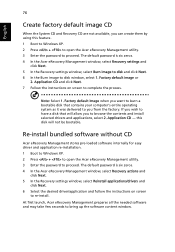
...Boot to Windows XP. 2 Press + to open the Acer eRecovery Management utility. 3 Enter the password to proceed. The default password is six zeros. 4 In the Acer eRecovery Management window, select Recovery settings and click Next. 5 In the Recovery settings window, select Burn image to disk and click Next.... 6 In the Burn image to re-install. Factory default image or 2. At first launch, Acer eRecovery Management prepares all...
...Boot to Windows XP. 2 Press + to open the Acer eRecovery Management utility. 3 Enter the password to proceed. The default password is six zeros. 4 In the Acer eRecovery Management window, select Recovery settings and click Next. 5 In the Recovery settings window, select Burn image to disk and click Next.... 6 In the Burn image to re-install. Factory default image or 2. At first launch, Acer eRecovery Management prepares all...
Aspire 3100 - 5100 - 5110 User's Guide
Page 91
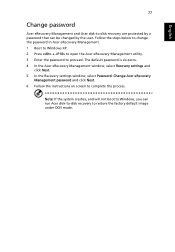
... is six zeros. 4 In the Acer eRecovery Management window, select Recovery settings and click Next. 5 In the Recovery settings window, select Password: Change Acer eRecovery Management password and click Next. 6 Follow the instructions on screen to -disk recovery are protected by the user. English 77 Change password Acer eRecovery Management and Acer disk-to complete the process...
... is six zeros. 4 In the Acer eRecovery Management window, select Recovery settings and click Next. 5 In the Recovery settings window, select Password: Change Acer eRecovery Management password and click Next. 6 Follow the instructions on screen to -disk recovery are protected by the user. English 77 Change password Acer eRecovery Management and Acer disk-to complete the process...

Aspire 3100 - 5100 - 5110 Service Guide
Page 31
... in a hidden partition on D:\ drive. Acer eRecovery Management provides: • Password protection • Recovery of applications and drives • Image or data backup: • Backup to HDD (set recovery point) • Backup to CD or DVD • Image/data recovery tools: • Recovery from a hidden partition (factory defaults) • Recovery from the HDD (most recent user...
... in a hidden partition on D:\ drive. Acer eRecovery Management provides: • Password protection • Recovery of applications and drives • Image or data backup: • Backup to HDD (set recovery point) • Backup to CD or DVD • Image/data recovery tools: • Recovery from a hidden partition (factory defaults) • Recovery from the HDD (most recent user...

Aspire 3100 - 5100 - 5110 Service Guide
Page 52
...: System Memory: Extended Memory: Video Memory Quiet Boot: Power on external video port. The size is connected on Display: Network Boot F12 Boot Menu: D2D Recovery: [14:13:43] [05/12/2006] 633 KB 1046528 KB 128 MB [Enabled] [Auto] [Enabled] [Disabled] [Enabled] Boot Exit Item Specific Help , , or selects field...
...: System Memory: Extended Memory: Video Memory Quiet Boot: Power on external video port. The size is connected on Display: Network Boot F12 Boot Menu: D2D Recovery: [14:13:43] [05/12/2006] 633 KB 1046528 KB 128 MB [Enabled] [Auto] [Enabled] [Disabled] [Enabled] Boot Exit Item Specific Help , , or selects field...

Aspire 3100 - 5100 - 5110 Service Guide
Page 53
The boot device change is only for one defined in the BIOS setup (Boot option). • D2D Recovery: It allows the users to enable or disable the disk-to-disk recovery. 44 Chapter 2 • F12 Boot Menu: • Enabled: When it is not enabled, device boot priority will be adjustable during POST. • Disabled: When it is enabled, the users can modify device boot priority by pressing during POST. In other words, when the system is rebooted, the boot device sequence will not be the same as the one -time change.
The boot device change is only for one defined in the BIOS setup (Boot option). • D2D Recovery: It allows the users to enable or disable the disk-to-disk recovery. 44 Chapter 2 • F12 Boot Menu: • Enabled: When it is not enabled, device boot priority will be adjustable during POST. • Disabled: When it is enabled, the users can modify device boot priority by pressing during POST. In other words, when the system is rebooted, the boot device sequence will not be the same as the one -time change.

Aspire 3100 - 5100 - 5110 Service Guide
Page 88
... EBh ECh EDh EEh EFh F0h F1h F2h F3h F4h F5h F6h F7h Beeps 1 For Boot Block in Flash ROM Initialize the chipset. Check force recovery boot. Initialize interrupt vectors. Boot to Full DOS. Set Huge Segment. Initialize Multi Processor. Output one beep before boot. Chapter 4 79 Initialize the system timer...
... EBh ECh EDh EEh EFh F0h F1h F2h F3h F4h F5h F6h F7h Beeps 1 For Boot Block in Flash ROM Initialize the chipset. Check force recovery boot. Initialize interrupt vectors. Boot to Full DOS. Set Huge Segment. Initialize Multi Processor. Output one beep before boot. Chapter 4 79 Initialize the system timer...


