
Aspire 5040 / 3040 Service Guide
Page 5
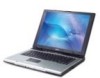
... to -date information available on card, modem, or extra memory capability). V For ACER-AUTHORIZED SERVICE PROVIDERS, your regional office MAY have a DIFFERENT part number code to provide you with further technical details. 2. These LOCALIZED FEATURES will not be covered in the printed Service Guide. You MUST use the list provided by your...
... to -date information available on card, modem, or extra memory capability). V For ACER-AUTHORIZED SERVICE PROVIDERS, your regional office MAY have a DIFFERENT part number code to provide you with further technical details. 2. These LOCALIZED FEATURES will not be covered in the printed Service Guide. You MUST use the list provided by your...
Aspire 5040 / 3040 Service Guide
Page 18
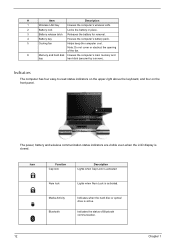
Note: Do not cover or obstruct the opening of Bluetooth communication. 12 Chapter 1 Indicators The computer has four easy-to-read status indicators on the upper-right above the ...
Note: Do not cover or obstruct the opening of Bluetooth communication. 12 Chapter 1 Indicators The computer has four easy-to-read status indicators on the upper-right above the ...

Aspire 5040 / 3040 Service Guide
Page 49
... step-by-step procedures on how to avoid mismatch when putting back the components. To disassemble the computer, you remove the stripe cover, please be careful not to scrape the cover. During the disassembly process, group the screws with the corresponding components to disassemble the notebook computer for the different components vary...
... step-by-step procedures on how to avoid mismatch when putting back the components. To disassemble the computer, you remove the stripe cover, please be careful not to scrape the cover. During the disassembly process, group the screws with the corresponding components to disassemble the notebook computer for the different components vary...

Aspire 5040 / 3040 Service Guide
Page 51
... must first remove the keyboard, then disassemble the inside assembly frame in that order. Start Battery Middle Cover Lower Case Assembly Lower Case Main Board Assembly H*2 Wireless LAN Cover O*1 Keyboard J*2 I*2 LCD Module Wireless LAN Cover ODD Module E*1 E*1(KB to U case) E*10 (U case to L case) F*3 (U case to... L case) RTC Battery Bluetooth Module H*3 DIMM/HDD Cover Memory N*4 HDD Module L*4 HDD Bracket HDD M*3 Upper Case Assembly N*3 Fan Upper Case Touchpad Assembly Speaker Set G*6 VGA Heatsink C*2 D*1 CPU...
... must first remove the keyboard, then disassemble the inside assembly frame in that order. Start Battery Middle Cover Lower Case Assembly Lower Case Main Board Assembly H*2 Wireless LAN Cover O*1 Keyboard J*2 I*2 LCD Module Wireless LAN Cover ODD Module E*1 E*1(KB to U case) E*10 (U case to L case) F*3 (U case to... L case) RTC Battery Bluetooth Module H*3 DIMM/HDD Cover Memory N*4 HDD Module L*4 HDD Bracket HDD M*3 Upper Case Assembly N*3 Fan Upper Case Touchpad Assembly Speaker Set G*6 VGA Heatsink C*2 D*1 CPU...

Aspire 5040 / 3040 Service Guide
Page 54
... HDD Module 1. Pop out the memory then remove it . 48 Chapter 3 Remove the two screws fastening the wireless LAN cover. 2. Then detach the wireless LAN cover. 3. Pop out the wireless LAN card then remove it . 4. Disconnect the main and the auxiliary antennae. 4. Remove ...the three screws fastening the DIMM/HDD cover. 2. Removing the Wireless LAN Card 1. Detach the DIMM/HDD cover carefully. 3. Remove four screws fastening the...
... HDD Module 1. Pop out the memory then remove it . 48 Chapter 3 Remove the two screws fastening the wireless LAN cover. 2. Then detach the wireless LAN cover. 3. Pop out the wireless LAN card then remove it . 4. Disconnect the main and the auxiliary antennae. 4. Remove ...the three screws fastening the DIMM/HDD cover. 2. Removing the Wireless LAN Card 1. Detach the DIMM/HDD cover carefully. 3. Remove four screws fastening the...

Aspire 5040 / 3040 Service Guide
Page 55
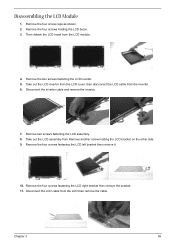
Removing the LCD Module 1. Open the notebook as shown. 5. Chapter 3 49 Turn over the keyboard as the impage shows. 2. Disconnect the keyboard cable then remove the keyboard. . 6. Use a flat headed screwdriver to push the ODD module outwards then remove it. Removing the ODD Module 1. Detach the middle cover carefully as shown. Pull out the wireless LAN antenna from the main unit as shown. . 3. Remove the screws fastening the ODD module as shown. 2. Remove the screw holding the keyboard. 4.
Removing the LCD Module 1. Open the notebook as shown. 5. Chapter 3 49 Turn over the keyboard as the impage shows. 2. Disconnect the keyboard cable then remove the keyboard. . 6. Use a flat headed screwdriver to push the ODD module outwards then remove it. Removing the ODD Module 1. Detach the middle cover carefully as shown. Pull out the wireless LAN antenna from the main unit as shown. . 3. Remove the screws fastening the ODD module as shown. 2. Remove the screw holding the keyboard. 4.
Aspire 5040 / 3040 Service Guide
Page 61
... the cable. Remove two screws fastening the LCD assembly. 8. Disconnect the LCD cable from the LCD module. 4. Take out the LCD inverter from the LCD cover, then disconnect the LCD cable from Remove another screw holding the LCD bezel. 3. Remove the four screws fastening the LCD right bracket then remove the...
... the cable. Remove two screws fastening the LCD assembly. 8. Disconnect the LCD cable from the LCD module. 4. Take out the LCD inverter from the LCD cover, then disconnect the LCD cable from Remove another screw holding the LCD bezel. 3. Remove the four screws fastening the LCD right bracket then remove the...

Aspire 5040 / 3040 Service Guide
Page 77
... Memory-Related Symptoms Symptom / Error Memory count (size) appears different from standby mode after closing the LCD The system doesn't resume from the computer. LCD cover switch System board See "Save to Disk (S4)" on page 61. Internal speakers make noise or emit no sound comes from hibernation mode. Keyboard (if... Card (PCMCIA) PCMCIA slot pin is from the keyboard) Hard disk drive System board Press Fn+oand see if the computer enters hibernation mode. LCD cover switch System board Chapter 4 71 Action in Sequence See "Save to Disk (S4)" on page 28.
... Memory-Related Symptoms Symptom / Error Memory count (size) appears different from standby mode after closing the LCD The system doesn't resume from the computer. LCD cover switch System board See "Save to Disk (S4)" on page 61. Internal speakers make noise or emit no sound comes from hibernation mode. Keyboard (if... Card (PCMCIA) PCMCIA slot pin is from the keyboard) Hard disk drive System board Press Fn+oand see if the computer enters hibernation mode. LCD cover switch System board Chapter 4 71 Action in Sequence See "Save to Disk (S4)" on page 28.

Aspire 5040 / 3040 Service Guide
Page 88
Aspire 3040/5040 FRU List 4 IO BRACKET LEFT 33.A46V1.002 3 LOWER CASE W/SPEAKER 60.A46V1.001 NS SPEAKER LEFT/RIGHT 23.A46V1.001 7 UPPER CASE W/COVER SWITCH 60.A46V1.002 CABLE CPU/Processor NS AMD MOBILE SEMPRON 2600+ 25WD KC.S2602.25D DVD-RW Module NS AMD MOBILE SEMPRON 2800+ 25WD NS AMD MOBILE SEMPRON 3000+ 25WD NS AMD MOBILE SEMPRON 3100+ 25WD NS DVD-RW MODULE 8X DUAL KC.S2802.25D KC.S3002.25D KC.S3102.25D 6M.A46V1.003 82 Chapter 6
Aspire 3040/5040 FRU List 4 IO BRACKET LEFT 33.A46V1.002 3 LOWER CASE W/SPEAKER 60.A46V1.001 NS SPEAKER LEFT/RIGHT 23.A46V1.001 7 UPPER CASE W/COVER SWITCH 60.A46V1.002 CABLE CPU/Processor NS AMD MOBILE SEMPRON 2600+ 25WD KC.S2602.25D DVD-RW Module NS AMD MOBILE SEMPRON 2800+ 25WD NS AMD MOBILE SEMPRON 3000+ 25WD NS AMD MOBILE SEMPRON 3100+ 25WD NS DVD-RW MODULE 8X DUAL KC.S2802.25D KC.S3002.25D KC.S3102.25D 6M.A46V1.003 82 Chapter 6

Aspire 5040 / 3040 User's Guide EN
Page 5
... current rating of it. Taking care of your AC adapter: • Do not connect the adapter to shut down the computer by closing the display cover, or by pressing the sleep hotkey + . If you cannot power off , do not pull on the cord itself but pull on the plug. • The...
... current rating of it. Taking care of your AC adapter: • Do not connect the adapter to shut down the computer by closing the display cover, or by pressing the sleep hotkey + . If you cannot power off , do not pull on the cord itself but pull on the plug. • The...

Aspire 5040 / 3040 User's Guide EN
Page 23
... LAN. Houses the computer's main memory and hard disk (secured with screws). Helps keep the computer cool. Releases the battery for removal. Note: Do not cover or obstruct the opening of the fan. Enable the computer to a display device (e.g., external monitor, LCD projector). Locks the battery in position. Houses the computer...
... LAN. Houses the computer's main memory and hard disk (secured with screws). Helps keep the computer cool. Releases the battery for removal. Note: Do not cover or obstruct the opening of the fan. Enable the computer to a display device (e.g., external monitor, LCD projector). Locks the battery in position. Houses the computer...

Aspire 5040 / 3040 User's Guide EN
Page 43
... an International Travelers Warranty (ITW) that gives you a helping hand. Before you travel, to provide the following information available when you call Acer for online service, and please be at your computer. You are traveling in does not have your computer, write them down as they appear... on hand, especially when you call takes and help solve your proof-of-purchase in the flap located inside the front cover of the ITW passport. Place your problems efficiently. If the country you are required to receive the benefits from our support centers. ...
... an International Travelers Warranty (ITW) that gives you a helping hand. Before you travel, to provide the following information available when you call Acer for online service, and please be at your computer. You are traveling in does not have your computer, write them down as they appear... on hand, especially when you call takes and help solve your proof-of-purchase in the flap located inside the front cover of the ITW passport. Place your problems efficiently. If the country you are required to receive the benefits from our support centers. ...

Aspire 5040 / 3040 User's Guide EN
Page 52
...the power button. English 42 Taking your notebook PC with you This section gives you may choose to shut down the computer. 4 Close the display cover. 5 Disconnect the cord from the AC adapter. 6 Disconnect the keyboard, pointing device, printer, external monitor and other external devices. 7 Disconnect the... the display; Moving around or traveling with your computer. Preparing the computer Before moving within the building. Then close and latch the display cover to place it in Sleep mode by pressing + . You can put the computer in Sleep mode. To bring the computer out of Sleep...
...the power button. English 42 Taking your notebook PC with you This section gives you may choose to shut down the computer. 4 Close the display cover. 5 Disconnect the cord from the AC adapter. 6 Disconnect the keyboard, pointing device, printer, external monitor and other external devices. 7 Disconnect the... the display; Moving around or traveling with your computer. Preparing the computer Before moving within the building. Then close and latch the display cover to place it in Sleep mode by pressing + . You can put the computer in Sleep mode. To bring the computer out of Sleep...

Aspire 5040 / 3040 User's Guide EN
Page 53
...longer, or if your battery is relatively short, you probably do not need to plug in your desktop, follow these steps to the top cover of time. Caution: Avoid packing items next to prepare the computer for a period of the computer. If the meeting room. Preparing the computer... After disconnecting the computer from the drive(s). Press + or close the display cover whenever you : • AC adapter and power cord • The printed User's Guide Taking the computer home When you have some items at home...
...longer, or if your battery is relatively short, you probably do not need to plug in your desktop, follow these steps to the top cover of time. Caution: Avoid packing items next to prepare the computer for a period of the computer. If the meeting room. Preparing the computer... After disconnecting the computer from the drive(s). Press + or close the display cover whenever you : • AC adapter and power cord • The printed User's Guide Taking the computer home When you have some items at home...

Aspire 5040 / 3040 User's Guide EN
Page 61
then lift up and remove the memory cover. 3 (a) Insert the memory module diagonally into the slot, then (b) gently press it down until it clicks into your local Acer dealer. To activate the BIOS utility, press during the POST; Boot sequence To set the boot sequence in the BIOS utility..., activate the BIOS utility, then select Boot from the memory cover; Your computer is already properly configured and optimized...
then lift up and remove the memory cover. 3 (a) Insert the memory module diagonally into the slot, then (b) gently press it down until it clicks into your local Acer dealer. To activate the BIOS utility, press during the POST; Boot sequence To set the boot sequence in the BIOS utility..., activate the BIOS utility, then select Boot from the memory cover; Your computer is already properly configured and optimized...

Aspire 5040 / 3040 User's Guide EN
Page 73
... sure of the type of power indicated on an unstable cart, stand or table. Should such problems occur, the user should never be blocked or covered. These openings must not be blocked by placing the product on a bed, sofa, rug or other equipment, may give rise to ensure that a separate telephone...
... sure of the type of power indicated on an unstable cart, stand or table. Should such problems occur, the user should never be blocked or covered. These openings must not be blocked by placing the product on a bed, sofa, rug or other equipment, may give rise to ensure that a separate telephone...

Aspire 5040 / 3040 User's Guide EN
Page 74
... liquid of other controls may expose you to rain or water. d If the product does not operate normally when the operating instructions are covered by a qualified technician to restore the product to qualified service personnel under the following conditions: a When the power cord or plug is ...instructions, since improper adjustment of any kind into the product. 10 Do not attempt to service this product yourself, as opening or removing covers may result in your accessories box) for service. 12 The notebook PC series uses lithium batteries. b If liquid has been spilled into...
... liquid of other controls may expose you to rain or water. d If the product does not operate normally when the operating instructions are covered by a qualified technician to restore the product to qualified service personnel under the following conditions: a When the power cord or plug is ...instructions, since improper adjustment of any kind into the product. 10 Do not attempt to service this product yourself, as opening or removing covers may result in your accessories box) for service. 12 The notebook PC series uses lithium batteries. b If liquid has been spilled into...


