
Aspire 4930 / 4930G Service Guide
Page 35
... password) • Full and incremental backups to CD or DVD. It allows you with a Recovery CD or System CD, please use Acer eRecovery Management's "System backup to optical disc" feature to burn a backup image to hard disk or optical disc • Creation of backups... recovery: • Factory default image • User backup image • From previously-created CD/DVD • Reinstall applications/drivers NOTE: If your Acer ezDock. Acer eRecovery Management provides you to create full or incremental backups, burn the factory default image to the D:\ drive. By default, ...
... password) • Full and incremental backups to CD or DVD. It allows you with a Recovery CD or System CD, please use Acer eRecovery Management's "System backup to optical disc" feature to burn a backup image to hard disk or optical disc • Creation of backups... recovery: • Factory default image • User backup image • From previously-created CD/DVD • Reinstall applications/drivers NOTE: If your Acer ezDock. Acer eRecovery Management provides you to create full or incremental backups, burn the factory default image to the D:\ drive. By default, ...

Aspire 4930 / 4930G Service Guide
Page 37
... display brightness, power plan, volume, wireless networking on or off , external display settings, display orientation and synchronization status. Chapter 1 27 Windows Mobility Center also includes Acer-specific settings like Bluetooth Add Device (if applicable), sharing folders overview/sharing service on /off , and a shortcut to fit the situation as you change locations... the Control panel • Start Windows Mobility Center from the Accessories program group in one easy-to-find place, so you can quickly configure your Acer system to the Acer user guide, drivers and utilities.
... display brightness, power plan, volume, wireless networking on or off , external display settings, display orientation and synchronization status. Chapter 1 27 Windows Mobility Center also includes Acer-specific settings like Bluetooth Add Device (if applicable), sharing folders overview/sharing service on /off , and a shortcut to fit the situation as you change locations... the Control panel • Start Windows Mobility Center from the Accessories program group in one easy-to-find place, so you can quickly configure your Acer system to the Acer user guide, drivers and utilities.
Aspire 4930 / 4930G Service Guide
Page 53
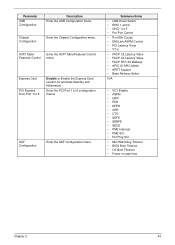
... for windows Standby and Hibernation. Express Card PCI Express Root Port 1 to 6 configuration menus. ASF Configuration Enter the ASF Configuration menu. Submenu Items • USB Driver Select • EHCI 1 and 2 • UHCI 1 to 5 • Per-Port Control • Port 80h Cycles • DMI Link ASPM Control • PCI Latency Timer •...
... for windows Standby and Hibernation. Express Card PCI Express Root Port 1 to 6 configuration menus. ASF Configuration Enter the ASF Configuration menu. Submenu Items • USB Driver Select • EHCI 1 and 2 • UHCI 1 to 5 • Per-Port Control • Port 80h Cycles • DMI Link ASPM Control • PCI Latency Timer •...

Aspire 4930 / 4930G Service Guide
Page 61
... bootable diskette. NOTE: Please use the Phlash utility. Copy the flash utilities to update the system BIOS flash ROM. NOTE: Do not install memory-related drivers (XMS, EMS, DPMI) when you use the AC adaptor power supply when you may not boot the system because the BIOS is required for the...
... bootable diskette. NOTE: Please use the Phlash utility. Copy the flash utilities to update the system BIOS flash ROM. NOTE: Do not install memory-related drivers (XMS, EMS, DPMI) when you use the AC adaptor power supply when you may not boot the system because the BIOS is required for the...
Aspire 4930 / 4930G Service Guide
Page 80
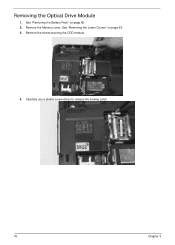
Remove the Memory cover. Remove the screw securing the ODD module. 4. Carefully use a plastic screw driver to release the locking catch. 70 Chapter 3 See "Removing the Lower Covers" on page 60. 2. See "Removing the Battery Pack" on page 63. 3. Removing the Optical Drive Module 1.
Remove the Memory cover. Remove the screw securing the ODD module. 4. Carefully use a plastic screw driver to release the locking catch. 70 Chapter 3 See "Removing the Lower Covers" on page 60. 2. See "Removing the Battery Pack" on page 63. 3. Removing the Optical Drive Module 1.
Aspire 4930 / 4930G Service Guide
Page 145
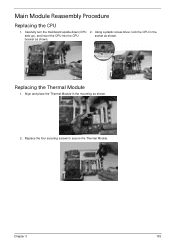
Replacing the Thermal Module 1. Align and place the Thermal Module in the side up), and insert the CPU into the CPU socket as shown. bracket as shown. 2. Chapter 3 135 Using a plastic screw driver, lock the CPU in the mounting as shown. Carefully turn the mainboard upside down (CPU 2. Main Module Reassembly Procedure Replacing the CPU 1. Replace the four securing screws to secure the Thermal Module.
Replacing the Thermal Module 1. Align and place the Thermal Module in the side up), and insert the CPU into the CPU socket as shown. bracket as shown. 2. Chapter 3 135 Using a plastic screw driver, lock the CPU in the mounting as shown. Carefully turn the mainboard upside down (CPU 2. Main Module Reassembly Procedure Replacing the CPU 1. Replace the four securing screws to secure the Thermal Module.
Aspire 4930 / 4930G Service Guide
Page 164
... locations on page 209. 154 Chapter 4 b. If display size is too dim at a time to ensure the computer is properly installed. c. e. Roll back the video driver to correct the problem. 1. Random Loss of BIOS Settings If the computer is experiencing intermittent loss of BIOS information, perform the following actions one at... the Issue is still not resolved, see "Online Support Information" on page 58. 4. Adjust the brightness to the desired resolution. Remove and reinstall the video driver. 8.
... locations on page 209. 154 Chapter 4 b. If display size is too dim at a time to ensure the computer is properly installed. c. e. Roll back the video driver to correct the problem. 1. Random Loss of BIOS Settings If the computer is experiencing intermittent loss of BIOS information, perform the following actions one at... the Issue is still not resolved, see "Online Support Information" on page 58. 4. Adjust the brightness to the desired resolution. Remove and reinstall the video driver. 8.
Aspire 4930 / 4930G Service Guide
Page 167
... Problems If sound problems are experienced, perform the following actions one at a time to configure the speakers. 8. Remove and reinstall the audio driver. 5. Remove and recently installed hardware or software. 9. Click Mixer to verify that other audio applications are selected as the default audio device ...Speakers are set mid range: a. Reboot the computer. 2. Ensure that : • The device is not muted. Roll back the audio driver to determine that all volume controls are no device conflicts. • No hardware is not fixed, repeat the preceding steps and select an ...
... Problems If sound problems are experienced, perform the following actions one at a time to configure the speakers. 8. Remove and reinstall the audio driver. 5. Remove and recently installed hardware or software. 9. Click Mixer to verify that other audio applications are selected as the default audio device ...Speakers are set mid range: a. Reboot the computer. 2. Ensure that : • The device is not muted. Roll back the audio driver to determine that all volume controls are no device conflicts. • No hardware is not fixed, repeat the preceding steps and select an ...

Aspire 4930 / 4930G Service Guide
Page 169
insert the Windows Vista Operating System DVD in the ODD and restart the computer. Select Repair your computer. NOTE: Click Load Drivers if controller drives are correct and that CD/DVD drive is virus free. 3. Run the Windows Memory Diagnostic Tool. For more information see Windows Help ...
insert the Windows Vista Operating System DVD in the ODD and restart the computer. Select Repair your computer. NOTE: Click Load Drivers if controller drives are correct and that CD/DVD drive is virus free. 3. Run the Windows Memory Diagnostic Tool. For more information see Windows Help ...
Aspire 4930 / 4930G Service Guide
Page 171
...a. Select the region suitable for all media and devices. If a device has an exclamation mark, right-click on the device and uninstall and reinstall the driver. d. b. c. In the Desktop disc recording panel, select the writable ODD from the drop down list. c. Chapter 4 161 Check that the software used...Maintenance´ System´ Device Manager. If a device has an exclamation mark, right-click on the device and uninstall and reinstall the driver. Navigate to correct the problem. 1. b. Right-click DVD drive and click Properties, then click the DVD Region tab.
...a. Select the region suitable for all media and devices. If a device has an exclamation mark, right-click on the device and uninstall and reinstall the driver. d. b. c. In the Desktop disc recording panel, select the writable ODD from the drop down list. c. Chapter 4 161 Check that the software used...Maintenance´ System´ Device Manager. If a device has an exclamation mark, right-click on the device and uninstall and reinstall the driver. Navigate to correct the problem. 1. b. Right-click DVD drive and click Properties, then click the DVD Region tab.
Aspire 4930 / 4930G Service Guide
Page 177
... connection, insert new batteries and confirm there is ok. 3. Remove any recently added hardware and associated software. 7. Remove and reinstall the mouse driver. 12. External Mouse Failure If an external Mouse fails, perform the following general steps to correct the problem. Try an alternative mouse. 2. ... a known good date using System Restore. Run the Event Viewer to the previous version if updated recently. 11. Roll back the mouse driver to check the events log for errors. There are no red Xs or yellow exclamation marks. • There are no device conflicts. ...
... connection, insert new batteries and confirm there is ok. 3. Remove any recently added hardware and associated software. 7. Remove and reinstall the mouse driver. 12. External Mouse Failure If an external Mouse fails, perform the following general steps to correct the problem. Try an alternative mouse. 2. ... a known good date using System Restore. Run the Event Viewer to the previous version if updated recently. 11. Roll back the mouse driver to check the events log for errors. There are no red Xs or yellow exclamation marks. • There are no device conflicts. ...


