Service Guide
Page 16
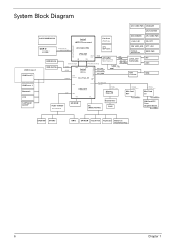
... 1 System Block Diagram GPU CORE PWR CHARGER 3/5V SYS PWR USB board USB Port X3 USB Port x 1 Bluetooth CCD CardReader AU6437 CLOCK GENERATOR intel Fan Driver (PWM Type) DISCHARGER +1.0V/+1.8V CPU CORE PWR CPU VTT DDR SYSTEM MEMORY Graphics Interfaces DDR III SO-DIMM 0 SO-DIMM 1 HDD (SATA) Dual Channel...
... 1 System Block Diagram GPU CORE PWR CHARGER 3/5V SYS PWR USB board USB Port X3 USB Port x 1 Bluetooth CCD CardReader AU6437 CLOCK GENERATOR intel Fan Driver (PWM Type) DISCHARGER +1.0V/+1.8V CPU CORE PWR CPU VTT DDR SYSTEM MEMORY Graphics Interfaces DDR III SO-DIMM 0 SO-DIMM 1 HDD (SATA) Dual Channel...
Service Guide
Page 41
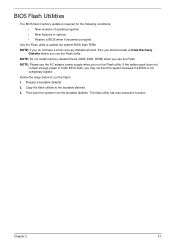
..., you use the Flash. Prepare a bootable diskette. 2. BIOS Flash Utilities The BIOS flash memory update is not completely loaded. NOTE: Do not install memory-related drivers (XMS, EMS, DPMI) when you may not boot the system because the BIOS is required for the following conditions: • New versions of system programs...
..., you use the Flash. Prepare a bootable diskette. 2. BIOS Flash Utilities The BIOS flash memory update is not completely loaded. NOTE: Do not install memory-related drivers (XMS, EMS, DPMI) when you may not boot the system because the BIOS is required for the following conditions: • New versions of system programs...

Service Guide
Page 79
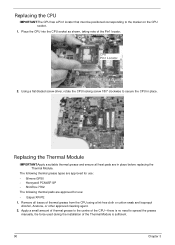
Removing the CPU 1. See "Removing the Thermal Module" on a clean, dry surface when it is not installed. Lift the CPU clear of the socket as shown. 3. Using a phillips screw driver, rotate the CPU locking screw 180° counter-clockwise as shown. Place the CPU on page 68. 2. Using both hands, lift the Thermal Module clear of the CPU are damaged, the CPU may malfunction. Chapter 3 69 IMPORTANT:The pins on the underside of the Mainboard. 4. If they are very delicate.
Removing the CPU 1. See "Removing the Thermal Module" on a clean, dry surface when it is not installed. Lift the CPU clear of the socket as shown. 3. Using a phillips screw driver, rotate the CPU locking screw 180° counter-clockwise as shown. Place the CPU on page 68. 2. Using both hands, lift the Thermal Module clear of the CPU are damaged, the CPU may malfunction. Chapter 3 69 IMPORTANT:The pins on the underside of the Mainboard. 4. If they are very delicate.
Service Guide
Page 100
Using a flat-bladed screw driver, rotate the CPU locking screw 180° clockwise to secure the CPU in place before replacing the Thermal Module. CPU Pin1 Locator 2. Replacing the Thermal ...
Using a flat-bladed screw driver, rotate the CPU locking screw 180° clockwise to secure the CPU in place before replacing the Thermal Module. CPU Pin1 Locator 2. Replacing the Thermal ...

Service Guide
Page 120
... is properly installed. See "LCD Module Disassembly Process" on page 42. 3. c. d. Click Apply and check the display. Roll back the video driver to its highest level. There are no device conflicts. • No hardware is listed under Other Devices. 9. If the BIOS settings are no ... perform the following actions one at the highest brightness setting, the LCD is faulty and should be replaced. 5. Remove and reinstall the video driver. 8. If HDD information is missing from the operating system DVD and follow the onscreen prompts. 11. See "Disassembly Process" on page 73...
... is properly installed. See "LCD Module Disassembly Process" on page 42. 3. c. d. Click Apply and check the display. Roll back the video driver to its highest level. There are no device conflicts. • No hardware is listed under Other Devices. 9. If the BIOS settings are no ... perform the following actions one at the highest brightness setting, the LCD is faulty and should be replaced. 5. Remove and reinstall the video driver. 8. If HDD information is missing from the operating system DVD and follow the onscreen prompts. 11. See "Disassembly Process" on page 73...

Service Guide
Page 123
... steps and select an earlier time and date. 10. Right-click on the Recording tab. 4. Chapter 4 113 Roll back the audio driver to complete the test. 8. Reinstall the Operating System. 11. The microphone appears on the microphone and select Enable. 5. Sound Problems If... software. 9. Reboot the computer. 2. b. Navigate to determine that other audio applications are set mid range: a. b. Remove and reinstall the audio driver. 5. Restore system and file settings from the list and click Next. Right-click on the Playback tab and select Show Disabled Devices (clear by...
... steps and select an earlier time and date. 10. Right-click on the Recording tab. 4. Chapter 4 113 Roll back the audio driver to complete the test. 8. Reinstall the Operating System. 11. The microphone appears on the microphone and select Enable. 5. Sound Problems If... software. 9. Reboot the computer. 2. b. Navigate to determine that other audio applications are set mid range: a. b. Remove and reinstall the audio driver. 5. Restore system and file settings from the list and click Next. Right-click on the Playback tab and select Show Disabled Devices (clear by...
Service Guide
Page 124
..., click Finish. Restore system and file settings from a command prompt. Select Repair your computer. Select the appropriate operating system, and click Next. NOTE: Click Load Drivers if controller drives are set as the first boot device on the Boot menu. 6. Startup Repair attempts to resolve the problem. 4. For more information see...
..., click Finish. Restore system and file settings from a command prompt. Select Repair your computer. Select the appropriate operating system, and click Next. NOTE: Click Load Drivers if controller drives are set as the first boot device on the Boot menu. 6. Startup Repair attempts to resolve the problem. 4. For more information see...

Service Guide
Page 126
...installed software and retrying the operation. b. If a device has an exclamation mark, right-click on the device and uninstall and reinstall the driver. Check that the disc is correctly seated in lDE ATA/ATAPI controllers. Check that the label on the disc is correct for the ...drives. Ensure that AutoPlay is record enabled: a. If a device has an exclamation mark, right-click on the device and uninstall and reinstall the driver. Ensure that the default drive is enabled: a. After Changes remaining reaches zero, the region cannot be burned, perform the following actions one at a...
...installed software and retrying the operation. b. If a device has an exclamation mark, right-click on the device and uninstall and reinstall the driver. Check that the disc is correctly seated in lDE ATA/ATAPI controllers. Check that the label on the disc is correct for the ...drives. Ensure that AutoPlay is record enabled: a. If a device has an exclamation mark, right-click on the device and uninstall and reinstall the driver. Ensure that the default drive is enabled: a. After Changes remaining reaches zero, the region cannot be burned, perform the following actions one at a...
Service Guide
Page 129
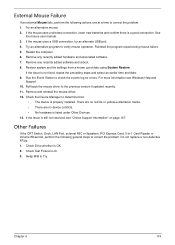
If the issue is listed under Other Devices. 13. Remove and reinstall the mouse driver. 12. Chapter 4 119 External Mouse Failure If an external Mouse fails, perform the following general steps to correct the problem. Try an alternative mouse. 2. Try ... select an earlier time and date. 9. Do not replace a non-defective FRUs: 1. Check Drive whether is properly installed. Restart the computer. 6. Roll back the mouse driver to Try. If the mouse uses a USB connection, try an alternate USB port. 4. Other Failures If the CRT Switch, Dock, LAN Port, external MIC or...
If the issue is listed under Other Devices. 13. Remove and reinstall the mouse driver. 12. Chapter 4 119 External Mouse Failure If an external Mouse fails, perform the following general steps to correct the problem. Try an alternative mouse. 2. Try ... select an earlier time and date. 9. Do not replace a non-defective FRUs: 1. Check Drive whether is properly installed. Restart the computer. 6. Roll back the mouse driver to Try. If the mouse uses a USB connection, try an alternate USB port. 4. Other Failures If the CRT Switch, Dock, LAN Port, external MIC or...
Service Guide
Page 132
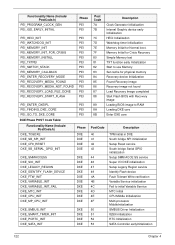
... service Identify Flash device Fault Tolerant Write verification Variable Service initialization Fail to initial Variable Service MTC Initial CPU Middle Initialization Multi-processor MiddleInitialization SMBUS Driver Initialization 8259 Initialization RTC Initialization SATA Controller earlyInitialization 122 Chapter 4 Memory Initial for Crisis Recovery Simple Memory test TXT function early Initialization Start to use...
... service Identify Flash device Fault Tolerant Write verification Variable Service initialization Fail to initial Variable Service MTC Initial CPU Middle Initialization Multi-processor MiddleInitialization SMBUS Driver Initialization 8259 Initialization RTC Initialization SATA Controller earlyInitialization 122 Chapter 4 Memory Initial for Crisis Recovery Simple Memory test TXT function early Initialization Start to use...
Service Guide
Page 133
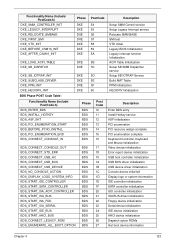
... resource assign complete PCI enumeration complete Keyboard Controller, Keyboard and Mouse initialization Video device initialization Error report device initialization USB host controller initialization USB BUS driver initialization USB device driver initialization Console device initial fail Display logo or system information IDE controller initialization SATA controller initialization SIO controller initialization ISA BUS...
... resource assign complete PCI enumeration complete Keyboard Controller, Keyboard and Mouse initialization Video device initialization Error report device initialization USB host controller initialization USB BUS driver initialization USB device driver initialization Console device initial fail Display logo or system information IDE controller initialization SATA controller initialization SIO controller initialization ISA BUS...


