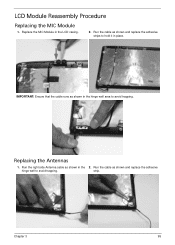
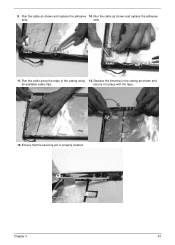
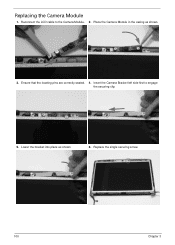
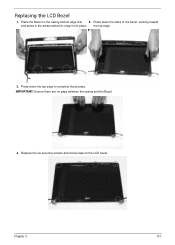
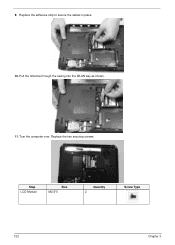
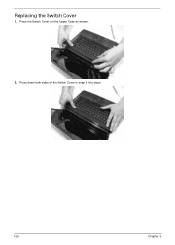
Acer Aspire 4540 Series Service Guide
Page 105
Run the cable as shown in the hinge well area to hold it in place. IMPORTANT: Ensure that the cable runs as shown and replace the adhesive strips to avoid trapping. Run the cable as shown in the LCD casing. 2. Replace the MIC Module in the 2. Replacing the Antennas 1. strip. Chapter 3 95 LCD Module Reassembly Procedure Replacing the MIC Module 1. Run the right side Antenna cable as shown and replace the adhesive hinge well to avoid trapping.
Acer Aspire 4540 Series Service Guide
Page 106
Run the cable along the edge of the casing using hinge well to avoid trapping. Replace the Antenna in place with the tape. 7. secure it in the casing as shown and 6. all available cable clips. Run the cable along the edge of the casing using 4. 3. Run the cable as shown in the 8. strip. 5. Ensure that the securing pin is properly located. Run the left side Antenna cable as shown and replace the adhesive all available cable clips. 96 Chapter 3
Acer Aspire 4540 Series Service Guide
Page 107
secure it in the casing as shown and all available cable clips. Run the cable as shown and replace the adhesive strip. Chapter 3 97 Run the cable as shown and replace the adhesive 10. Run the cable along the edge of the casing using 12. Ensure that the securing pin is properly located. 9. strip. 11. Replace the Antenna in place with the tape. 13.
Acer Aspire 4540 Series Service Guide
Page 108
... the six screw holes (three on each side) on the LCD Panel as shown (1). Insert the LCD panel into the LCD Panel as shown. 2. Replace the six securing screws in place. Turn the panel over. Run the LCD cable as shown and press down into the... casing back edge first 6. seated before continuing. 98 Chapter 3 Secure the cable along the length of the cable to secure it in numeric order, from 1 to 3. 3 2 1 1 2 3 3. Insert the LCD Panel cable 4. by replacing the securing strip (2). 2 1 5. Ensure that the four locating ...
Acer Aspire 4540 Series Service Guide
Page 109
Replace the three screws to secure the panel and grounding within the LCD module. Chapter 3 99 Replace the Camera Module cable bundle in the LCD brackets (red callout) do not use the screw holes marked with 'X'. 7. IMPORTANT: When replacing the screws in the casing as shown. 8. These slots are reserved for the Bezel securing screws.
Acer Aspire 4540 Series Service Guide
Page 110
Place the Camera Module in the casing as shown 6. Lower the bracket into place as shown. 3. Ensure that the locating pins are correctly seated. 4. Replace the single securing screw. 100 Chapter 3 Insert the Camera Bracket left side first to the Camera Module. 2. Reconnect the LCD cable to engage the securing clip. 5. Replacing the Camera Module 1.
Acer Aspire 4540 Series Service Guide
Page 111
Press down the top edge to snap it into place. Replacing the LCD Bezel 1. the top edge. 3. Chapter 3 101 Press down the sides of the bezel, working toward and press in the areas marked to complete the process. Replace the six securing screws and screw caps on the casing bottom edge first 2. IMPORTANT: Ensure there are no gaps between the casing and the Bezel. 4. Place the Bezel on the LCD bezel.
Acer Aspire 4540 Series Service Guide
Page 115
Chapter 3 105 Place the cable bundle in the casing and apply pressure to secure the adhesive in the casing as shown. 5. Pull the cable through the casing as shown. 2. Replace the adhesive tape and insert the cable through the casing completely. 6. Turn the computer over and run the cable along the cable channel using all available cable clips. 4. Replace the RJ-11 Port in place. 3. Run the cable along the cable channel using all available cable clips. Replacing the RJ-11 Port 1.
Acer Aspire 4540 Series Service Guide
Page 116
Be sure to align the securing pins and slide the RJ-11 cable through the groove in the chassis, left hand edge first to allow the I/O Ports through the casing to the top side as shown 106 Chapter 3 Ensure that the Mainboard is face up. Insert the cable through the casing, then lower it into place. Replacing the Mainboard 1. 7. Place the Mainboard in the main board as shown.
Acer Aspire 4540 Series Service Guide
Page 118
Insert the USB Board into the FFC connector. 108 Chapter 3 Run the cable along the casing and insert it into the casing, ensuring that the USB Port is soldered to the connections shown. The RTC Battery is accessible through the case. 2. Replacing the USB Board 1. To replace the battery, solder the new battery to the Mainboard. Removing the RTC Battery IMPORTANT: Follow local regulations for disposal of all batteries.
Acer Aspire 4540 Series Service Guide
Page 119
Lock the connector and press down on the casing. 4. Chapter 3 109 Insert the Bluetooth Module left side first so the board slides under the securing flange and lower it on the FFC securing latches to secure it into place. Step USB Board Size M2.5*3 Quantity 1 Screw Type Replacing the Bluetooth Board 1. Ensure the locating pins is correctly seated and replace the single securing screw. 3.
Acer Aspire 4540 Series Service Guide
Page 122
Replace the two securing screws. 112 Chapter 3 4. Secure the Modem cable in the casing. 2. Place the TouchPad in place with the adhesive tape. Replacing the TouchPad Bracket 1.
Acer Aspire 4540 Series Service Guide
Page 131
NOTE: Ensure the cable is replaced. Insert the Antenna cables through the casing, as shown to the Mainboard as shown, using all available cable clips. IMPORTANT: Run the cables as shown, and pull through the casing. 8. Run the Antenna cables along the cable channel as shown. 7. Reconnect the LVDS cable to avoid trapping when the Switch Cover is pulled completely through from the underside. Chapter 3 121 6.
Acer Aspire 4540 Series Service Guide
Page 132
Replace the adhesive strip to secure the cables in place. 10. Pull the Antenna through the casing into the WLAN bay as shown. 11. Turn the computer over. Step LCD Module Size M2.5*5 Quantity 2 Screw Type 122 Chapter 3 Replace the two securing screws. 9.
Acer Aspire 4540 Series Service Guide
Page 133
IMPORTANT: Be sure the LVDS and microphone cables pass over the Speaker Module. 2. Align and replace the Speaker Module in place. Chapter 3 123 Replacing the Speaker Module 1. Replace the adhesive tape to the Upper Cover. Reconnect the Speaker cable. 3. Replace the two pieces of adhesive tape securing the Antenna cables to secure the LCD cables in the lower case. 12.
Acer Aspire 4540 Series Service Guide
Page 136
Press down both sides of the Switch Cover to snap it into place. 126 Chapter 3 Place the Switch Cover on the Upper Case as shown. 2. Replacing the Switch Cover 1.
Acer Aspire 4540 Series Service Guide
Page 139
Push the ODD Module into the chassis as shown and press it into place. Chapter 3 129 Align the ODD Bezel as shown until the bezel is flush with the casing. External Module Reassembly Process Replacing the ODD Module 1. Align the ODD Bracket as shown and replace the securing screws. 3. Close the ODD drawer. 2.
Acer Aspire 4540 Series Service Guide
Page 148
...computer and the electrical outlet. If the Issue is properly connected to the failure point. 6. Disconnect the power and open the casing to check the Thermal Unit and fan airways are not necessary to boot the computer to the computer and the electrical outlet. 2.... Plug the computer directly into a known good electrical outlet. 4. Remove any recently installed software. 7. Do not replace a non-defective FRUs: Computer Shutsdown Intermittently If the system powers off at intervals, perform the following actions one at a time to correct the ...