
Acer Aspire 4540 Notebook Series Start Guide
Page 3
... AcerSystem User Guide. If Adobe Reader is available in the text with setting up your notebook. The Aspire Series Generic User Guide contains useful information applying to use your Acer notebook, we have designed a set of guides: First off, the Just for your computer. In ...access it contains warranty information and the general regulations and safety notices for Starters... For instructions on the screen to its nature, the Generic User Guide as well as Acer's Empowering Technology, using the keyboard, audio, etc. Please understand that due to complete the installation....
... AcerSystem User Guide. If Adobe Reader is available in the text with setting up your notebook. The Aspire Series Generic User Guide contains useful information applying to use your Acer notebook, we have designed a set of guides: First off, the Just for your computer. In ...access it contains warranty information and the general regulations and safety notices for Starters... For instructions on the screen to its nature, the Generic User Guide as well as Acer's Empowering Technology, using the keyboard, audio, etc. Please understand that due to complete the installation....
Acer Aspire 4540 Notebook Series Start Guide
Page 4
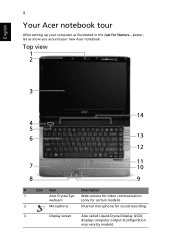
English 4 Your Acer notebook tour After setting up your new Acer notebook. webcam (only for certain models) 2 Microphone Internal microphone for video communication. Top view # Icon Item Description 1 Acer Crystal Eye Web camera for sound recording. 3 Display screen Also called Liquid-Crystal Display (LCD), displays computer output (Configuration may vary by models). poster, let us show you around your computer as illustrated in the Just for Starters...
English 4 Your Acer notebook tour After setting up your new Acer notebook. webcam (only for certain models) 2 Microphone Internal microphone for video communication. Top view # Icon Item Description 1 Acer Crystal Eye Web camera for sound recording. 3 Display screen Also called Liquid-Crystal Display (LCD), displays computer output (Configuration may vary by models). poster, let us show you around your computer as illustrated in the Just for Starters...
Acer Aspire 4540 Notebook Series Start Guide
Page 6
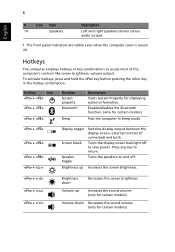
...Function System property Bluetooth Sleep Description Starts System Property for certain models) Puts the computer in the hotkey combination. Turns the display screen backlight off . Increases the screen brightness. + < > + < > + < > Brightness down Decreases the sound volume (only for certain models). Hotkeys The.... (only for displaying system information. Volume up Switches display output between the display screen, external monitor (if connected) and both. Volume down Decreases the screen brightness. Turns the speakers on and off to save power. 6 English # Icon...
...Function System property Bluetooth Sleep Description Starts System Property for certain models) Puts the computer in the hotkey combination. Turns the display screen backlight off . Increases the screen brightness. + < > + < > + < > Brightness down Decreases the sound volume (only for certain models). Hotkeys The.... (only for displaying system information. Volume up Switches display output between the display screen, external monitor (if connected) and both. Volume down Decreases the screen brightness. Turns the speakers on and off to save power. 6 English # Icon...
Acer Aspire 4540 Series Service Guide
Page 4
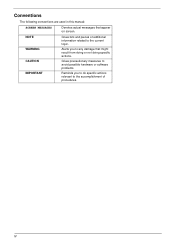
Alerts you to do specific actions relevant to the accomplishment of additional information related to any damage that appear on screen. Conventions The following conventions are used in this manual: SCREEN MESSAGES Denotes actual messages that might result from doing or not doing specific actions. NOTE WARNING CAUTION IMPORTANT Gives bits and pieces of procedures. IV Gives precautionary measures to avoid possible hardware or software problems. Reminds you to the current topic.
Alerts you to do specific actions relevant to the accomplishment of additional information related to any damage that appear on screen. Conventions The following conventions are used in this manual: SCREEN MESSAGES Denotes actual messages that might result from doing or not doing specific actions. NOTE WARNING CAUTION IMPORTANT Gives bits and pieces of procedures. IV Gives precautionary measures to avoid possible hardware or software problems. Reminds you to the current topic.

Acer Aspire 4540 Series Service Guide
Page 15
Front View No. 1 2 3 4 5 6 Chapter 1 Icon Item Acer Crystal Eye webcam Microphone Description Web camera for video communication (only for sound recording. Lights up when Caps Lock is activated. Keyboard For entering data into your computer. 5 Display screen Power button HDD Num Lock Also called Liquid-Crystal Display (LCD), displays computer output (Configuration may...
Front View No. 1 2 3 4 5 6 Chapter 1 Icon Item Acer Crystal Eye webcam Microphone Description Web camera for video communication (only for sound recording. Lights up when Caps Lock is activated. Keyboard For entering data into your computer. 5 Display screen Power button HDD Num Lock Also called Liquid-Crystal Display (LCD), displays computer output (Configuration may...
Acer Aspire 4540 Series Service Guide
Page 21
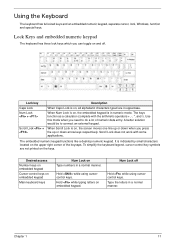
... The keyboard has full-sized keys and an embedded numeric keypad, separate cursor, lock, Windows, function and special keys. Hold while typing letters on , the screen moves one line up or down arrow keys respectively. When Scroll Lock is on the keys. Hold while using cursorcontrol keys.
... The keyboard has full-sized keys and an embedded numeric keypad, separate cursor, lock, Windows, function and special keys. Hold while typing letters on , the screen moves one line up or down arrow keys respectively. When Scroll Lock is on the keys. Hold while using cursorcontrol keys.
Acer Aspire 4540 Series Service Guide
Page 24
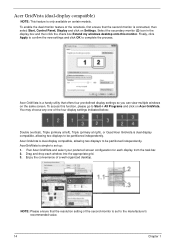
...monitor. AcerGridVista is dual-display compatible, allowing two displays to be partitioned independently. Acer GridVista is connected, then select Start, Control Panel, Display and click on the same screen. Enjoy the convenience of the second monitor is dual-display compatible, allowing two ...displays to be partitioned independently. Acer Gridvista is simple to set to complete the process. Run Acer GridVista and select your preferred screen configuration for each window into the appropriate grid. 3. To enable the dual...
...monitor. AcerGridVista is dual-display compatible, allowing two displays to be partitioned independently. Acer GridVista is connected, then select Start, Control Panel, Display and click on the same screen. Enjoy the convenience of the second monitor is dual-display compatible, allowing two ...displays to be partitioned independently. Acer Gridvista is simple to set to complete the process. Run Acer GridVista and select your preferred screen configuration for each window into the appropriate grid. 3. To enable the dual...
Acer Aspire 4540 Series Service Guide
Page 30
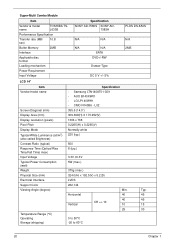
L02 Screen Diagonal (mm) 355.6 (14.0") Display Area (mm) 309.399(H) X 173.952(V) Display resolution (pixels) 1366 x 768 Pixel Pitch 0.2265(H) x 0.2265(V) Display Mode Normally white Typical ...
L02 Screen Diagonal (mm) 355.6 (14.0") Display Area (mm) 309.399(H) X 173.952(V) Display resolution (pixels) 1366 x 768 Pixel Pitch 0.2265(H) x 0.2265(V) Display Mode Normally white Typical ...
Acer Aspire 4540 Series Service Guide
Page 33
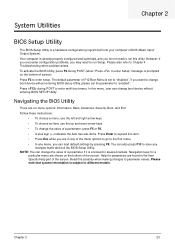
...is already properly configured and optimized, and you do not need to change the value of screen). To activate the BIOS Utility, press F2 during POST to the Exit menu. • In any of the screen. If you are found in any menu, you may need to save any changes made...changes to different models. Help for a particular menu are six menu options: Information, Main, Advanced, Security, Boot, and Exit. The default parameter of the screen. Navigation keys for parameters are in the Item Specific Help part of the menu options to go to enter multi-boot menu. However, if you...
...is already properly configured and optimized, and you do not need to change the value of screen). To activate the BIOS Utility, press F2 during POST to the Exit menu. • In any of the screen. If you are found in any menu, you may need to save any changes made...changes to different models. Help for a particular menu are six menu options: Information, Main, Advanced, Security, Boot, and Exit. The default parameter of the screen. Navigation keys for parameters are in the Item Specific Help part of the menu options to go to enter multi-boot menu. However, if you...
Acer Aspire 4540 Series Service Guide
Page 34
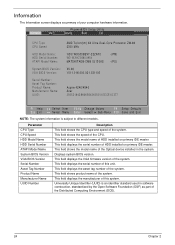
... This field shows the CPU type and speed of the system. This field shows product name of your computer hardware information. Information The Information screen displays a summary of the system. This field shows the model name of the Distributed Computing Environment (DCE). 24 Chapter 2 Information M a...84 2300 MHz WDC WD500BEVT-22ZAT0 WD-WXHZ08604954 MATSHITADB-CMB UJ130AS -(PM) -(PS) V0.06 V011.016.000.021.031105 Aspire 4240/4540 Acer 39353164386665643635001EECE1D377 F1 Help Esc Exit Select Item F5/F6 Change Values F9 Setup Defaults Select Menu Enter Select Sub-Menu F10 Save...
... This field shows the CPU type and speed of the system. This field shows product name of your computer hardware information. Information The Information screen displays a summary of the system. This field shows the model name of the Distributed Computing Environment (DCE). 24 Chapter 2 Information M a...84 2300 MHz WDC WD500BEVT-22ZAT0 WD-WXHZ08604954 MATSHITADB-CMB UJ130AS -(PM) -(PS) V0.06 V011.016.000.021.031105 Aspire 4240/4540 Acer 39353164386665643635001EECE1D377 F1 Help Esc Exit Select Item F5/F6 Change Values F9 Setup Defaults Select Menu Enter Select Sub-Menu F10 Save...

Acer Aspire 4540 Series Service Guide
Page 35
... disables the Press to set the system time and date as well as enable and disable boot option and recovery. Control the mode in this screen. Format/Option Format: HH:MM:SS (hour:minute:second) Format MM/DD/YYYY (month/day/year) N/A N/A N/A Option: Enabled or Disabled ...Option: Enabled or Disabled Option: Enabled or Disabled Option: Enabled or Disabled Option: ACHI or IDE Chapter 2 25 Main The Main screen allows the user to display boot menu message during startup. The table below describes the parameters in which the SATA controller should operate. The hours...
... disables the Press to set the system time and date as well as enable and disable boot option and recovery. Control the mode in this screen. Format/Option Format: HH:MM:SS (hour:minute:second) Format MM/DD/YYYY (month/day/year) N/A N/A N/A Option: Enabled or Disabled ...Option: Enabled or Disabled Option: Enabled or Disabled Option: Enabled or Disabled Option: ACHI or IDE Chapter 2 25 Main The Main screen allows the user to display boot menu message during startup. The table below describes the parameters in which the SATA controller should operate. The hours...
Acer Aspire 4540 Series Service Guide
Page 36
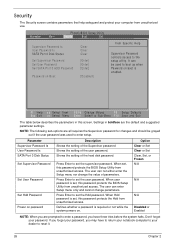
...the user password. When set , this password protects the BIOS Setup Utility from unauthorized access. When user password is set , this screen. Parameter Supervisor Password Is User Password Is SATA Port 0 Disk Status Set Supervisor Password Set User Password Set Hdd Password Power on ...before the system halts. Press Enter to set the Hdd password. Don't forget your dealer to the setup utility. Security The Security screen contains parameters that help safeguard and protect your computer from unauthorized access. Press Enter to set , this password protects the Hdd from...
...the user password. When set , this password protects the BIOS Setup Utility from unauthorized access. When user password is set , this screen. Parameter Supervisor Password Is User Password Is SATA Port 0 Disk Status Set Supervisor Password Set User Password Set Hdd Password Power on ...before the system halts. Press Enter to set the Hdd password. Don't forget your dealer to the setup utility. Security The Security screen contains parameters that help safeguard and protect your computer from unauthorized access. Press Enter to set , this password protects the Hdd from...
Acer Aspire 4540 Series Service Guide
Page 37
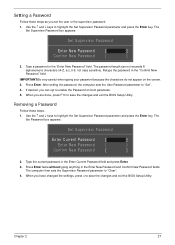
Setting a Password Follow these steps: 1. Use the ↑ and ↓ keys to enable the Password on the screen. 3. When you can not exceeds 8 alphanumeric characters (A-Z, a-z, 0-9, not case sensitive). Press Enter. The Set Password box appears: Set Supervisor Password Enter Current Password [ ] Enter New ...
Setting a Password Follow these steps: 1. Use the ↑ and ↓ keys to enable the Password on the screen. 3. When you can not exceeds 8 alphanumeric characters (A-Z, a-z, 0-9, not case sensitive). Press Enter. The Set Password box appears: Set Supervisor Password Enter Current Password [ ] Enter New ...

Acer Aspire 4540 Series Service Guide
Page 38
... New Password field. 4. Press Enter. If the current password entered does not match the actual current password, the screen will display the following . Setup Warning Passwords do not match, the screen will show you the Setup Warning. Retype the password in the Enter New Password field. If the verification is complete... password and confirm new password strings do not match. Changing a Password 1. Setup Notice Changes have been saved. [Continue] The password setting is OK, the screen will display as following message. Re-enter password. [Continue] 28 Chapter 2
... New Password field. 4. Press Enter. If the current password entered does not match the actual current password, the screen will display the following . Setup Warning Passwords do not match, the screen will show you the Setup Warning. Retype the password in the Enter New Password field. If the verification is complete... password and confirm new password strings do not match. Changing a Password 1. Setup Notice Changes have been saved. [Continue] The password setting is OK, the screen will display as following message. Re-enter password. [Continue] 28 Chapter 2
Acer Aspire 4540 Series Service Guide
Page 40
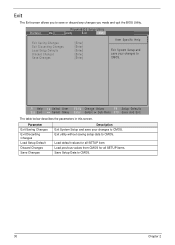
... F5/F6 Change Values F9 Setup Defaults Select Menu Enter Select Sub-Menu F10 Save and Exit The table below describes the parameters in this screen. Exit utility without saving setup data to save or discard any changes you to CMOS. Load previous values from CMOS for all SETUP items. Save...
... F5/F6 Change Values F9 Setup Defaults Select Menu Enter Select Sub-Menu F10 Save and Exit The table below describes the parameters in this screen. Exit utility without saving setup data to save or discard any changes you to CMOS. Load previous values from CMOS for all SETUP items. Save...
Acer Aspire 4540 Series Service Guide
Page 47
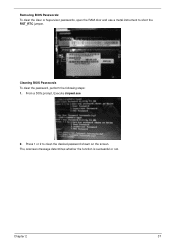
From a DOS prompt, Execute clnpwd.exe 2. Press 1 or 2 to short the RST_RTC jumper. Chapter 2 37 Removing BIOS Passwords: To clear the User or Supervisor passwords, open the RAM door and use a metal instrument to clean the desired password shown on the screen. The onscreen message determines whether the function is successful or not. Cleaning BIOS Passwords To clear the password, perform the following steps: 1.
From a DOS prompt, Execute clnpwd.exe 2. Press 1 or 2 to short the RST_RTC jumper. Chapter 2 37 Removing BIOS Passwords: To clear the User or Supervisor passwords, open the RAM door and use a metal instrument to clean the desired password shown on the screen. The onscreen message determines whether the function is successful or not. Cleaning BIOS Passwords To clear the password, perform the following steps: 1.
Acer Aspire 4540 Series Service Guide
Page 48
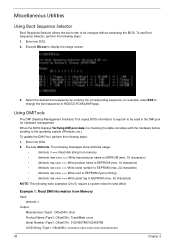
... following steps: 1. The following messages show dmitools usage: • dmitools /r ==> Read dmi string from Memory Input: dmitools /r Output: Manufacturer (Type1, Offset04h): Acer Product Name (Type1, Offset05h): TravelMate xxxxx Serial Number (Type1, Offset07h): 01234567890123456789 UUID String (Type1, Offset08h): xxxxxxxx-xxxx-xxxx-xxxx-xxxxxxxxxxxx 38 Chapter 2 Execute BS.exe... displays Verifying DMI pool data it is checking the table correlates with the hardware before sending to display the usage screen. 3. To use Boot Sequence Selector, perform the following steps: 1.
... following steps: 1. The following messages show dmitools usage: • dmitools /r ==> Read dmi string from Memory Input: dmitools /r Output: Manufacturer (Type1, Offset04h): Acer Product Name (Type1, Offset05h): TravelMate xxxxx Serial Number (Type1, Offset07h): 01234567890123456789 UUID String (Type1, Offset08h): xxxxxxxx-xxxx-xxxx-xxxx-xxxxxxxxxxxx 38 Chapter 2 Execute BS.exe... displays Verifying DMI pool data it is checking the table correlates with the hardware before sending to display the usage screen. 3. To use Boot Sequence Selector, perform the following steps: 1.
Acer Aspire 4540 Series Service Guide
Page 69
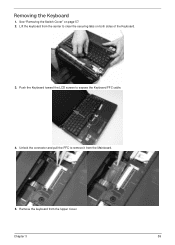
Removing the Keyboard 1. Lift the keyboard from the center to clear the securing tabs on page 57. 2. Unlock the connector and pull the FFC to expose the Keyboard FFC cable. 4. See "Removing the Switch Cover" on both sides of the Keyboard. 3. Remove the keyboard from the Mainboard. 5. Push the Keyboard toward the LCD screen to remove it from the Upper Cover. Chapter 3 59
Removing the Keyboard 1. Lift the keyboard from the center to clear the securing tabs on page 57. 2. Unlock the connector and pull the FFC to expose the Keyboard FFC cable. 4. See "Removing the Switch Cover" on both sides of the Keyboard. 3. Remove the keyboard from the Mainboard. 5. Push the Keyboard toward the LCD screen to remove it from the Upper Cover. Chapter 3 59

Acer Aspire 4540 Series Service Guide
Page 97
Starting at the centre of the top edge, pry the inside of the bezel away from the screen as shown. Remove the six screw caps and screws as shown. Removing the LCD Bezel 1. Chapter 3 87 See "Removing the LCD Module" on page 62. 2. Work round the edges to pry the bezel away from the screen. Step LCD Bezel Size M2.5*5 Quantity 6 Screw Type 3.
Starting at the centre of the top edge, pry the inside of the bezel away from the screen as shown. Remove the six screw caps and screws as shown. Removing the LCD Bezel 1. Chapter 3 87 See "Removing the LCD Module" on page 62. 2. Work round the edges to pry the bezel away from the screen. Step LCD Bezel Size M2.5*5 Quantity 6 Screw Type 3.

Acer Aspire 4540 Series Service Guide
Page 150
... "Disassembly Process" on page 42. 4. If permanent vertical/horizontal lines or dark spots display in the same location, the LCD is not running on the screen), the LCD is experiencing intermittent loss of BIOS information, perform the following actions one year old, replace the CMOS battery. 2. Adjust the brightness to the...
... "Disassembly Process" on page 42. 4. If permanent vertical/horizontal lines or dark spots display in the same location, the LCD is not running on the screen), the LCD is experiencing intermittent loss of BIOS information, perform the following actions one year old, replace the CMOS battery. 2. Adjust the brightness to the...


